The violin bridge is a device designed both to support the strings and to transmit their vibrations to the body of the instrument. Made from maple wood, the shape of the bridge varies from one violin to another, and its placing and fit have a significant impact on the tone and playability of the instrument.
Violin bridge fitting is a task best assigned to a trained luthier with specialist knowledge. The height, thickness, placing, shape and top curve of the bridge are all vital to how the violin will work.
 Student violin kits often arrive in the mail without the bridge set in place. Instruments are packed this way to avoid breakages in transit.
The bridge that comes with a beginner instrument will often be a chunky, approximate cut, far too thick to vibrate well. Oddly, violins designed for beginners can therefore be more difficult to play than those owned by advanced players.
When your violin arrives, take it to a good violin shop or luthier to set the bridge up. Violin bridge fitting involves a certain amount of refining and shaping as well as knowing where to place the bridge.
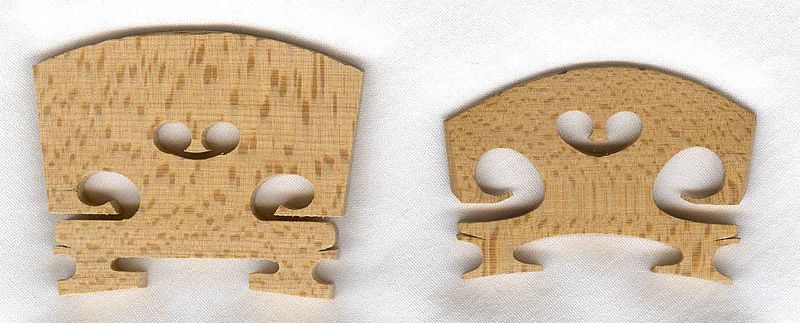
Every bridge starts out as a ‘blank’, a crude, thick, unshaped design. Bridge blanks come in different sizes. A standard full-size bridge is 41.5 millimetres wide, but a narrow violin will require a smaller bridge. A trained luthier will be able to tell you if your violin needs a non-standard bridge.
A good bridge blank shows a longer grain of wood on the front where it will face towards the fingerboard, and shorter grain on the back where it will face the tailpiece.

The feet of the bridge sit on the belly of the violin. When the bridge blank arrives, the feet will be flat, but the belly of the violin is curved. Some violins have a higher belly arch than others and no two are the same.
The feet of the bridge must be sanded so that they sit firmly on the belly. As the bridge is held in place by the tension of the strings and NEVER glued in place, this element of violin bridge fitting is crucial. The better the fit, the more contact the bridge has with the belly, meaning the vibration travels down into the body of the instrument unhindered.
The top of the bridge (which is most likely the same height on both sides of your bridge blank) must be shaped and cut down so that the arch and string height is correct. A standard height for the E string is 3mm above the fingerboard while the G string rises 5mm.
Again this will very from one instrument to another and from player to player. If this shape is cut badly, the violinist will experience difficulty in crossing strings. If the strings are too high they will require too much left hand pressure which can cause tension, and equally strings that are too low can cause left hand discomfort and distortion in the sound as too much of the string is in contact with the fingerboard.
 Once the violin bridge is fitted to the correct height, it then needs to be properly shaped. The back of the bridge will remain at a right angle to the body of the violin, but the front of the bridge must be thinned.
Carving out much of the wood again improves the transmission of vibrations from the strings to the body of the instrument. The ankles can be narrowed, the feet be made thinner and the ‘kidneys’, the holes that look decorative but have the function of reducing the bulk of the bridge, can be carved out.
Too much wood in a bridge will dampen the sound of the violin in the same way that placing a mute on a well-fitting bridge produces a more muffled sound because it prevents the bridge from vibrating to its full extent.
Finally, grooves must be added so that the strings can sit on the bridge. The strings should sit on top of the bridge and never sink into the wood, again to aid vibration.
An old bridge that has developed deep grooves can be adjusted with veneers to raise the strings. Strings left sinking into a bridge can also cause warping, as the bridge will be tugged back and forward every time the violin is tuned.
If your violin bridge has fallen over or received a knock, it is sometimes possible to set it back in place by looking carefully at the marks on the varnish of the belly which will show where the feet normally sit. However, if you have an older instrument, there may be numerous such ‘footprints’ which will make it hard to set.
Loosen your strings and place the bridge on the violin, making sure the lower side is on the E-string side of your violin. Tighten the strings a little at a time, ensuring that the back of the bridge remains perpendicular with the belly of the violin.
Tightening the strings can cause the bridge to pull forward, and if left leaning either forward or backwards the bridge can easily warp over time: As the strings pull down on the bridge the feet will stay in direct contact with the belly causing the bridge to bend.
If your bridge is cut badly or your instrument is of better quality than a basic student kit model, it is advisable always to take it to a professional to adjust the bridge. The shape and fitting of the bridge is so integral to the sound it is not worth getting it wrong, and whilst the bridge is easy enough to move it is also easy to break or damage.
Never change your strings by removing them all at once; change them one at a time and watch out for the bridge pulling or leaning forward as you tune the new string.
Ask your luthier to show you the optimum position for your bridge, and check it regularly to see that it is not leaning. A new bridge is expensive and unless a bridge has warped or broken it should last many years.
To get the best out of your violin and your playing, it is important to have your bridge shaped and fitted by an expert. Just as you could cut your own hair but you might regret the results, there is a complex knowledge bank behind the skill of violin bridge fitting.
There are countless videos on YouTube giving various levels of advice, but they cannot replace the specialist training and understanding of a luthier. That small piece of maple takes the vibrations from your violin strings and produces the mighty singing voice of your violin. Treat it well and it will reward you with years of beautiful sounds.
Please visit our sponsors:
London String School - Tuition for Adult Learners in London
MusicLand - Creative Music Products for Teachers and Learners
Please visit our sponsors:
FiddlerShop.com - Quality instruments at an affordable price
London String School - Tuition for Adult Learners in London
MusicLand - Creative Music Products for Teachers and Learners
