
We're pleased to introduce an all-new feature on ViolinSchool.com - Five Minute Workouts!
These great little exercises came about when one of our London learners kept running out of practice time each week because his crazy-busy job in the City of London meant that he barely had any time to practice each day!
He tried to cram in all his practice at the weekend, but it wasn't really working... it's always better to practice 'little and often' rather than in one big chunk. That way you'll remember what you learn much more easily - and you'll be able to build habits more quickly and effectively. So instead, we persuaded him to put aside 5 minutes a day for his practice - literally, just 5 minutes!
To make things as easy as possible, we created a series of '5 minute workouts' so that he didn't have to think about what to practice. Each day, he'd take one of these workouts, and practice it slowly and carefully, either until he got to the end... or until 5 minutes were up!
[vc_basic_grid post_type="workout" max_items="4" style="lazy" items_per_page="4" element_width="3" order="ASC" item="masonryGrid_BlurOut" grid_id="vc_gid:1497534017406-3f2999c8-e4ce-2"]
Click here to see all the Workouts! >>
Each Workout covers a different skill - different finger patterns, bowing patterns, rhythms, keys, techniques and so on.
Every time you practise, 'loop' each line for about a minute, making it a little bit better each time you repeat it. First of all, play the exercise really slowly, and then gradually speed it up. Try each Workout at different dynamics too.
Whatever you do, always aim to play musically and with a beautiful sound. Have a great workout!
Click here to see all the Workouts! >>
 There are many reasons that people have for wanting to play the violin. Here are some of the reasons we hear most often:
Regardless of where the initial inspiration for playing the violin comes from, if you drill down far enough, we also find that with almost any learner you'll uncover a desire to be able to communicate emotionally with other people through music (and by extension, through the violin).
Whatever the fundamental desire is that makes you want to play the violin, it's worth being aware of it. That way, when you hit difficult challenges in your practice (it will always happen!), you can keep motivated by staying focused on the big picture and on your long-term goals.
When you're learning violin for the first time, it can be difficult to remember which finger goes where. It also takes a long time to think about where to put each finger - especially if you're playing a new piece of music.
A good way around this is to get used to playing scales before you embark upon a piece of music. If you get used to playing a pattern of notes in the form of a scale, then your muscle memory will be stronger, and it will be easier for you to place the notes correctly when you play the piece.
When you're practising a new scale, it can still be really tricky to remember which note goes where. And that's where finger grids become useful! Grids give you a visual reference for each scale pattern. This makes it easier to get to the next note, as you have one less thing to remember! Here's an example of a scale grid in G Major:
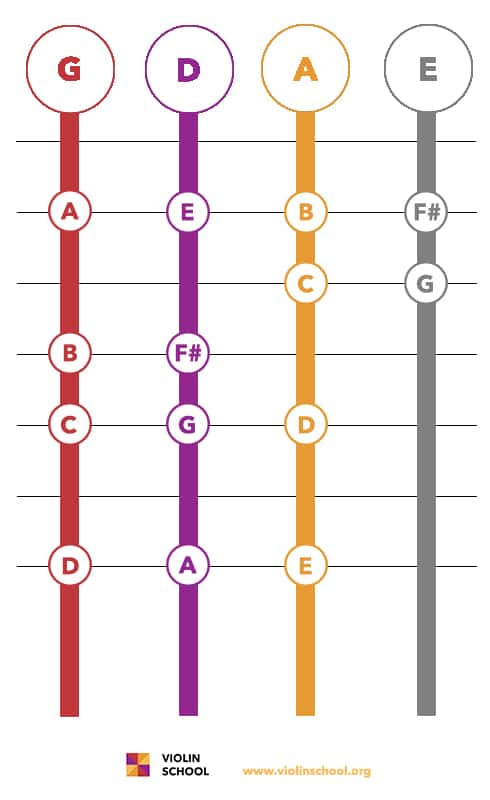
You can find more scale grids in the member section at ViolinSchool.com, but you can also create your own! Try drawing four vertical lines (one for each string), and then writing in the notes that you need for the scale you're currently working on.
The learning process never stops because there are so many layers of complexity in violin-playing. Each layer reveals more, and richer possibilities for musical expression.
At the same time, you don't want to get so wrapped up in the detail of one particular technique or that you lose sight of your overall music-making! Make sure you keep a balance between technical and musical at all times. One feeds the other.
One of ViolinSchool's learners, Susan Shaw, came up with this model for thinking about and describing the need to balance lots of complex details at the same time...
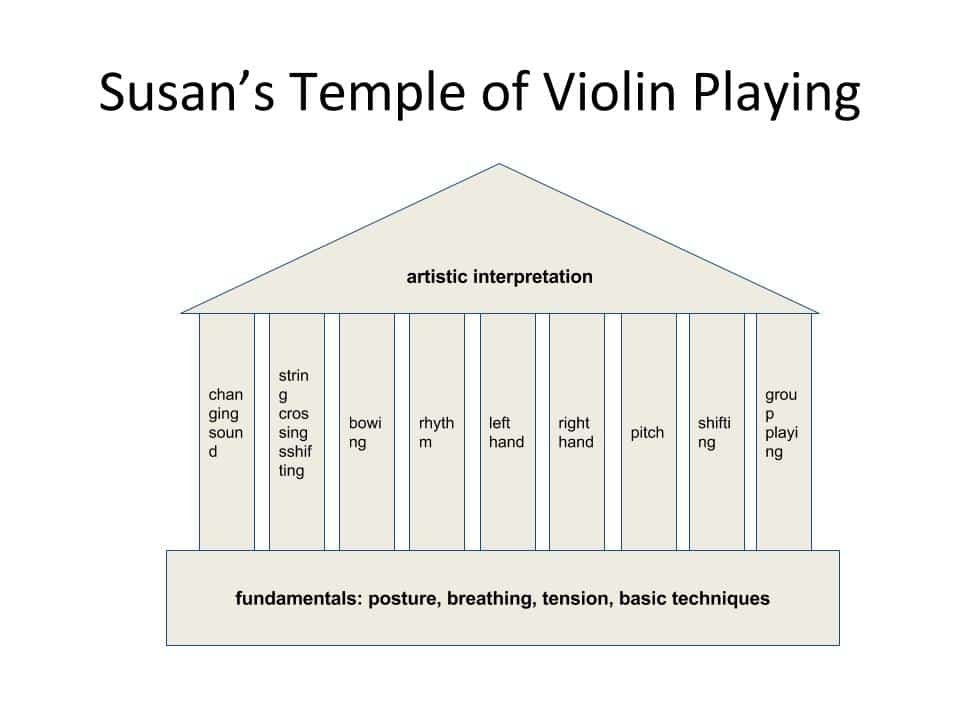
(imagine there are lots and lots of pillars, not just the 9 pictured here - one for each technique)
The principle is that you should always develop the 'pillars' of the temple at a roughly similar speed. Otherwise, you'll become too advanced at some techniques, or under-developed in other techniques, and your playing will become unbalanced (and the roof of the temple will slide off!).
Never become obsessed with making one technique perfect before moving on to the next. Otherwise, your technique will fall out of balance and you'll find it really difficult to play.
The Violin Guide and our online learning resources will help you to explore different aspects of technique layer-by-layer, and on your own terms. Everyone's body is different, so you need to adopt the core technical principles that are true for everyone, but then build up your technique in the way that's right for YOU.
That way, you can maximise your artistry and creativity in your violin playing, without you drowning in technical details. With this approach, your technique will build up and become brilliant over time, without you losing your overall perspective - including your approach to performance and to the music itself.
We'll be giving you everything you need to tackle the violin-playing adventure; all you need to do is to do it!
The Violin Orchestra starts this Saturday in London, UK. Check out our new video by Setareh Mood, to learn all about the project!
Here are some really useful exercises for shifting down from 3rd position.
What goes down must go up! Click here for the shifting up version!
Shifting Down Exercises - from 3rd Position - ViolinSchoolHere are some really useful exercises for shifting up to 3rd position.
What comes up must go down! Click here for the shifting down version!
Shifting Up Exercises - to 3rd Position - ViolinSchoolStaccato Spritzer! is not just a great study for practising staccato strokes, it's also a delightful piece of music ... with a very cheeky ending! Hone your ability to play staccato eighth notes (quavers) and staccato quarter notes (crotchets), all the while negotiating single, double and triple string crossings!
Top tip: keeping your bow as close to the string as possible will really help with control! There are a few places where you need to switch super-quickly between staccato and legato ... this should be completely seamless ...no bumpy landings! At slower tempos, each staccato note will need its own highly controlled impulse. At faster tempos, try to achieve a feeling of momentum, finding the natural bounce of the bow.
Amazing Grace is surely one of the most popular melodies on earth ... especially in America!
In this ViolinSchool partition we've got the main version of the melody at the top of the page, then another version that's been slightly embellished.
Embellishing a melody is like putting ornaments on the mantlepiece, decorating it and elaborating on it whilst maintaining the melody's original structure.
The notes that get added are often called 'ornaments' and the process is called 'ornamentation'. You could, for example, add passing notes to fill in the gaps between the intervals. You could include grace notes, quick little notes performed around a central note, usually written smaller in the score. Or trills, where you rapidly alternate between two notes. The possibilities are endless!
Why not try it yourself ... take a melody that you're really familiar with and try embellishing it.
When playing Amazing Grace, you should aim to make it sound really smooth and full of feeling, 'legato' and 'espressivo'. It's very easy for the quarter notes (or crotchets) to stick out. To avoid this, you'll need to think about bow speed and bow pressure ... a slightly slower bow and a bit less weight on the quarters will help to keep the sound consistent.
Look out for the long E that lasts for five beats. We need to make a crescendo on this note, but, because it's on a down bow, this is quite tough to do. The down bow goes from the heavy part of the bow to the light part, so there's a natural diminuendo built into the stroke. We need to really fight this in order to achieve a convincing crescendo, adding more and more weight throughout the stroke.
Also, you might find that the open E string sounds a bit strident, so try using a 4th finger on this note instead.
In the embellished version, we've got some triplets, where the beat is divided into three equal notes instead of two.
We've got some grace notes in this version. These happen just before the beat, so the main note will land *on* the beat, with the grace notes squeezed in just before. The grace notes should be subtle and delicate, so they don't interfere with the melody too much.
Try embellishing Amazing Grace yourself by adding your own ornaments. We'd *love* to hear your own versions. Film or record yourself and send a link to [email protected]... and we may even feature your video on this page!
A Barcarolle is a traditional folk song sung by Venetian gondoliers.
The Barcarolle (“Belle nuit, ô nuit d'amour”) by Jacques Offenbach, from his final opera, The Tales of Hoffmann, is surely the most famous Barcarolle there is!
If you're a practically minded violinist, the idea of learning to maintain and repair your own instrument can be an interesting diversion. Those interested in cars who buy a vintage classic model would naturally learn how to improve the engine and fix things up when repairs are needed.
Surely, just like the keen motor mechanic, in order to feel properly invested in your violin playing, you must own a full set of violin repair tools and be able to carry out your own repairs?
No.
Violin repair tools are available quite cheaply online. The violin is made of wood. Perhaps buying wood glue and a set of clamps would be sensible?
No.
The violin is an extremely delicate instrument, both physically and scientifically. The way it is put together in order to work is extremely sp
ecific. String teachers speak with horror and humour combined of students arriving to their lesson with the bridge glued on the instrument because a helpful parent with some DIY skills had noticed it had a tendency to fall off. Any violinist knows that the bridge is fixed to the body of the instrument by the tension of the strings, but to a lay-person this must seem like madness.
Violin maintenance at home involves some very simple violin repair tools. You will already have some of the items that will help keep your instrument playing well. Some are regular household items. You may also have some DIY-type tools that it is tempting to use, but which should never go anywhere near your violin.
Leave them in the garage.
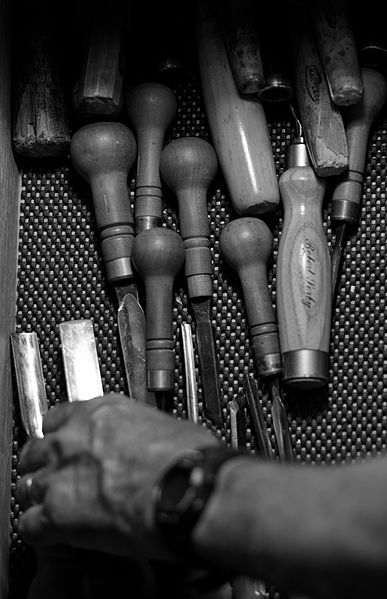 Simple Violin Repair Tools
A small screwdriver or chinrest pin
Replacing or tightening a loose chinrest is a simple repair. It is possible to fix the chinrest onto the violin using a mini-screwdriver. Ask in your violin shop before you attempt this for the first time. Be careful that the screwdriver does not poke through the adjustment holes in the chin-rest legs or you will scratch the varnish or even gouge the wood of your violin. Once you have been shown how to replace or tighten a chinrest, this is an easy repair that you can carry out yourself at home. Custom-made chinrest tools are available: If you buy a new chinrest it should come with a pin-type tool, or key tools such as this one are available. http://www.ebay.co.uk/itm/VIOLIN-CHIN-REST-CLAMP-KEY-TOOL-FOR-SAFELY-OPENING-TIGHTENING-CLAMP-UK-SELLER-/221592229815?hash=item3397ed17b7:g:YMQAAOSwrx5UVPCy
A duster
The simple lint-free duster or cloth is a valuable asset in your violin case. Use this to wipe excess rosin and sweat from your instrument after each time you play. Removing rosin dust from the varnish helps to keep it in good condition where a build-up can create a sticky, dirty surface that will deaden on the tone of the instrument.
Dry uncooked rice
A surprising amount of dust and fluff can and will collect inside your violin. This can have a negative effect on the sound. If the inside of your violin looks dirtier than the skirting board behind the sofa, a small amount of dry, uncooked rice will help. Gently pour some of the rice into the f-holes, and shift it around carefully. The rice will collect any dust and fluff fibres. You can then turn your violin upside down and let the rice fall out of the f-holes. Make sure you get every grain of rice out, and the key word is ‘gently’. Don’t fill your violin with rice and shake it around like some sort of primary-school percussion instrument.
Peg paste
Ask your violin repairer to supply you with some peg paste. This comes in two varieties; one stops your pegs from slipping, the other lubricates stiff pegs. There is no substitute for well-fitting pegs, but even these can slip or stick in extreme weather. Sometimes pegs can stick so badly it seems impossible to move them. In this case, do not apply any sort of force or use a tool to loosen the peg. You could snap the neck of your violin. Take the violin to a violin repairer to have the peg adjusted. Apply peg paste to your pegs to keep them turning well. This will also increase the life of your strings as each adjustment of pitch when tuning will be smoother and more gentle.
A soft pencil
When you fit a new string, it is a good idea to make some marks on the peg with a soft pencil, around 3B or 4B. You can also mark some pencil at the top nut where the strings join the fingerboard, and in the grooves of the bridge. This works to supply a smooth surface for the string to slide over and acts in the same way as peg paste to keep the pegs turning easily.
Small sharp scissors
Sometimes the bow hair breaks or snaps off whilst playing. Try to avoid pulling the loose ends out. This can result in more breakages or in the whole bunch of hair falling out of the bow. Use a pair of scissors such as nail scissors to trim the broken hairs back as closely as possible to the nut and tip.
Things you definitely never need…
Wood glue or superglue
Violins sometimes come unglued round the edges or develop cracks. So why can’t you repair this yourself using wood glue? Luthiers use a very specialist glue to make and repair violins. This ‘hoof and hide’ glue has just the right properties: It shrinks when it dries, pulling the instrument together and it is a weak glue. This is crucial. Not only does the weak glue allow the violin to be unglued at a later date if necessary, it guards the instrument against cracks as it will separate rather than force the wood to stay glued. Imagine you are in a very dry climate. The wood of your violin shrinks with the low humidity. Your violin is glued together with superglue. What will happen? The glue will remain tight and the wood will split as it shrinks.
The specialist glue needed for violin repairs is reconstituted from granules and has a very short shelf life. An experienced luthier will regularly make fresh glue. The luthier will also have the specialist clamps needed to keep your violin together until the glue has dried.
Never try to glue your violin yourself: It just isn’t worth it. Bad repairs will significantly reduce the value of an instrument and will cost more to put right in the long run.
A sound-post adjuster
Adjusting your own sound-post is tempting. You know that it can make the violin work better, so why not learn to do this yourself? Violin repairers report significant damage to instruments from players who think they can make their own sound-post adjustments. On one hand, anyone with basic motor skills and an Amazon account can purchase the tool and move the post, but the truth is, the knowledge behind how and where to move it is hugely complex, and in an instrument that has a curved belly, actually making the post fit is a different matter. You do not need a sound-post tool any more than you need to attempt your own dentistry.
DIY repair is not a prerequisite of violin playing, and is rarely or never attempted by most top professionals. Ask friends or your teacher to recommend a luthier who is able to help you get the most out of your violin and leave the repairs to the specialist. Most small repairs are relatively inexpensive and a good luthier will be happy to discuss options before undertaking the work.
Joseph-Hector Fiocco is best known for his virtuoso showpiece ‘Allegro’, arranged here for TWO violins! Fiocco was born in Brussels in 1703 and died, tragically young at just 38, in 1741. The Allegro was originally written for harpsichord – part of Fiocco’s Pièces de Clavecin – and later popularised as a violin piece being a staple of Suzuki Book Six!
When you're first starting to read music, you'll quickly come across different types of notes.
The rhythm of each note is represented by the SHAPE of the note-head and the stem.

This PDF shows some of the most common note values that you'll see. The words on the right of each note represent the rhythm names for each note. The exact timing of notes will depend on other factors such as the time signature and the tempo of the piece, which we'll talk about another time. But this visual guide will help you to remember the names of each note type... this will be really helpful when we start to talk about rhythm.
Frolic is a lovely new piece of music written exclusively for ViolinSchool! Get your fingers warmed up with some G major scales and arpeggios, then try playing the piece through with lots of energy and a nice, lilting feel to the phrasing. Think of some little lambs gambolling in the countryside!
Watch out for the 'ritardando' (gradually slowing down) in bars 15 and 16; you'll need to practise your bow control to make sure that you pace the slurs and staccato notes effectively. And be sure to get a big, resonant sound on the last two accented staccato notes - they come as a big surprise, and round off the piece in a very joyful way!
Here's the main theme from Paganini's 24th Caprice for solo violin. The Caprice itself is one of the most ferociously difficult pieces ever written for violin, and it includes quadruple stops, left hand pizzicato, tenths, and other fiendish techniques... However, the first part of the piece - the main theme upon which the rest of the variations are based - can actually be played in first position!
If you're already an experienced player and you're comfortable with the higher positions, then experiment with different fingerings and strings to see how it changes the tone you produce.
If you're a vegan, can you keep to your principles as a committed violin player? If you're conscious of your impact on the environment, could violin playing be a problem?
Information about food production, sustainability, recycling and issues such as deforestation is commonly available, sought out by many of us to enable informed choices.
Many people choose a vegetarian diet because of concerns about animal welfare or the impact of livestock farming on the environment. Veganism is experiencing an explosion of popularity. In the UK, the number of vegans rose by 350% between 2006 and 2016, with the majority of vegans between the ages of 15 and 34.
Non-vegetarians are also increasingly keen to buy products that have been produced ethically. This stretches beyond animal products into the environmental sustainability of other substances, either for their impact on wildlife, such as the widely discussed problems with orang-utan treatment by producers of palm oil or for problems around species extinction and even exploitation of employees.
The violin and bow have traditionally made using very specific substances, some of which are not vegan friendly or environmentally sustainable. Alternatives are developing but there is still discussion as to their suitability.
Replacing natural products with plastic-based substitutes increases the amount of non-biodegradable material impacting on the planet – a negative effect of a positive intention.
Old instruments, particularly violin bows, are often made with materials that are now endangered - the principal wood used for bows was pernambuco which is now listed on the International Union for Conservation of Nature’s (IUCN) endangered list - or unacceptable: Antique bows are commonly decorated with tortoiseshell and ivory.
Bow makers still prefer pernambuco, but the brazilwood often seen in cheaper violin kits is actually from the same tree, the Pau Brazil– brazilwood is the lighter coloured outer sap wood from the tree, pernambuco is the heart wood.
Some student violin kits have snakewood bows. Snakewood also comes from a relatively rare tree.
In an interview in Strings Magazine in November 2016, bowmaker Yung Chin explained that efforts are being made to ensure the survival of the pernambuco producing Pau Brazil tree.
“The worldwide bow-making community, through the efforts of the International Pernambuco Conservation Initiative (IPCI), has been very involved with helping to find solutions whereby we can have longterm sustainability of the resources we use so that future generations of bow makers can continue our wonderful craft.”
Many carbon fibre bows are also on the market, and are often used as second/spare bows by professionals. Carbon fibre bows lack the subtlety of a really good wooden bow, but there are many models that do the job perfectly well.
Bow hair comes from horses’ tails, generally horses in cold climates such as Mongolia, where the hair grows more coarsely. Many violinists like to believe that the tail hair is simply cut from the living animal, with some people imagining ranches of horses bred purely for their hair.

But in reality, horsehair is a by-product of the slaughter industry, with other parts of the animal being used for meat, hide and glue making.
While some would argue that using the hair, ensuring no part of the slaughtered animal goes to waste, is ethical, many vegetarian violinists are uncomfortable about the use of horsehair.
The hair used for violin bows represents only a small fraction of the horsehair industry. The vast majority of the hair is used for other purposes including as fine art paintbrushes, fabrics, upholstery, jewellery, fishing lines and fly tying.
This video shows how the hair is sorted and cleaned:
Back in the 1930’s, concert violinist and founder of the Israeli Philharmonic Orchestra, Bronislaw Huberman, was known to use bow hair made from aluminium, but it was never seen as a genuine alternative by other players. More recently, synthetic alternatives have been produced.
General consensus is that the synthetic hair does not hold the rosin so well, is smoother and plays differently from real horsehair, but the makers of the Incredibow, a carbon fibre bow with polymer filament hair, claim their bow hair should last at least 3-4 years, in contrast with horsehair which needs replacing every few months depending on how much use the bow gets.
The Incredibow can be rehaired, but must be returned to the manufacturer - the hair cannot be replaced by a bow maker. Likewise the Incredibow can be repaired by the manufacturer.
There is still no info about recycling or what happens to the materials when the bow does eventually become unusable as Incredibow has only been in business 15 years.
While a traditional bow lasts many decades, a bow that cannot be rehaired must be discarded once the hair has worn out. Is this pro-animal at the expense of sustainability?
The increased interest in veganism has prompted development of synthetic hairs that meet the high expectations of violinists, but these are not used widely by professionals – the traditional horsehair is still felt to function better.
Opinions about synthetic hair on violinist forums are largely subjective, ranging from those who prefer it to those who think it is “truly awful.” Where real horsehair is biodegradable, synthetic versions made from plastic may have their own environmental impact.
However, the synthetic option has one clear practical benefit: Where natural horsehair will shrink or sag in different humidity, synthetic hair will not, holding its tension much better.
New violin bows are often decorated with mother of pearl – the inner lining of the oyster shell and a by-product of the pearl farming industry. The mother of pearl slide on the base of the bow could be replaced with a number of materials.
Suggestions include ebony, a wood also used for fingerboards, pegs and other details on the violin. A 2001 TED case study found that 50,000 ebony trees are cut down in Kenya every year, some species of ebony are now on the IUCN endangered list and others have disappeared altogether.
There is also the option of a plastic slide that looks like mother of pearl, keeping the traditional appearance of the bow without using an animal product.
Ivory or whalebone bow tips can be replaced with plastic, but this could be deemed unnecessary, as metal (silver, gold or nickel) is also a traditional material for the inner tip of the bow. A further alternative for the vegan violinist would be to replace the leather thumb grip with a faux-leather fabric.
Originally, violin strings were made from catgut – animal (usually sheep or goat) intestines. These are still used by baroque musicians who want an authentic sound.
Metal-wound strings with a gut core are also still popular. However, so many types of violin string exist that contain no products this should not be an issue.
Good quality metal, synthetic or silk-core strings are widely available. Shop around and try different types until you find the string that suits you best.
Catgut is also the traditional material for the tailpiece hanger, though to accommodate the tension of modern strings, stronger materials such as metal or nylon are now generally used instead.
The violin is glued with hoof and hide glue, an adhesive made out of the connective tissues, bones and hides of animals (mainly cattle) that have gone to the slaughterhouse. There isn’t currently any way around this, even for the most stalwart vegan.
Hoof and hide glue is the standard glue of all luthiers. It has all the necessary properties to maintain and protect the instrument. The glue shrinks when it dries, pulling the instrument together, and it is a weak glue, meaning that when the instrument shrinks or expands with humidity and use, the glue will come undone rather than the instrument split and crack. It can also be unglued to enable repairs.
The manufacture of violins is a centuries-old tradition. Some of the original materials can be replaced by newer alternatives, and there are several options for those who want to avoid animal products.
While there is no issue with sustainability or environmental concerns such as deforestation, it is in the interests of good bow and violinmakers to source sustainably, and to take an interest in the production of their materials.
The widely held opinion is that no synthetic hair is as good as horsehair, but then some violinists prefer it, so there is no definite answer. There does not seem to be an alternative to hide glue.
For vegan violinists, for the moment at least, playing the instrument requires a compromise.
Could this change in the future? Do you know of any active research or companies working to find a fully vegan, zero-impact solution for luthiers and violin manufacturers? If so, please let us know at [email protected]
The Radetzky March was composed by Johann Strauss Sr and premiered in Vienna in August 1848. Strauss was commissioned to write the piece to celebrate a victory in battle by Austrian Field Marshal Joseph Radetzky von Radetz. The march became popular as a piece of marchinig music for soldiers, and has a celebratory, up-tempo feel to it that's made it a popular choice of music for festive occasions all over the world!
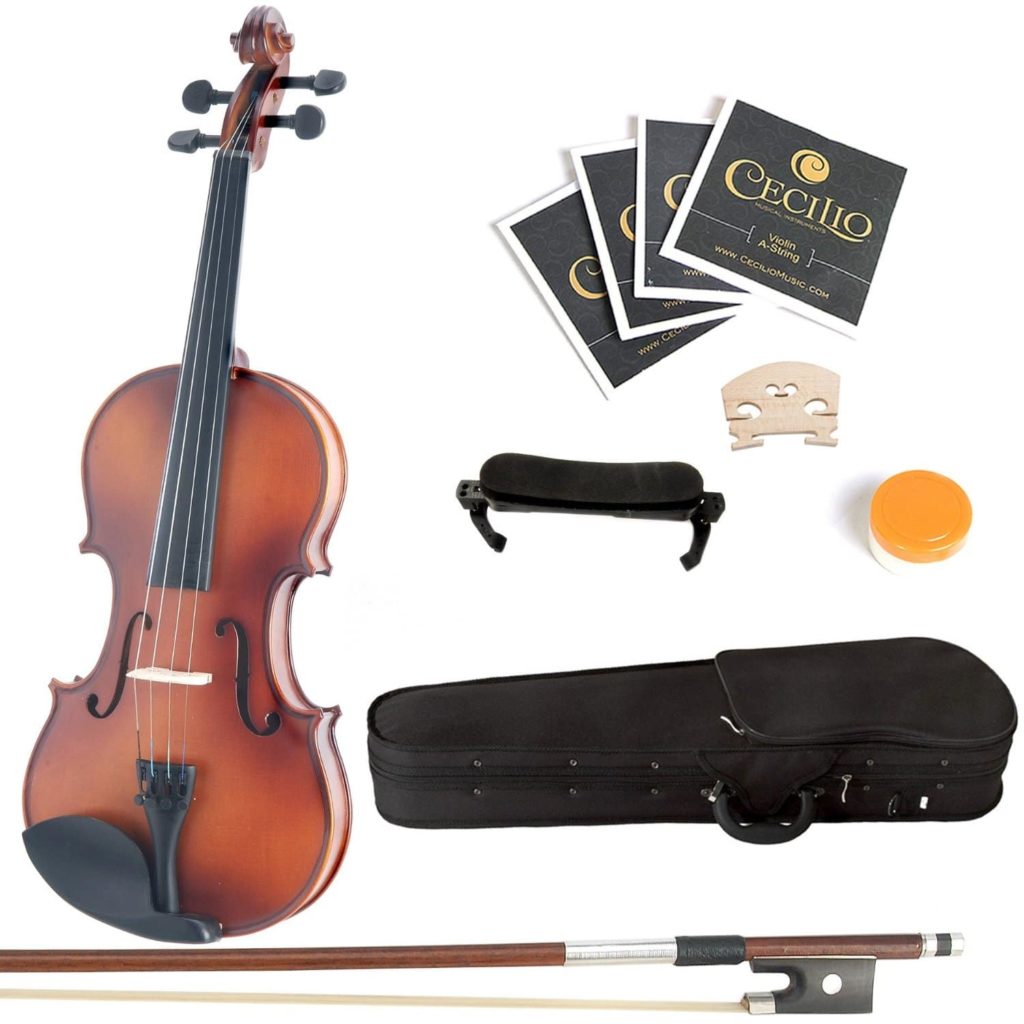
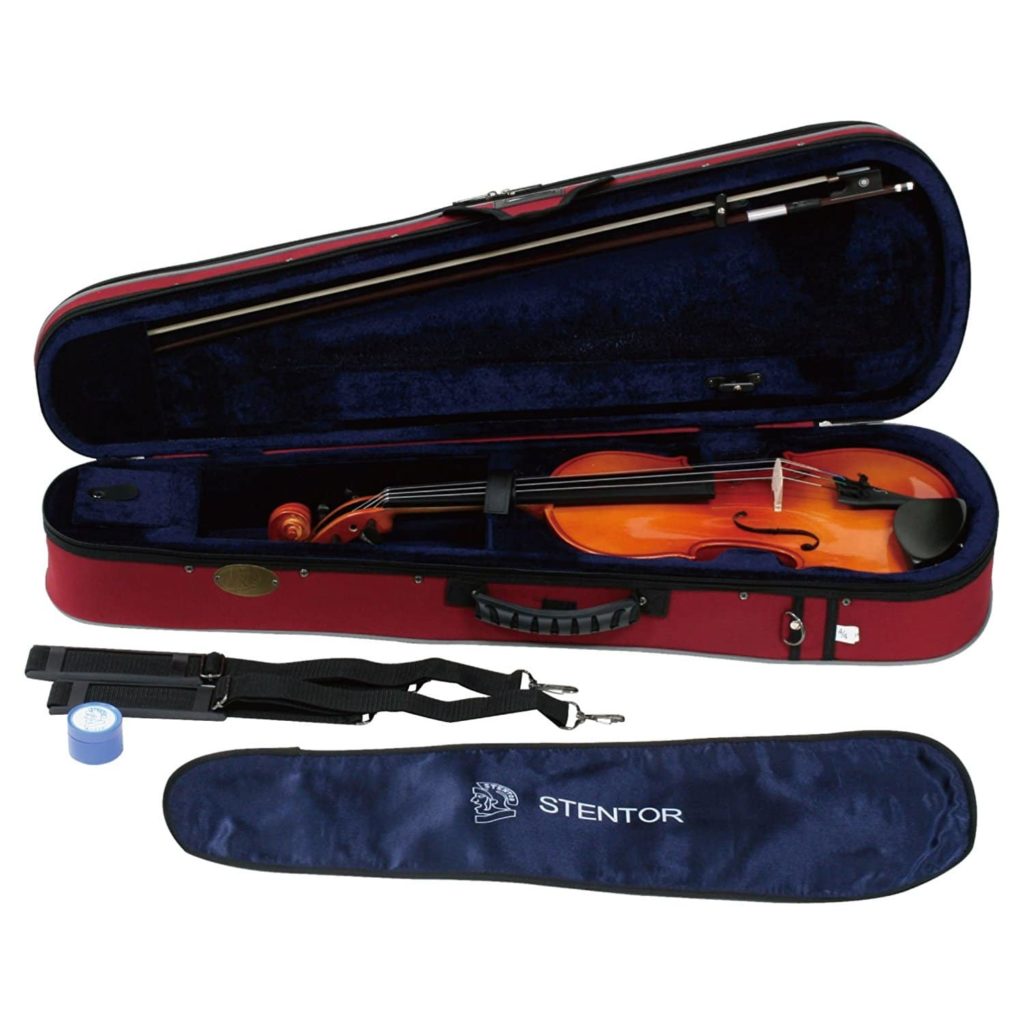
How to Choose a Beginner Violin Outfit
Buying your first violin will probably seem a bit overwhelming. Before you have had a chance to really learn about the instrument, what you want from it and what you need, it is necessary to purchase a whole raft of equipment that may be totally unfamiliar. There is also the expense. It’s important not to make a costly mistake that may be detrimental to your progress and enjoyment of learning.
There is a huge range of ‘starter kits’ on the market, both in music and specialist violin shops and online. These present an all-in-one package comprising violin, bow, case, rosin and sometimes extras such as a dust cover. An influx of competitive products imported from China and Eastern Europe make for plenty of affordable options, and this broadening market means that the quality of student violins has risen in recent years. For a beginner, the simplicity of purchasing almost everything you need in one go can remove the first barrier to playing.
A sweet story about the famous violinist Fritz Kreisler explains how his talent was drawn into question because as he became famous he was able to play on the finest instruments. It also shows that a low cost student instrument can produce a quality sound.
 One evening, Kreisler was due to perform a concert on a beautiful violin by Guarnerius, one of the foremost violinmakers of all time. He moved the audience to tears and joy with his playing that night, but as the applause died away, he lifted the violin above his head, brought it down and broke it across his knee. The audience gasped. Kreisler looked slowly around the hall and smiled. “Do not worry,” he said. “My Guarnerius is safe in my dressing room. I bought this violin today in a local store for only three dollars.”
Violin outfits are available with different specifications. Often the outfit pricing can represent significant savings over buying each element separately, with the value of the violin making up the majority of the price. The case and bow are more or less ‘thrown in’ to get you started. Some violin shops offer custom outfits, a discount on a case or a bow when you buy an instrument, or the chance to upgrade one or more items for a surcharge.
For aspiring violinists who do not have access to a specialist violin or music shop, the Internet offers plenty of choice. There is wisdom in the idea of starting with an inexpensive violin, developing skills and getting a feel for the instrument, then moving on to something better that matches your preferences and playing style. However, it is also true that, right from the outset, progress can be impeded or even utterly frustrated by poor equipment.
The main advantage of the beginner violin outfit is that almost everything you need arrives in one go. But be aware that not every aspect of the kit may be of the same quality. The main differences in quality and playability at this level are in set-up.
What to look for in a beginner outfit
The equipment should not create barriers to learning. Look for these fundamental things when choosing an outfit:
As you move to the higher price range, various aspects of the violin outfit will become more sophisticated. A mid range product will offer a higher quality bridge and tailpiece, with more attention to detail in the set-up. In this mid-range, be careful to select an instrument that offers better sound and playability, an even tone and good projection, not just refinement in looks.
What to expect from a high-end violin outfit
Outfits are excellent value, provided the violin is well set up. Many beginner outfits are supplied with minimal attention to the set-up, yet an instrument that is correctly adjusted will play and sound at its best. If you are buying online or remotely, it is worth enquiring if your supplier has workshop facilities and the skill to set up the violin. Professional alterations that will improve sound and playability include:
This work can only be undertaken by a qualified luthier but will make a big difference to the sound of the instrument.
Consider budgeting for a better bow
Often the bow that comes with the kit is serviceable, but sometimes this is not the case. A cheap bow can be of such poor quality that it is not worth the price of a rehair (the process by which worn-out hair is replaced). These bows are poorly balanced and difficult to control, draw a poor sound and warp easily. More expensive outfits will dedicate a larger portion of the cost to the bow.
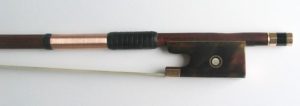
A good bow can make a real difference in clarity, tone production, articulation and ease of use. A higher-spec outfit will come with a pernambuco or carbon fiber bow rather than the cheaper brazilwood option, but even this may be worth upgrading if it does not suit or do justice to the violin.
Quality strings make a big difference
A cheaper model is likely to be strung with low-cost steel core strings. These have a metallic, thin sound. Look for mid-cost aluminium-wound strings with a nylon or gut core. These will make a big difference to the sound.
Other things to note
It is worth buying new. A second-hand outfit is unlikely to be value for money, unless you are sure of the condition and set-up. It may require expenditure that would surpass the cost of a new outfit to make it playable.
The rosin that comes with the violin outfit is usually adequate, but as you progress it is worth looking at other products. Look for an amber coloured rosin that applies easily to the bow hair. Remember, when the outfit is new, the bow hair is unlikely to have any rosin on, and will take patience to prepare. It can help to score or scratch the shiny surface of the rosin before you first apply.
Most violin outfits do not include a shoulder rest, and those that do, the shoulder rest is often inadequate and poorly designed. So it's a good idea to consider purchasing a shoulder rest separately. Look for a strong rest with adjustable legs, and some flexibility. You need to be able to fit the rest to your violin and shape it to sit comfortably on your shoulder at a height that positions your chin correctly.
The shoulder rest, when used correctly, aids posture and mobility. A poorly fitted shoulder rest can actually impede progress. You can read more about choosing a shoulder rest here, https://www.violinschool.com/do-your-chin-and-shoulder-rest-fit/
And here. https://www.violinschool.com/choose-shoulder-rest/
If you haven't already watched our video about finding a violin, you can do so here:
https://www.violinschool.com/video/finding-a-violin/
Intonation and Using a Violin Tuner as a Practice Aid
A common question asked by non-violinists is, “How do you know where to play the notes when you have no frets?”
Violin intonation is one aspect of playing that is challenging for players of every level. Beginners often start learning with stickers over the fingerboard to help with finger placement, but these marker points are generally approximate and can slide around if the glue softens, and the practise of looking at the fingers while playing can impede music reading and impact on posture.
Paradoxically, many teachers use this visual aid without explaining its temporary status, then have to implore their students not to watch the fingers. The ideal is for the student to be able to hear whether the intonation is good. It can take time to develop the ear and some people initially really struggle to trust whether or not they are playing in tune.
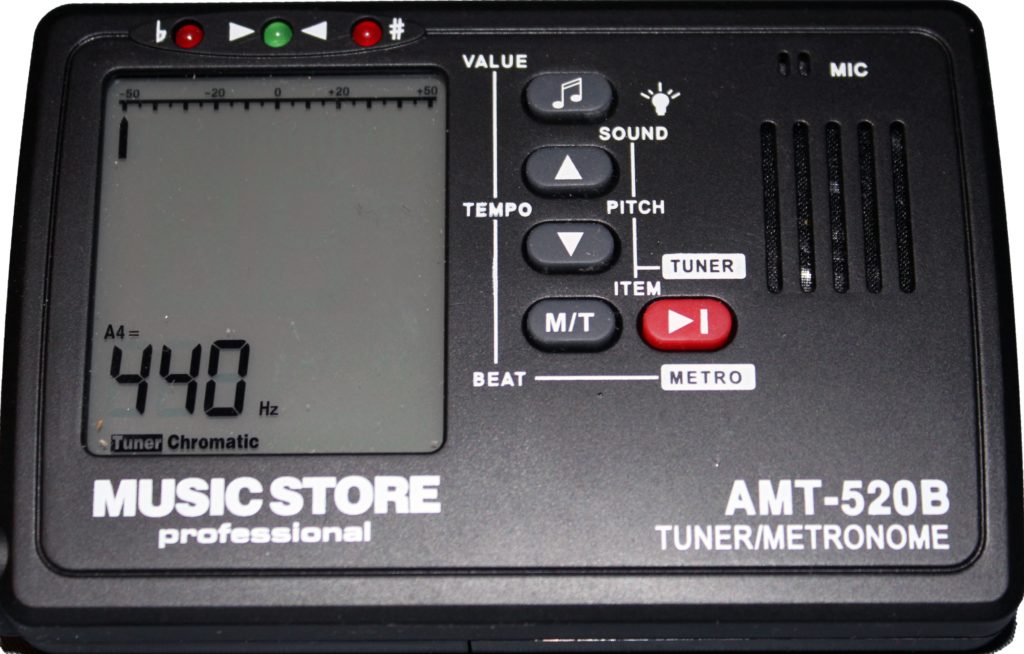
The dilemma of good intonation has many students reaching for the chromatic tuner, but the idea of practising with a tuner raises heated debate among students and teachers. A violin tuner – there are many models that clip onto the instrument – a digital tuning device or a tuning app from the app store is useful for tuning the strings of the violin, predominantly the A string.
Using a tuner, it is easy to settle the violin at a desired pitch, whether that be A440, A442 or otherwise. Tuning each of the four strings with a tuner would do no significant harm, but although you might consider this would make the violin perfectly in tune, it in fact will not be in tune with itself.
In her blog, The Ideal Violinist, concert violinist and Associate Professor at Boston University College of Fine Arts, Bayla Keyes writes:
“Good intonation is both an acoustic reality, with notes “agreeing” (i.e., creating overtones or undertones) with other notes being sounded simultaneously, and a kind of societal compromise, with musicians and audiences growing accustomed to and agreeing upon a certain delineation of pitches. Professional musicians must have finely tuned ears and accurate fingers, so that they can adapt to the intonation system being used by the players with whom they are playing; but true artists must understand functional harmony as well, at times choosing to shade a note up or down to create a certain tension or relaxation.”
Equal Temperament
The system of tuning most in use today is called equal temperament. This system uses the octave, a frequency with a 2:1 ratio, discovered by Pythagoras in around 530 B.C.E. In equal temperament the octave is divided into 12 equal half-steps or semitones. This system is ideal for keyboards, atonal music and modulation. Its development in the 16th century made the progress of western classical music possible.
The problem with this system for violinists is that it does not take advantage of the acoustical properties of the instrument. Keyes explains:
“The violin will not ring. The sound will be bland; intervals will seem indistinguishable and lack personality. Sharps will seem low, flats will seem high, and in general intervals will not be expressive enough. Half-steps will seem lazy, especially at fast tempos. Fifths and fourths will be slightly too small to ring. Major thirds and minor sixths will be slightly too wide to get a third tone, minor thirds and major sixths slightly too narrow. Only the octaves will be pure, and you will most definitely match the piano.”
With the four strings of the violin tuned to equal temperament, the instrument will be in tune with the piano but its acoustic properties will be compromised. The sound will not ring with sympathetic vibrations.
There are two other systems of tuning common on the violin – just intonation and expressive intonation.
Just Intonation
The Pythagorean theory of intervals creates a situation where open fifths and octaves sound correct, but in a scale built solely on Pythagoras’ ratios, intervals such as thirds and sixths might sound ‘out of tune.’ In just intonation, the ratio of the third and sixth is adjusted. Thirds and sixths will have a ‘third tone,’ a tone underneath the played notes. This acoustic phenomenon enhances the sound of the violin, making it ring.
Intervals/double stopped notes that are really in tune have no beats. When intervals are out of tune you will hear a beating sound that will speed up or slow down as the intonation is adjusted. When absolutely in tune, thirds and sixths will produce an audible overtone. This method too requires certain adjustments, probably most noticeable within a string quartet. If the intervals are absolutely adhered to, the bottom C string of the cello will be wildly out of tune with the violin E strings. A compromise must be found, which in this example means the musicians of the quartet will tune their lower and upper strings respectively to narrow fifths.
Tuned using open fifths, the violin will ring beautifully, but the G-string in particular will be flat with the piano and the E will sound sharp. Generally violinists use a compromise tuning, where the G will be slightly flat to the piano and the E slightly sharp. This compromise will bring the instruments in more or less in line intonation-wise whilst allowing for the violin’s natural acoustical properties and a ringing sound. This difference in tuning will not be noticeable enough to trouble the listener.
Keyes goes as far as suggesting the following solution, which could be achieved with a chromatic tuner:
Open Fifths (Pythagorean) Compromise Tuning (Keyes) Equal Temperament (Piano)
E: tuner at A = 443 E: tuner at A = 442 E: tuner at A = 441
A: tuner at A = 441 A: tuner at A = 441 A: tuner at A = 441
D: tuner at A = 440-439 D: tuner at A = 441 D: tuner at A = 441
G: tuner at A = 439-438 G: tuner at A = 440 G: tuner at A = 441
Expressive Intonation
Expressive intonation is a tool of the concert violinist. It is soloistic tuning and exploits the violin’s ability to play in the gaps between tempered intervals. Sharps are raised and flats lowered to give the maximum expressive effect. One positive aspect of this method is that notes are more often in tune with the open strings, giving rise to plenty of sympathetic vibrations that produce a real richness of tone. Giving a push to expressive notes such as leading notes deepens the tonal palette, just as mixing different tones of the same colour paint gives much more richness to an artwork, and this kind of intonation makes the solo line easily audible over a whole orchestra.
Some intonation practice tips:
Pyrography, or wood burning, a craft dating back to ancient African and Egyptian cultures, is done with a wood-burning pen. The term means "writing with fire", from the Greek pur (fire) and graphos (writing). Heat is applied to the wood, and different effects created by varying the type of tip or the temperature.
When we think of wood burning crafts, images of rustic craft work spring to mind: Pieces of tree trunk embellished with a house name burned into the timber, or a natural wood desk calendar, perhaps.
Romanian, Dino Muradian is a self-taught pyrographer. He works as a freelance artist, customising guitars, violins and other instruments for a living. He has been practising wood burning for 50 years, during which he has developed his own tools and techniques, creating pieces that are entirely different from the usual pokerwork artefacts. His violins are works of art:
But these violins would not be playable or practical for everyday use without varnish.
The varnish of the violin is very important to the sound or tone of the instrument. In physical terms, the main effect of the varnish of the violin is to change the elastic properties of the wood. Wood is naturally strong in the direction of the grain and weak in directions transverse to the grain. As the varnish penetrates into the wood, its polymer properties strengthen the crosswise fibres. The net result is a change in the stiffness of the wood. This hardening changes the vibrational properties of the violin’s timber.
In an unvarnished violin, the sound is faster along the grain and slower perpendicular to it. When varnish is applied, these differences are reduced, leading to a more uniform sound radiation. Varnish also protects the violin against the long-term effects of wear and humidity.
This video shows an unvarnished, or ‘white’ violin being played. The tone is undeveloped.
Unfinished white violins are commonly available through online platforms such as eBay, but the tools and skill required to convert these to playable instruments would outweigh any benefit of the cheap purchase price or the temptation to build a custom-made, working instrument. The violin will require finishing and setting up. The fingerboard, which on a cheap violin is often attached with virtually heatproof glue, will need to be removed so that the instrument can be varnished.
However, these instruments are perfect if for anyone interested in creating an artwork from the violin rather than a functioning instrument.
The violin in its usual state is a thing of beauty as well as function, but sometimes violins and other string instruments are heavily decorated and still work brilliantly. A cello may have a coat of arms on the back - Andrea Amati’s ‘King’ cello, dating from somewhere after 1532 bears the royal arms of Charles IX of France. This indicates that this instrument must have represented the best work that Charles, or his commissioners, could find. The decoration on this instrument is painted, not carved or inlaid.
Older instruments, ancestors of the violin, such as the Venetian lira da braccio by Francesco Linarol have elaborate inlays, while Stradivarius’s decoration was subtle in the extreme – delicate, florid inlays in the ribs of the violin.
Most decorative work on violins has been imitative of the painted armorials of Amati or the embellished purfling and mastic inlay used by Stradivari. But despite the use of decoration by these greatest of makers, decorated instruments generally have a poor reputation among players. Most violinists prefer not to stand out from the crowd or risk the fragility, buzzing and rattling that can come with inlays.
Ornamentation and decoration add nothing to the sound quality, and if carried to excess are likely to detract from the tone. The more inlay added to a violin, the less of the body can vibrate freely and the more things there are to go wrong. Carvings such as that on the back of Scottish fiddler James Scott Skinner’s violin create different thicknesses in the wood. The thickest parts will not vibrate as freely as the back of a normal violin and this will affect the sound.
The Norwegian Hardanger Fiddle is the one sort of ‘played’ violin that is commonly highly carved. The wood burned designs and carved heads traditional to Hardanger fiddles create a truly unique look to these instruments.
If you are interested in creating a wood-burning project on a white violin, it is important to note that woods can emit toxins when burned and may cause serious respiratory problems when inhaled. Be sure to take precautions, such as wearing a good dust mask, and gloves when sanding to prevent a rash. Many violins are made from spruce and maple. Spruce can create respiratory sensitivity and maple wood can create skin rashes and respiratory problems. Work outside or position a fan to ventilate the space.

[Image from The Strathspey King, Temple Records]
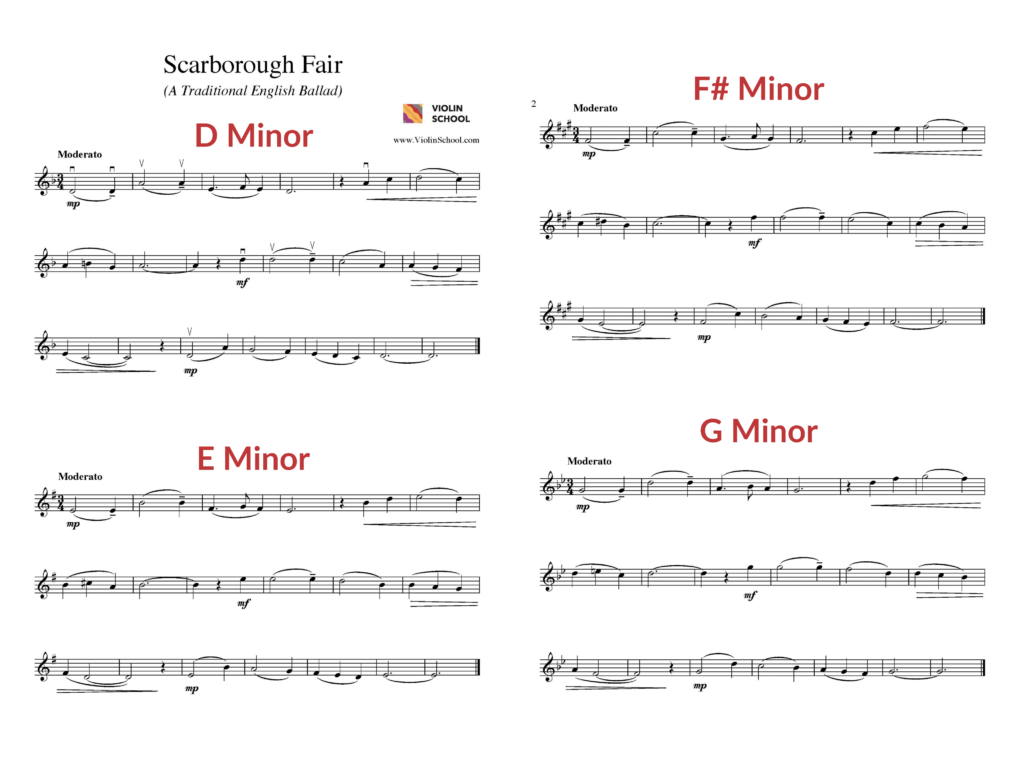
Scarborough Fair is a traditional English ballad about the Yorkshire town of Scarborough.
It’s an absolutely *gorgeous* melody. If you haven’t heard the Simon & Garfunkel version, then do search for it and take a listen … it’s a really beautiful recording!
Here's the sheet music for you to download, learn and play along with! We've written the music out in four different 'keys', so you can choose which note pattern you'd like to use:
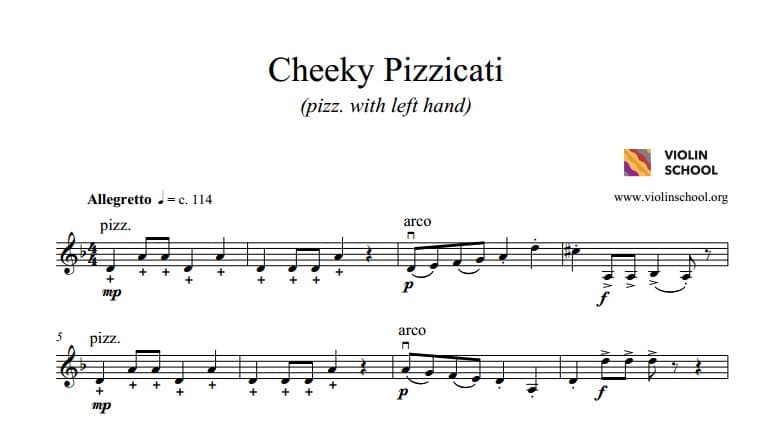
Cheeky Pizzicati is an exclusive ViolinSchool piece that's a really fun way to practise left hand pizzicato. In this video we'll learn how to pluck the strings using the left hand, and where to place the hand in order to make a good sound.
If you're a member of ViolinSchool, you can download and print the sheet music (below). Then try playing along with the 'playthrough' at the end of the video. Happy plucking!
 [wcm_restrict]
[/wcm_restrict][wcm_nonmember]
If you'd like to download all of ViolinSchool's sheet music and have access to all our online learning resources, you can become a member for $19/month. Click here to get started today!
[/wcm_nonmember]
Here's a new video (from our forthcoming Setup online course), explaining all about Mutes and Practice Mutes.
There are two main types of mute you can use with the violin – standard mutes, and practice mutes. They dampen the vibrations of the bridge and the strings, which softens the sound.
We use standard types of mute to change the tone of the sound for *musical* reasons, but practice mutes are much thicker and heavier than other mutes, and are usually made out of metal or rubber. They're great for practising when you don't want to disturb other people with your violin practice!
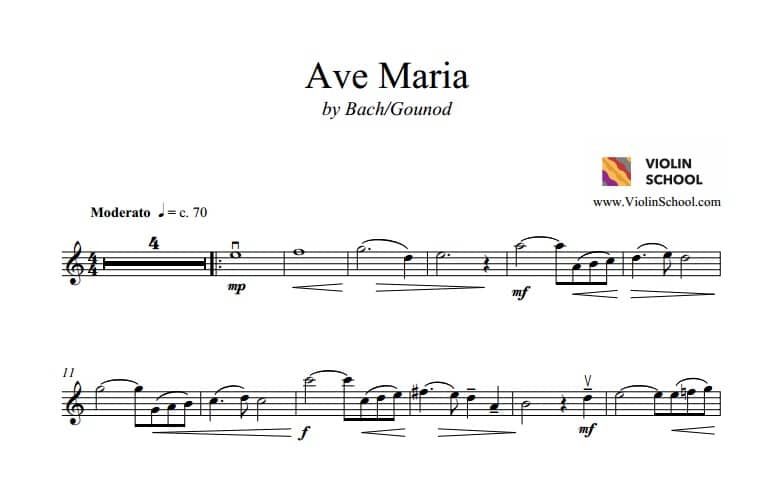
This sublime melody was first published in 1853. It was written by French composer Charles Gounod to fit with the Prelude No.1 in C major from J.S. Bach's The Well-Tempered Clavier, written over 130 years earlier. Try playing the melody along with a recording of the Bach Prelude!
[wcm_restrict][/wcm_restrict][wcm_nonmember]
If you'd like to download all of ViolinSchool's sheet music and have access to all our online learning resources, you can become a member for $19/month. Click here to get started today!
[/wcm_nonmember]
Violin finger charts are a quick, visual way for beginner violinists to understand the geography of the violin fingerboard. Simple diagrams to show finger placing can also help in early note reading.
Tutor books such as C. Paul Herfurth’s A Tune A Day traditionally combine finger charts with music theory and note-reading exercises to help build a clear understanding of how the position of each finger on the violin strings relates to the notes on the stave.
Violin finger charts generally show the position of every finger in one position on the violin string. Most are limited to first position, as once first position is mastered, it is easier to understand new positions without such visual help.
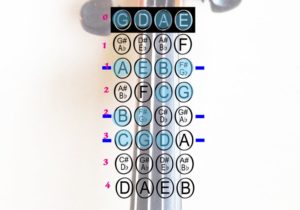
Here is an example of a basic violin finger chart showing the notes in first position. The letters marked by the black banner at the top of the chart indicate the open strings, G, D, A and E.
The blue markings at the side of the chart show the positions where, if you have stickers on your violin, the stickers are normally placed. This chart shows every single note in first position, making up a chromatic sequence of semitones.
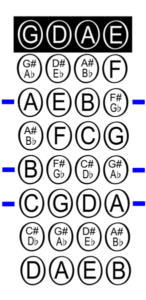
This very basic violin finger chart simply shows all of the pitches that are available in first position. Each pitch name represents a semitone. The first two notes on the G string, G#/Ab and A can both be played with the first finger.
A#/Bb and B can be played with the second finger, C and C#/Db, the third finger, and D on the G string would be played with the 4th finger. However, this is not set in stone. In certain passages, a C# in first position might be played with a 4th finger, or an A# with a first finger. There are numerous options depending on the context.
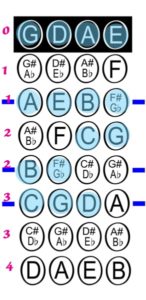
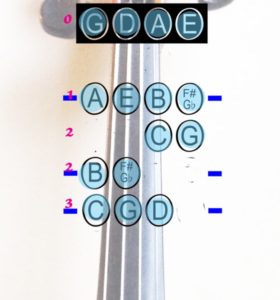
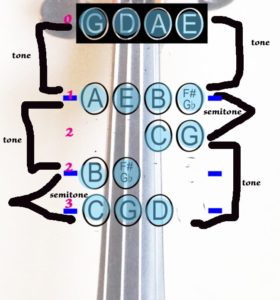
Now look at the chart again. This time it has been edited to show the notes of the G major scale. For clarity, the fingers have been added at the side of the chart. Every note highlighted in blue is played as part of the G major scale, and it is easy to see that the scale falls into two distinct finger patterns or shapes.
On the lower two strings, the 1st and 2nd fingers are a tone (whole note) apart and the third finger is spaced only a semitone (half note) from the 2nd. On the top strings this pattern reverses, with a low 2nd finger.
Violin finger charts are a useful way to begin learning scales. They show the patterns of tones and semitones in each key, and prepare the brain for the hand shapes within that key.
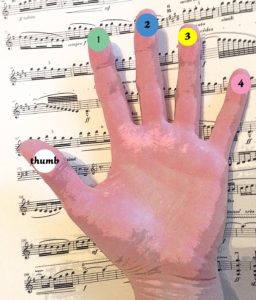
Each finger is given a number. This is universal to all teaching methods. The index finger is called 1, the middle finger is called 2, the third finger, 3, and the little finger is called 4. Unlike the piano, the thumb does not have a number, because the left hand thumb does not contact the strings.
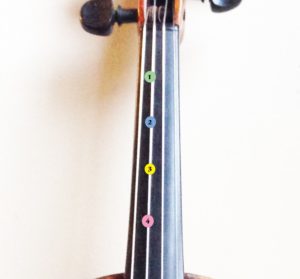
Look at the picture below. Each finger is marked with the correct number:
Now imagine the finger chart is actually a diagram of the fingerboard of your violin:
Where would the coloured dots and numbers fall to give the correct notes for G major?
Now let’s look at the original chart again, but this time, placed over the violin fingerboard:
All the fingering chart is, is a diagram of the pitches in first position.
This diagram shows the pitches and hand shapes for G major highlighted in blue. The image below shows only the notes of G major. Using these templates, it is easy to create your own fingering charts for scale practice.
Violin finger charts are a helpful way to build a visual and physical memory of finger placings. Use them to learn scales and to get to grips with the pitches on each string. Then have a look at the way the notes are written on the stave.
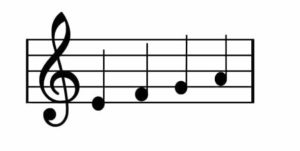
The musical stave is just another diagram, a depiction of the different sounds you will make. These notes, when played on the violin in first position, all use the fingers on the D string. As they climb the stave from line to space, progressive finger numbers are used to raise the pitch of the note. These notes are called E, F, G and A:
They are played using these fingers:
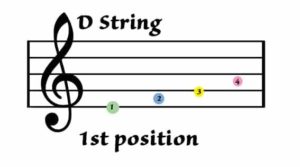
Notice how the notes on the stave relate to the finger numbers and to the positioning on the fingerboard of the violin.
As you progress on the violin it will be less practical to devise finger charts, but for beginners they are a great way to understand finger placing and to begin note reading.
For advanced violinists too, a mental image of a finger chart can be useful. If you encounter a left-hand problem, imagining the sequence of tones and semitones can help to solve the issue.
There are many free charts available online, but why not create your own? In drawing your own charts you will develop a clear understanding of finger position, where there are spaces and which notes are close together, and a much better knowledge of your scales and keys!

