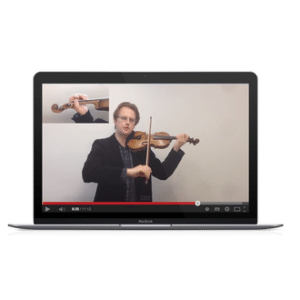
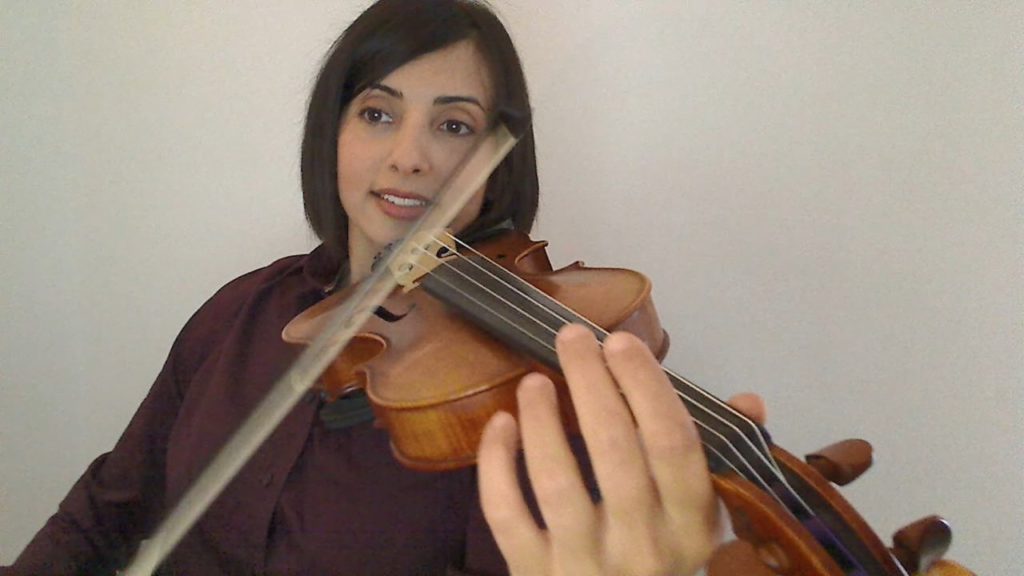
Registration for our new Online Beginner Violin Course is now open! We've recorded a video to tell you all about it - check it out here!
We have 30 places available for the first online edition of the course (or you can sign up for ViolinSchool Membership for digital-only access).
p.s. this is the online version of the same Beginner Violin Course we run at our London school! The offline course runs again in September 2019 at our London school, and you can find details here.
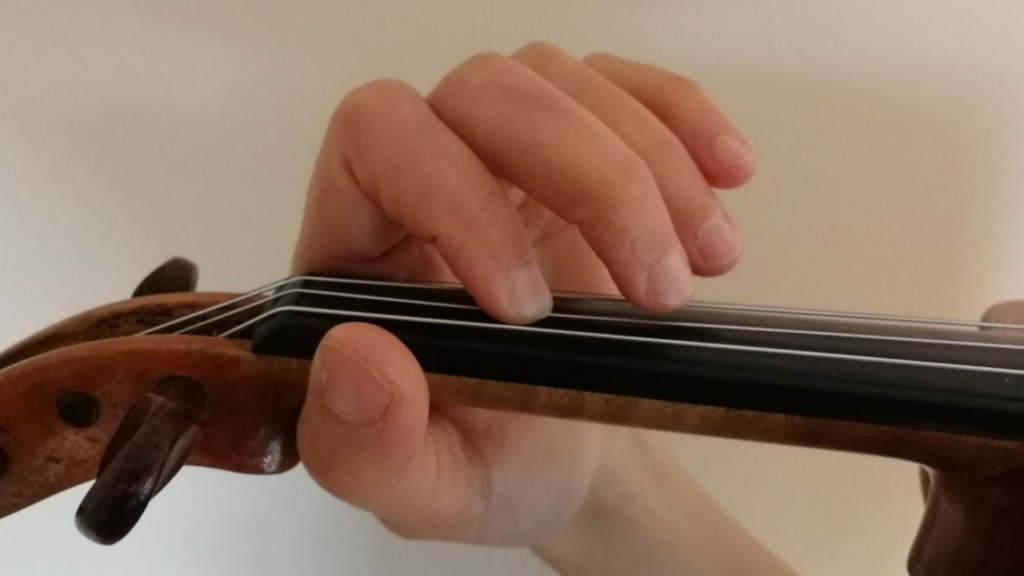
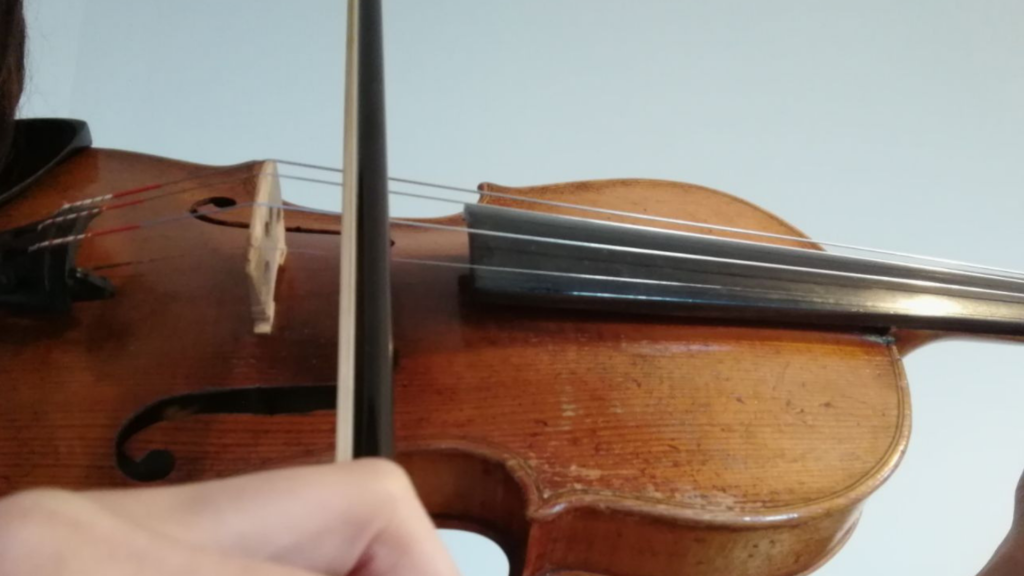
Here's the next in our series of Intonation Exercises from the ViolinSchool Library - one per week, for you to improve the accuracy of your left hand placement!
Leap of Faith: Shifting big distances like these on a single string really does require a leap of faith!
But that faith will come from repeating the movement slowly lots of times, and being aware of your arm movement (especially the elbow movement) during the shift.
The smoother and more secure the arm and hand, the easier it is to drop your finger into exactly the right place.
Keep the frame of your hand secure but relaxed as you move!
Leap of Faith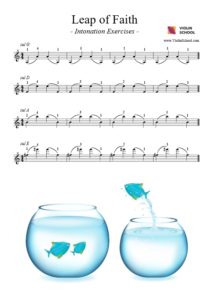 Click here to download it from the ViolinSchool Library!
(login required)
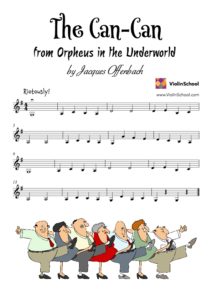
We've just added a new piece of music to Course A and to the ViolinSchool Library... The Can-Can by Jacques Offenbach! Offenbach's famous 'Can-Can' is a classic of the genre... a high-octane dance that's full of energy, and sure to get your feet tapping! Here's an easy version in G major for Beginner violinists to try!
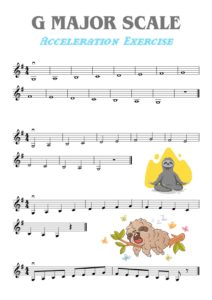
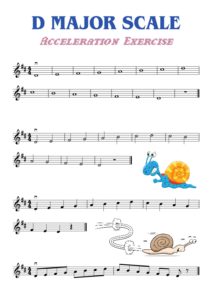
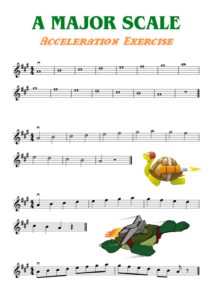
These new Scale Acceleration Exercises from Online Beginner Course A will help you to drill in your scale patterns in G, D and A major.
Once you've mastered the basic pattern, play through each scale using a long rhythm value (the exercise starts with a 4-beat semiquaver/whole note).
Then, play it again, but halve the note value to a 2-beat minim/half note. It'll feel like you're playing the scale much faster! And you'll be having to place the fingers in just half the time.
(Intermediate and Advanced players can do exactly the same thing with bigger scales that go into different octaves!).
We recommend using a metronome to help you maintain a secure pulse. Only change note on a metronome beat, to be sure that you are playing in time.
Before long, you'll find that you reach the limit of what you can currently do, and you'll find it hard to keep up with the metronome. When this happens, just go back a step, and practise the previous exercise (longer note values) a bit more.
At this point, you can also slow down your metronome beat and repeat the exercise at a slower speed. This will give you more time to clearly visualise your finger placement action.
Do this a few extra times to drill the pattern deeper into your muscle memory, and then try it again at a higher speed!
Having a good structure to your violin practice, as described in the Practice Menu, is important. But it isn't everything... you also need to be able to use time efficiently within your practice time.
That means knowing what to do... which types of exercises will be helpful, and which kinds of activities will guarantee you results?
It's a big topic, but a great place to start is with some of the most useful and effective practice techniques that have been proven time and again by violinists over many years.
Here's a useful checklist of some of the most popular techniques...
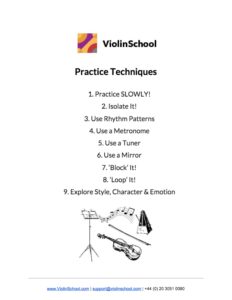
Download it from the ViolinSchool Library

It seems obvious, doesn't it? If you play something underspeed, you have more time to think ahead and get it right. But slow practice gives you sooo much more than just more time. You'll also benefit from...
Accurate Repetition - The more you repeat something, the more it 'grooves' itself into your muscle memory. So obviously, it's better to groove those memories in accurately! And you're most likely to achieve a high level of accuracy when practising new motions, if you're playing them slowly!
Speed of Acquisition - When you're playing slowly, you've got more time to think about the detail of what you're doing. You can use this time to create a comprehensive visual image of how you are playing, in your imagination. This helps you to get the action more quickly into your subconscious memory than if you were playing it fast. So weirdly, slow practice = fast learning!
Proportion - Try approaching slow practice as if you are playing in 'slow motion'. What you're doing is just a slowed-down version of what you'd be doing at full speed. This is actually quite challenging to do, because you become aware of the subtlety of each element of your movements. But it really makes you think about how to improve your playing. Does your body balance? Are all your movements in good proportion to one another? Is each motion as efficient and smooth as it could be?
When we perform music on the violin, or play through pieces at speed, we have to rely a lot on the 'automatic' skills that we've built up during training. That's fine if you already know a piece of music well.
But if you're learning something for the first time, then it simply doesn't work to jump straight into playing things through. The detail of your muscle memory just isn't strong enough, and you'll become overwhelmed.
That's why it's important to break things down and isolate them... it allows us to focus on solving one issue at a time. Once that's done, we can carefully and slowly take the time to internalise each movement, until it's well 'grooved' into our muscle memory.
The same thing works for fixing problems in your violin practice. You need time and energy to focus on solving individual issues, one at a time, without distractions. Once you've fixed a passage of music at a slow speed, then you can test it at a higher speed!
Once we have a solution to a problem, or we've learnt how a complex techinque works, we need to make our physical memory as strong as possible. Then we can recall each set of movements effectively and efficiently in performance - without needing to consciously think about it!
To do this, a different kind of 'breaking down' becomes useful... instead of simplifying a task by reducing complexity, we need to increase the complexity of the movements, in order to test and expand the limits of what we can do.
Adding complexity to a task places stronger and stronger demands on our technical capability and mental capacity. This forces us to depend more and more on our subconscious memory (i.e. our training). If we can monitor this effectively, then it's possible to predict accurately the level to which we can perform under pressure - which is a great way of reducing stress and performance anxiety!
Two of the most important ways of building up these skills are by varying the rhythm and bowing patterns that you use during practice. For example, you might be able to play a simple 2 or 3 octave scale using, for example, quarter notes on separate bows.
But try the same scale with dotted rhythms, changing the bow every three notes, and you'll have a MUCH harder challenge to complete!
Of course, it's sensible not to jump too far ahead of your current capability. So try to introduce rhythm and bowing variations that are only just outside of your comfort zone... challenging, but still doable!
As you introduce more rhythm and bowing changes, you'll find that you can cope with increasing amounts of complexity whilst playing, and the underlying tasks will become easier (such as, in this example, the original 2 or 3 octave scale).

Timing is one of the most important aspects of music. And for music to make sense, the pitches we play have to be proportionate to each other!
Yes, that means you have to play the right rhythms. But those rhythms have to be right in proportion to the pulse of the music.
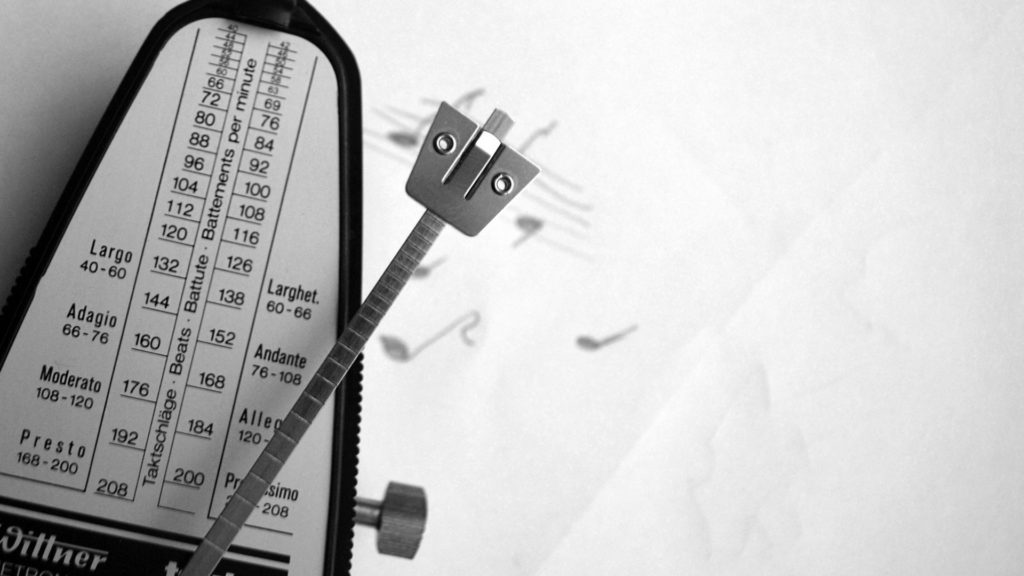
Our perception of time can become warped when we're concentrating on other things. So next time you face a challenging technical problem, try switching on a metronome. Keep listening to the metronome as you play, and you'll hear immediately if your timing becomes uneven.
Using a tool like a metronome means you have one thing to think about as you play. It frees up your brain to focus on whatever technical issue you're working on!
Better still, by premptively using the metronome to stop you from veering off-tempo, you avoid grooving in any timing errors whilst you're practising!
But, a warning... don't become addicted to the metronome! (Or to the tuner or mirror - see below). If you depend too much on the visual memory, it can cause other problems. But it's easily avoided... read Are You A Metronome Addict? to find out how!
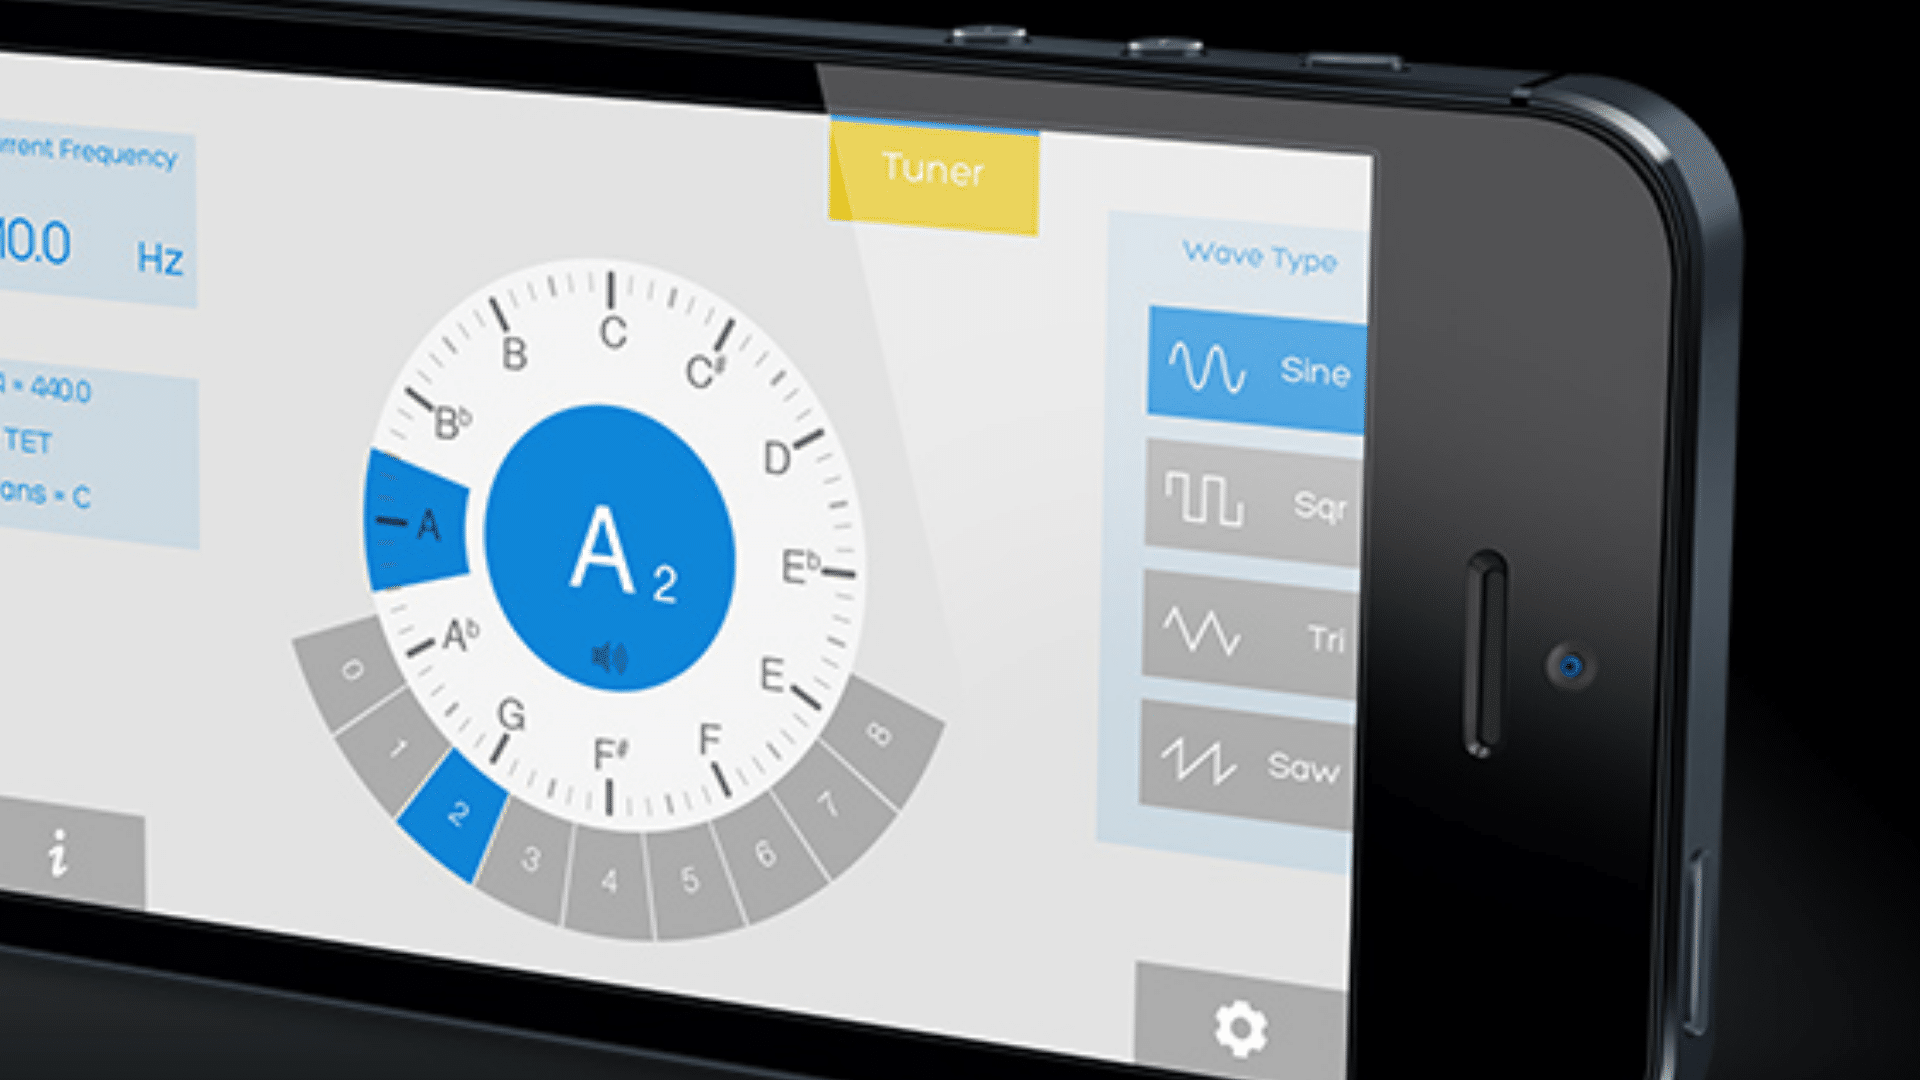
As with timing, it can be really helpful to have independent, objective feedback on your pitch as you practise. A tuning app will give you a visual read-out, which will show whether you are playing in tune or not.
It's best to use a tuner for testing, checking and correcting your playing... rather than just following along with the the visual cues!
Most 'intonation practice' (i.e. practising your finger placement, and tuning the notes correctly) benefits from slow practice, because when you are bowing with clear, full, slow bow strokes, then it is much easier to create a big, beautiful and resonant sound.
And that's the kind of sound you need to hear, in order to make good solid decisions about your intonation!
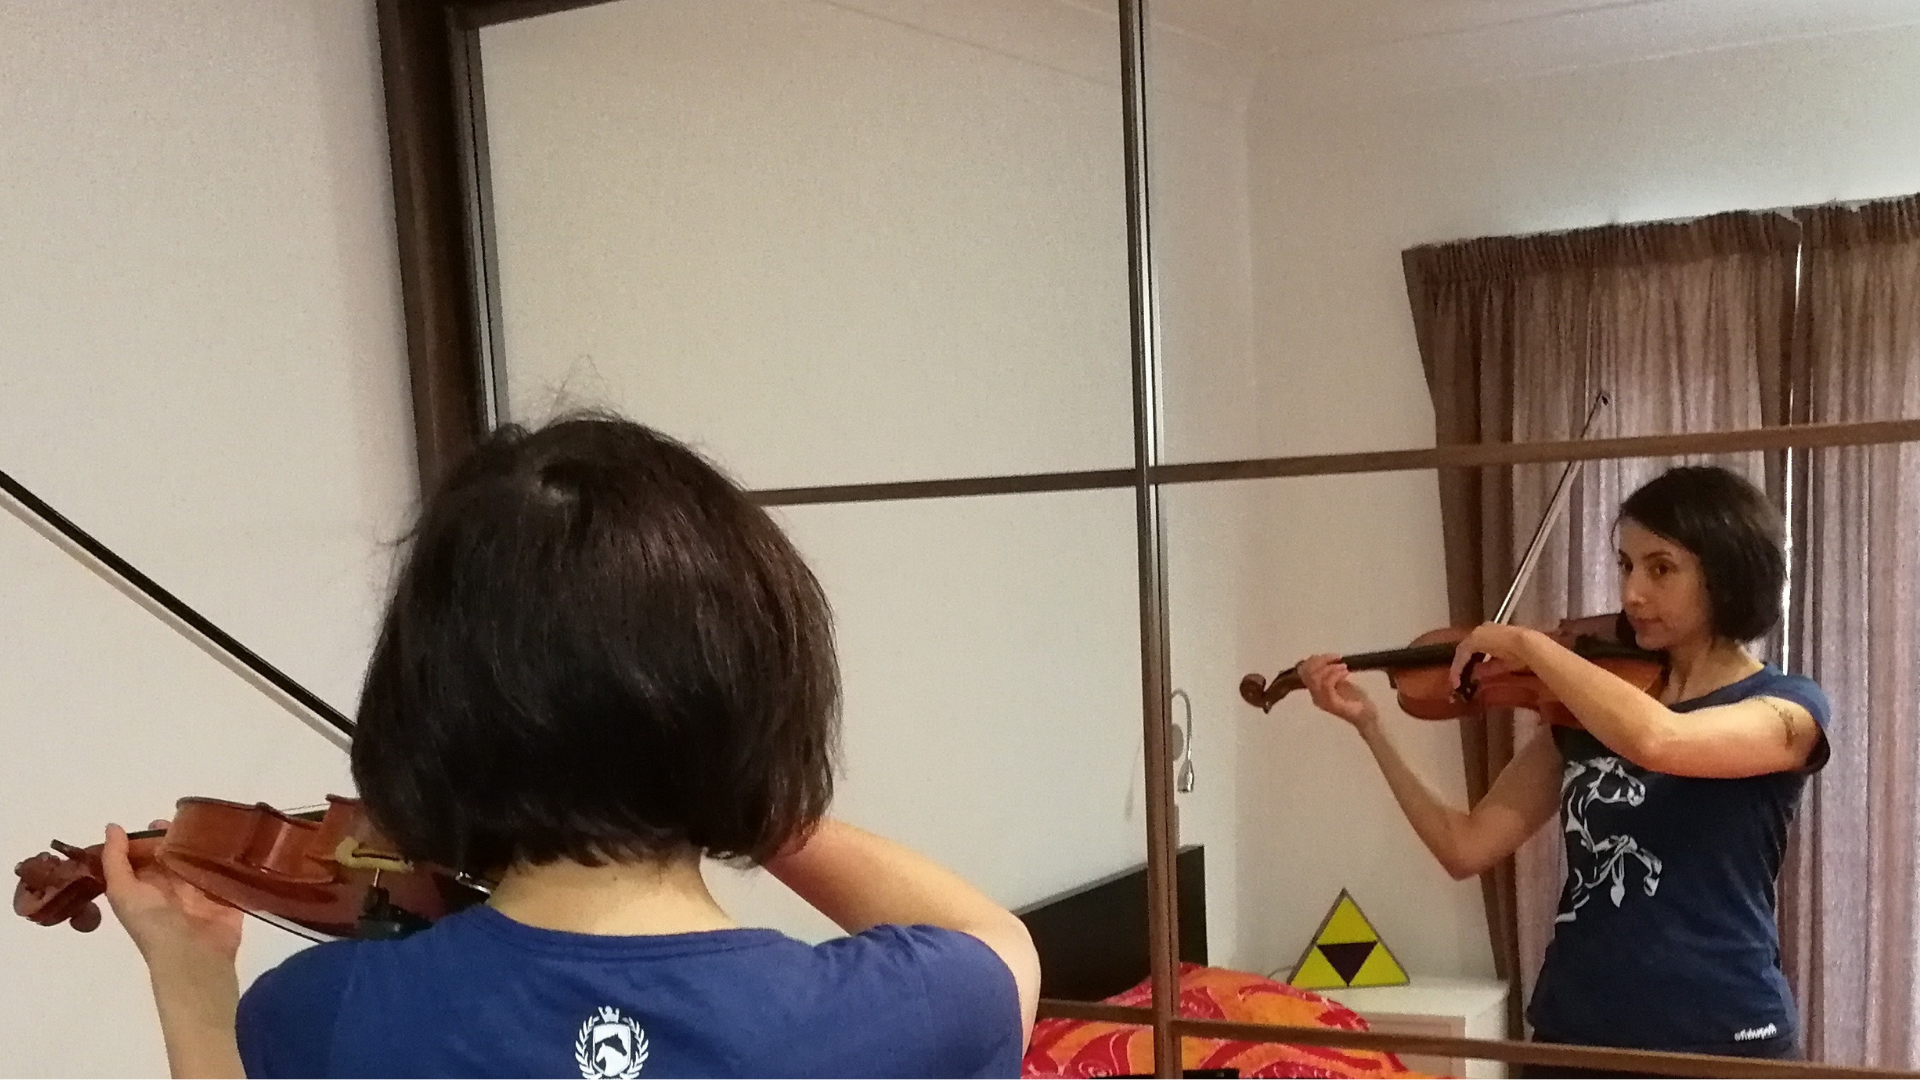
Mirrors are great for giving visual feedback on your technique. As your experience grows, you'll develop a second sense for what 'looks right' when playing the violin, and a quick glance in a mirror can give you instant feedback on whether what you're doing is effective or not.
As with the metronome and the tuner, don't become reliant on the mirror... instead, position yourself so that you can look into it easily, without turning your head.
If you're monitoring your bowing, then you'll need to rotate your body slightly to the left (as you're looking at the mirror, so that your feet are pointing at approximately a 45 degree angle to the left of the mirror.
Then you'll be able to see clearly whether or not your bow angles are correct, and whether the bow is approximately parallel to the bridge or not.
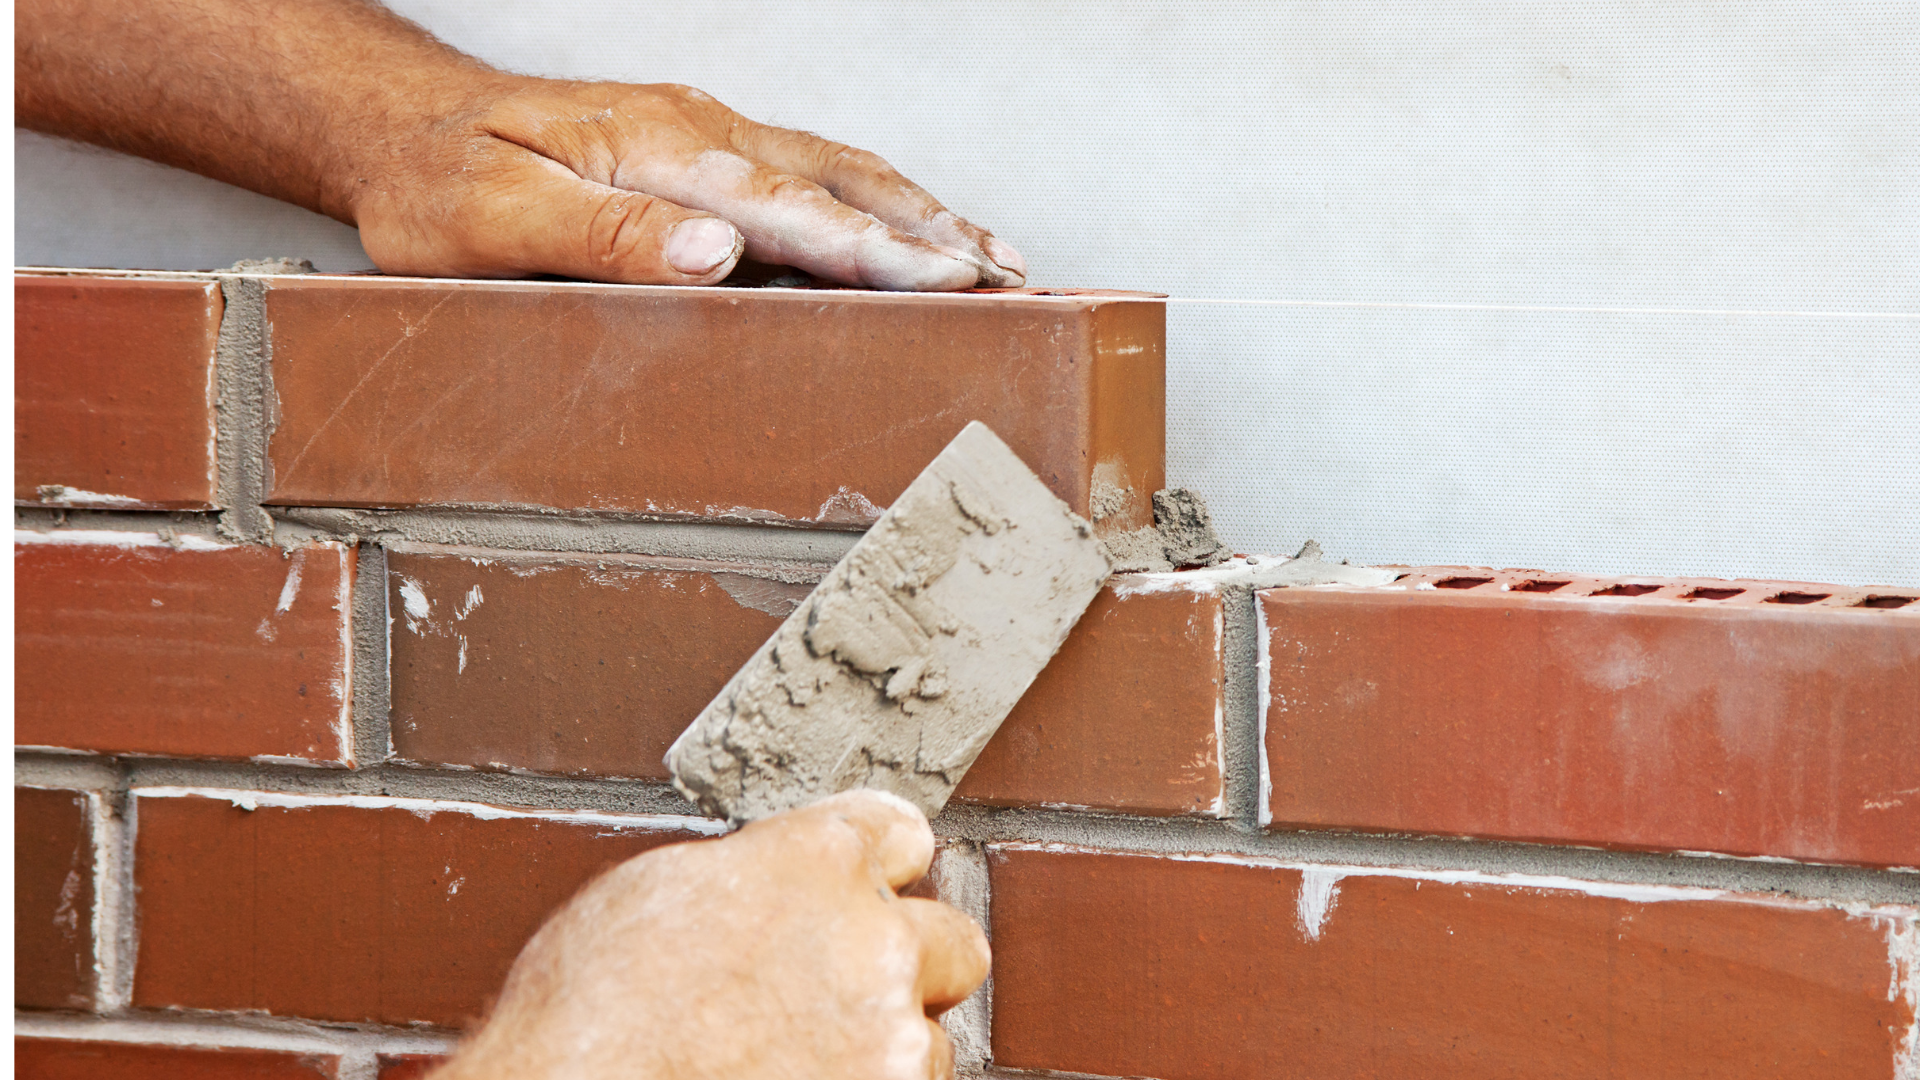
Learning a piece of music conscientiously is a bit like building a brick wall! Each brick needs to be carefully connected to the bricks next to it, so that you end up with a smoooothly constructed, neatly finished end product.
A great way of doing this is by breaking down the music that you're learning into 'blocks'. How big the blocks are is up to you - 1 block could equal 1 bar, or 1 phrase, or any other quantity that you think is appropriate!
Once you've practised each block, you then practise together with the next one.
Practise Block A, then Block B, then Blocks A + B together.
Then practise Block C, then Blocks B + C together.
Then practise Blocks A, B + C together.
Extend and repeat this for as long as you feel necessary!
This one's simple. Solved a problem? Fixed a technical issue? Then 'loop' it - repeat it over and over again - until you've drilled the memory super-deep into your muscles!
Repetition is really powerful though, so be really careful that you're grooving in the right motions before you start looping things!

Good Technique is really important, but ultimately, most people play music on the violin in order to communicate emotion, and technique is only the means to that end.
Try exploring different ways of playing all the music that you practise... experiment with styles and characters that go beyond what you think you might eventually use. This way you'll discover interesting insights and perspectives; you'll think about the music you're playing in a new way.
Also, don't leave the 'musical' or 'expressive' side of things until too late in your practice... your technique needs to adapt to support your musical decisions, so begin experimenting with different musical ideas well before your technical motions are finalised.
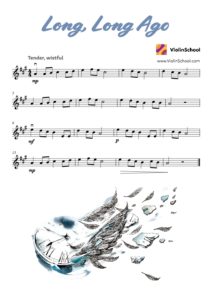
We've just updated our edition of the much-loved folk song, Long, Long Ago and it's now available to download (free login required!) from the ViolinSchool library... just click here:
The song dates back to the early 1830s, when it was written by the English writer and poet Thomas Haynes Bayly. It became famous after it was published in America in the mid-19th century, and has remained in wide circulation ever since.
The piece has been a firm favourite amongst violinists for many years, not least because of its prominent positioning in Suzuki Violin Book 1 - one of the best-selling violin books of the last hundred years!
Here's the next in our series of Intonation Exercises from the ViolinSchool Library - one per week, for you to improve the accuracy of your left hand placement!
Copycat: Play an interval on one string, and then play the same notes in a different place on the violin, by moving to a different string and a different position...
But be careful, Copycat... you need to aim for exactly the same pitch, wherever you climb!
Copycat Click here to download it from the ViolinSchool Library!
(login required)

To a violinist, a violin is a beautiful work of art, whose sound can generate the deepest and most profound emotions known to humankind.
But to woodworm, a violin is a very tasty lunch!
Let's explore how woodworm can damage violins, and what you can do to avoid woodworm problems in your violin!
What are Woodworm, anyway?

Well, they're not worms. Woodworm are actually the larvae of wood boring beetles - and a violin is a nice place for that larvae to live, before it becomes a beetle!
The wood boring beetles usually emerge from wood during the summer months - so generally between May and October in the northern hemisphere.

If you're aware of what a woodworm infestation looks like, then you have a chance of spotting it early... before it's too late to be treated!
The Best Conditions for Eating a Violin (if you're a woodworm!)
Obviously Woodworm love wood... but they're also attracted by humidity. So a humid violin makes for a great hot meal!
It all starts after mating, when a female beetle will look for small cracks in wood, where it can safely lay its eggs.

For this reason, you're unlikely to have a woodworm problem in a new or new-ish beginner instrument that's recently rolled out of a mass production workshop.
But if you have an antique violin, particularly one that's had repair work done to it in the past, this is definitely something to be aware of - particularly if you're in a humid part of the world.
Ready to Hatch... and Munch!
Once the eggs hatch, the larvae will burrow downwards into the wood of the violin, and eat their way up and down for anywhere up to five years! This can cause extensive structural damage.
The larvae form 'pupal chambers' - spaces where they enlarge the burrowing tunnels towards the surface of the wood, so that they have space to pupate into fully grown adult beetles.

Each beetle then eats its way out of the wood, in order to search for a mate. Once they're successful, the process begins all over again.
Woodworm can cause significant damage to violins by eating their way through the wood whilst they're still in their larval stage.
The Early Bird Catches The Woodworm
It's essential for violinists to identify the signs of a woodworm infestation before it becomes too severe, and the instrument becomes damaged beyond repair.
It's not clear whether larvae are affected by a musical instrument being played... but as far as we're aware, they don't have particularly strong musical opinions!
On a practical level, it's easier to spot woodworm deterioration if you're handling an instrument regularly, than if it's locked up in a storage unit!
That's why woodworm is a greater worry for collectors or people buying second hand instruments, than for violinists who are playing their instruments regularly.
HOW TO IDENTIFY WOODWORM
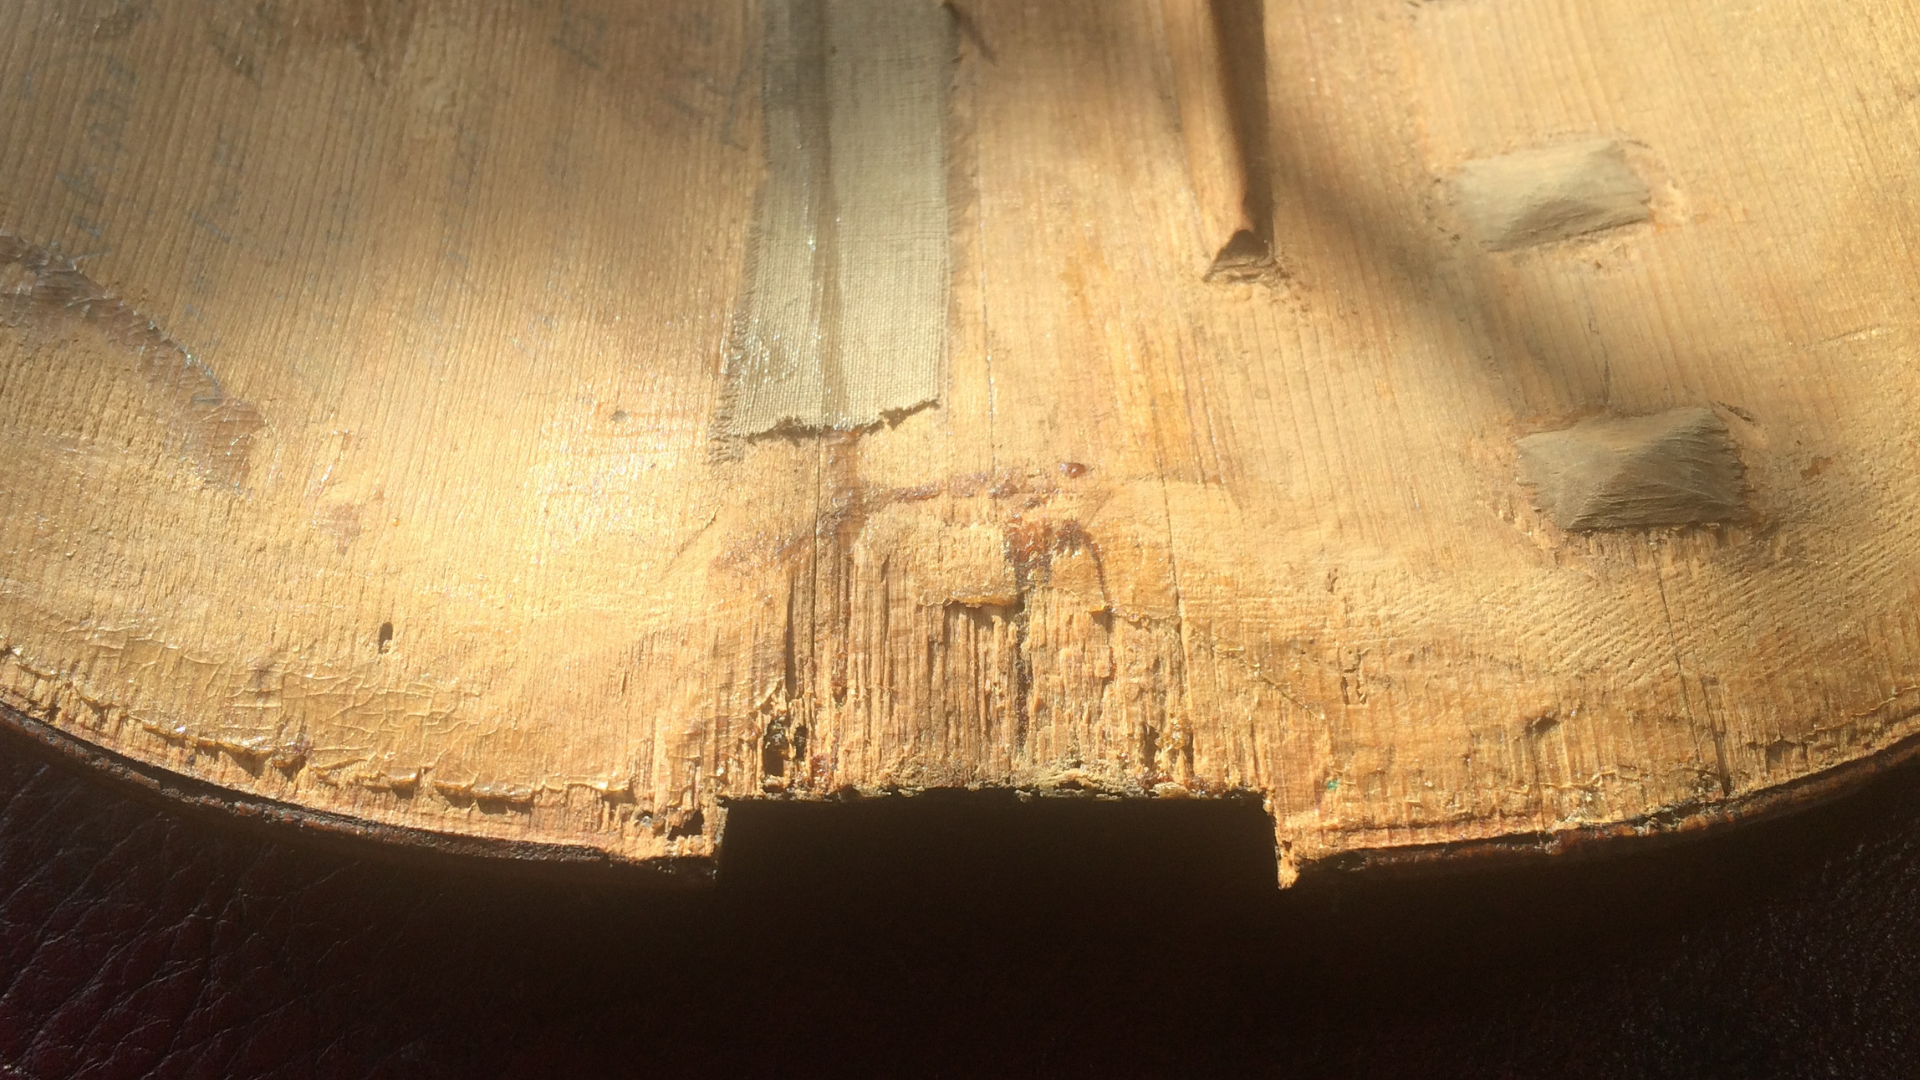
Finding Burrow Holes and Tunnels in a Violin

When the beetle is looking for a mate, it eats its way through the wood. On the way out, it creates a small exit hole ('burrow hole') in the violin.
These holes look similar to the holes that darts make when thrown into a dartboard!

If you notice burrow holes in a violin, then you should first establish whether or not the infestation is still active.
You need to know this in order to assess the level of damage that has been caused to the violin.
Its possible that there may still be wood boring beetles inside the instrument - but this can't be determined by the burrow holes alone.
Instead, look for raised “tunnels” within the wood. These tunnels indicate the route taken by the larvae as it eats through the violin.
Frass
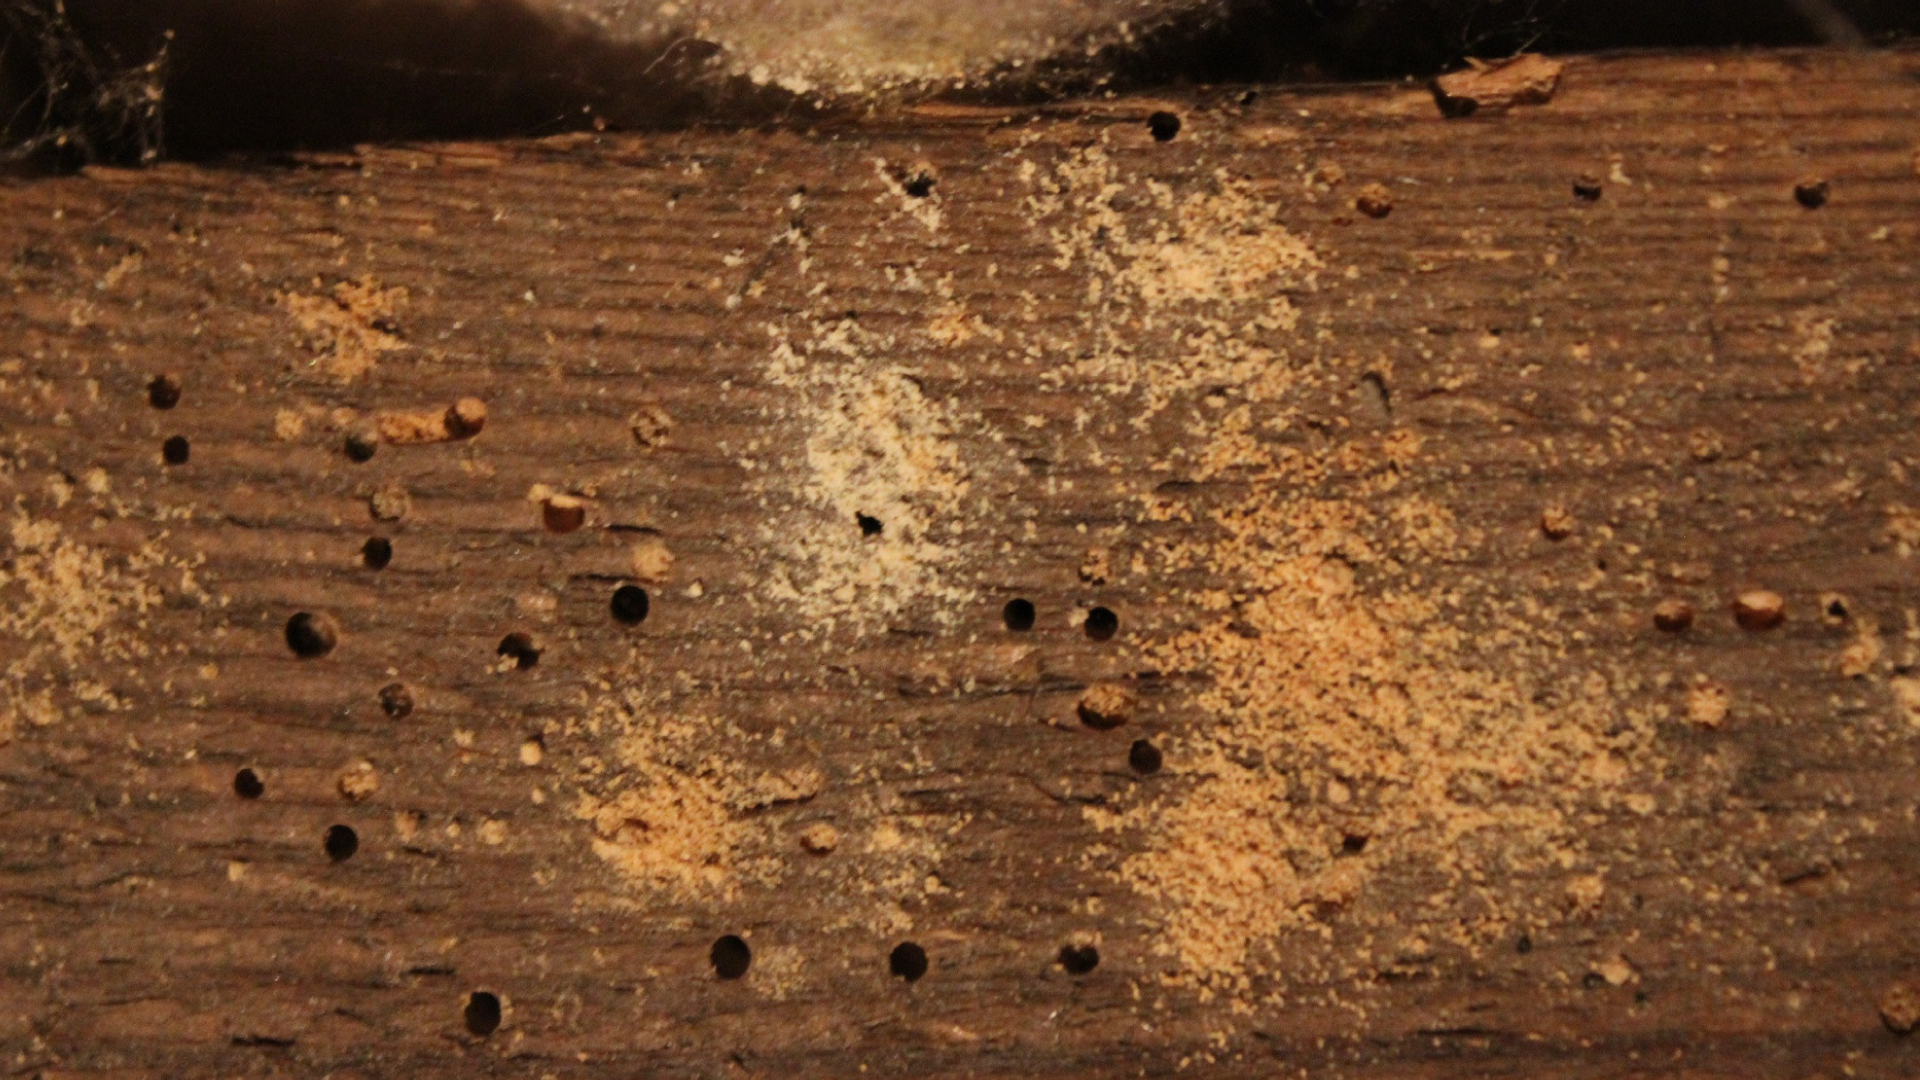
A key sign of an active infestation in a violin is 'frass', a fine powdery dust which looks like moist sawdust, and is found near the burrow holes.
This powdery dust is essentially woodworm poo! It's the faeces that the beetle larvae leave behind after they've eaten. Mmmm, delicious!
Frass is generally a sign of a woodworm infestation at the larval stage (not the result of new beetles emerging).
Crumbly Edges
Over time, the number of woodworm will multiply if the infestation isn’t treated.
This will result in an increase in the amount of exit holes in the violin, making the edges of the wood appear crumbly.
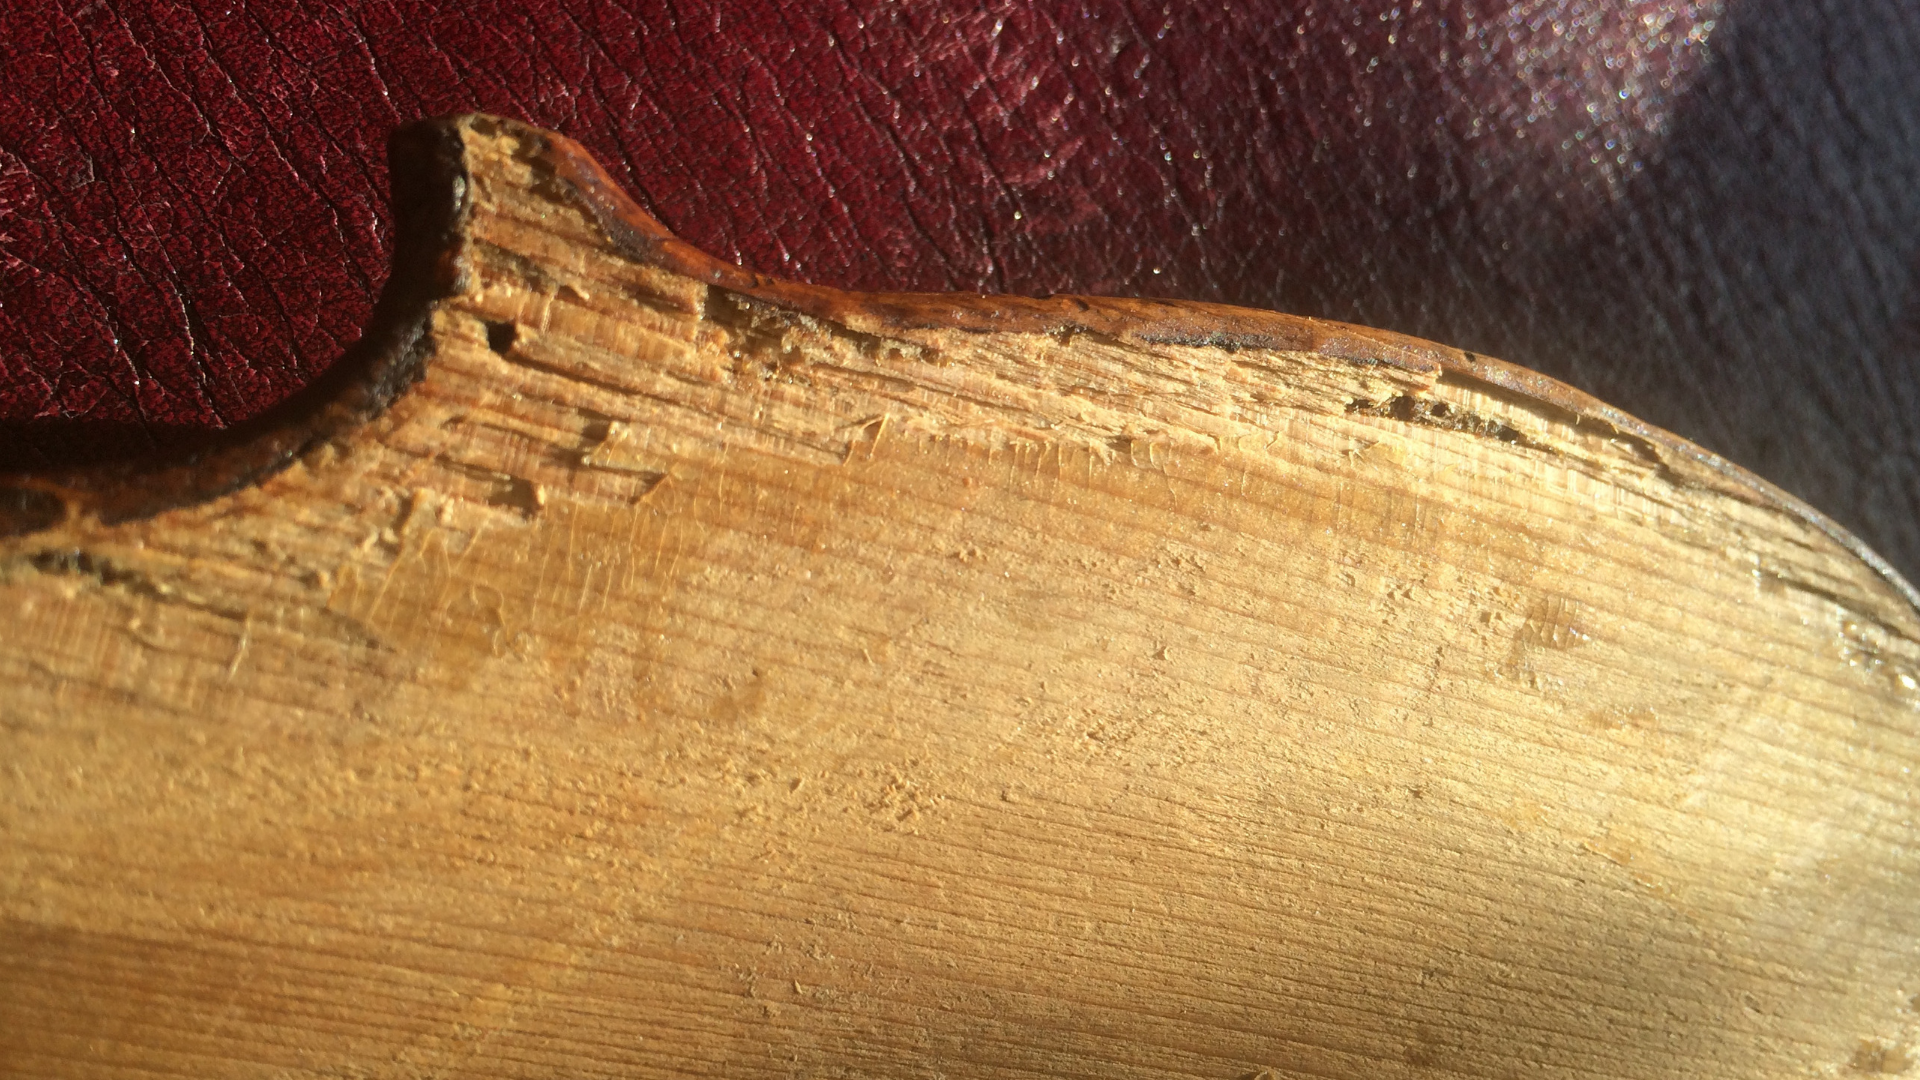
Crumbly edges indicate that the woodworm infestation has been active for a long time. In this instance, immediate treatment is necessary to prevent further damage to the violin.
Beetles Found... Dead or Alive!

The strongest indication that your violin has suffered a woodworm infestation is if you find beetles - dead or alive! - in close proximity to the instrument.
If you actually see beetles emerging from the exit holes in the violin, then you're almost certainly dealing with an active woodworm infestation.
Beetles generally emerge from the burrow holes in summer, after having caused damage during the larval stage.
In the United Kingdom, the 'Common Furniture Beetle' (a small, brown beetle) is extremely common. These beetles are prone to dying just a few days after mating, so they can often be found lying dead near the infested wood.
WHAT DO I DO IF I SUSPECT WOODWORM IN MY VIOLIN?
The adult beetle itself causes very little damage to wood. But after mating, the female beetles will fly around in search of nearby wood to lay their eggs.
Therefore, if you notice signs of woodworm in your violin, there's a risk that if the infestation remains untreated, that it could spread to other instruments and furniture.
For this reason, it's strongly recommended to get advice immediately from an experienced luthier, as soon as you suspect woodworm in your violin!
Additional research by Jake Ryan of Wise Property Care
Additional violin images courtesy of Bridgewood & Neitzert, London
One of the most important skills any violinist can have is knowing how to practise! This one single skill can transform your progress, because if you always know how to improve then you'll always be getting better and better!
A big part of knowing how to practise is being able to create a useful structure for each practice session that you do. A good structure should be a simple, solid framework that you can rely on to help you decide how to plan your time and what do do during that time.
But it should also be flexible. No one should ever dogmatically add things to their violin practice simply because they think it's 'the right thing to do' or 'because my teacher told me to'.
Instead, you need to be creative and switch around the tasks that you do from day to day, week to week -- according to what will help you get closer to your goals... faster AND better!
![]()
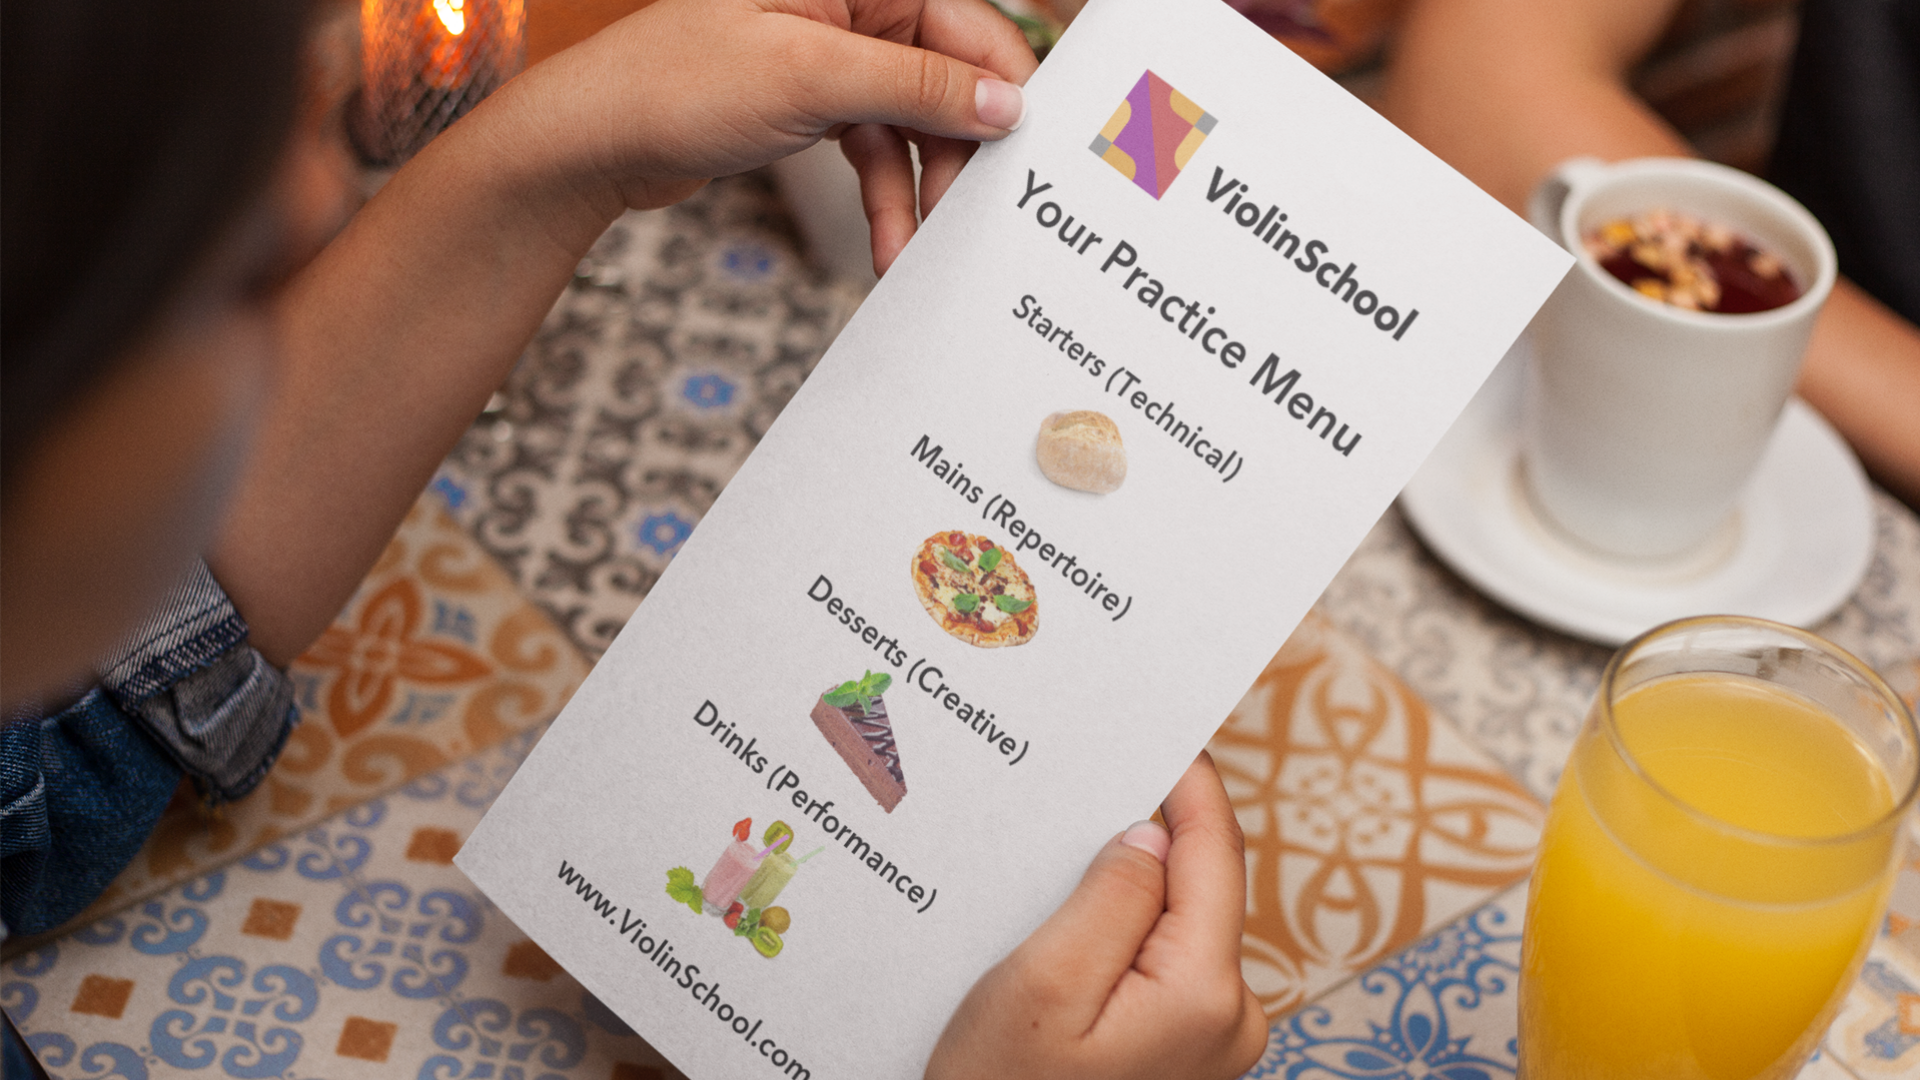
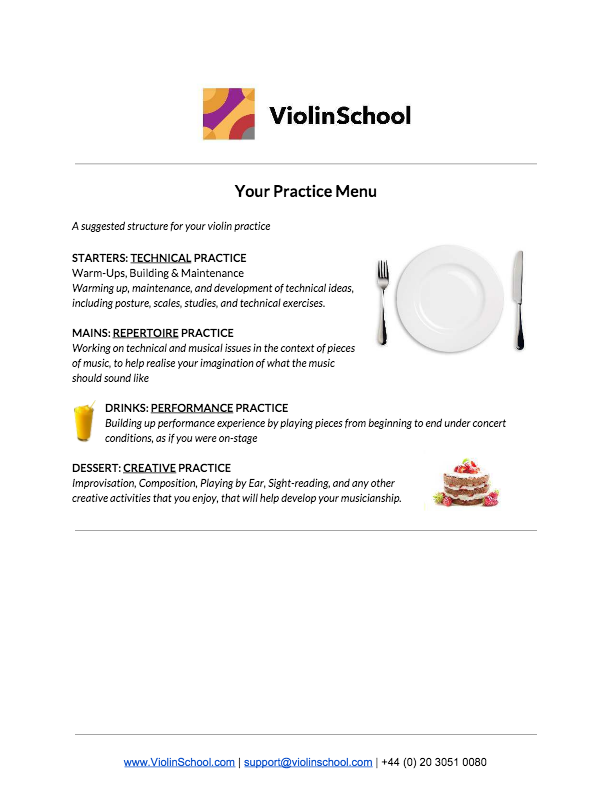
One of our favourite analogies for this is The Practice Menu. Think about how a restaurant would compartmentalise their menu according to different types of food.
It's necessary, isn't it? If the chocolate cake was next to the vegetable tart which was nestling between the coffee which was next to the soup... well, you'd just end up confused!
You need a structure that makes sense. And just like with food, where there can be infinite recipes and dishes - just as there are infinite variations in technical exercises and pieces of music for the violin - there are some useful guidelines that are broadly correct whoever and wherever you are.
In most restaurants you'll start with savoury starters and mains, some with sides. A sweet dessert will usually follow the main course.
Drinks will often be available on a separate menu, or at least in a clearly marked section. It's clear, it's organised, and it's easy to choose what you'd like.
In your violin practice, try following a similar structure.
First begin with the STARTERS - the TECHNICAL part of your practice.
This is where you get your warm-ups done, but it's also a time for building your technique (for example, practising new techniques that you haven't mastered before) and maintaining (making sure that everything you already know is in really good shape).
Then you can move on to the MAIN COURSE - the REPERTOIRE - i.e. the pieces of music you play.
This is usually the biggest part of your practice. What you're looking to do in this part of your practice is to analyse and improve the technical and musical issues that will make a big impact on how you play each piece.

When you're having a meal, don't forget the DRINKS! In our analogy, that's the equivalent of performing.
Your performance practice is absolutely critical if you're going to get used to playing to other people, but you'd be surprised how often people forget about performance practice entirely. It's also a learnable skill, so with the right training you can eliminate performance anxiety completely.
Finally, don't forget to reward yourself with some DESSERTS! Whether it's composition (creating your own music), improvisation (creating music by playing it in real time!), sight-reading, music theory or any other musical topic that improves your overall musical experience, make sure you leave time for creative activities that will expand your general musicianship!
Being really creative in your practice is a great way to stay motivated and make sure that you're always excited about your playing.
[wcm_nonmember]In ViolinSchool's online learning programs, we go into great detail about how to approach practice, and to create a structure to your practice time that gets you great results. Our online courses include the How to Practise training and a section dedicated to useful practice resources.If you'd like to give your practice a boost then check out the benefits of ViolinSchool Membership to see how we can help you to transform your violin playing! We'll also help you to review your learning and put together a personalised practice plan for you when you join![/wcm_nonmember] [wcm_restrict]As part of your ViolinSchool membership, we can help you to plan your practice with a personalised practice plan (if you haven't already done this, email [email protected] and we'll get you started on this straight away).
Download the 'practice menu' sheet below - we recommend printing this out and keeping it in the place where you do most of your practice, so that you're keeping the structure of your practice front of mind! [/wcm_restrict]
New - 'Playalong' video for First Things First
We've updated this piece, which you can find in Beginner Course A or in the Library, and added a playalong video!
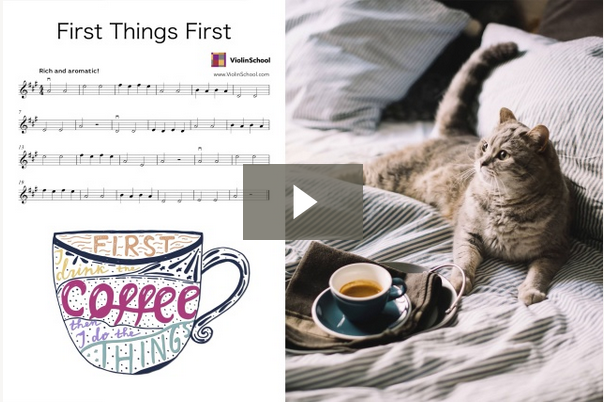
Try playing a long in time with the music and see if you can play everything clearly and in tune.
Make sure your hand is in the right place and then lift and drop the finger, landing a tone above the open string!
Here's the next in our series of Intonation Exercises from the ViolinSchool Library - one per week, for you to improve the accuracy of your left hand placement!
At Anchor: 'Anchor' your hand in the 3rd and 4th positions, then practise tuning the stopped notes in relation to the open strings.
At Anchor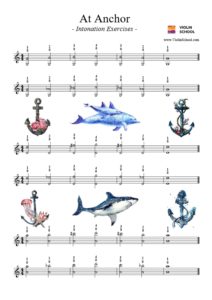 Click here to download it from the ViolinSchool Library!
(login required)
New in the Library... all Level 1 Music Theory is now live on the ViolinSchool Library for ViolinSchool members to download right now! Just click the 'Music Theory' button, or click directly here.
The full-colour 'Explainers' show you how all the most essential music theory works at a basic level. You'll find all the theoretical info you'll need to understand in order to play the violin well in 1st position, including:

Click here to explore all the Music Theory topics, or browse the Library to see the full range of sheet music, technical exercises, practice tools, workouts, and more!
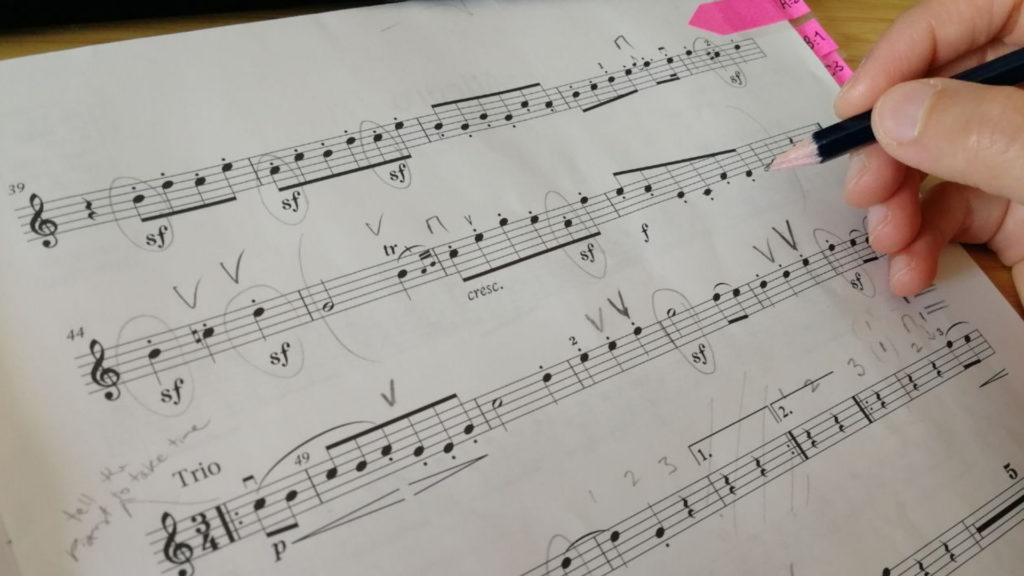
When we begin learning a piece of music, and find that it contains tough challenges, it's time to break down what's going on and understand the individual elements of each problem.

Complex music often requires complex violin technique. And in tricky passages, it's common to have several movements happening simultaneously in different parts of the body.
Every Element Should Be Strong
Each of these individual movements needs to be accurate and well-proportioned in order for the overall technique to work effectively, and for your playing to sound good.
If you're only vaguely aware of the different actions within each technical task, then you may end up overlooking important details.
So if you're struggling with a passage of music, it's a good idea to stop trying to do everything at once!
Instead, try this approach:
Step 1) Separate the Pitch, Rhythm and Physical movements
You can practise pitch, rhythm and specific violin techniques separately from one another to make sure everything is working as it should be. This simplifies the task and reduces cognitive load... which means you can give your full and undivided attention to one single element of what you need to work on!
Step 2) Train each element until you can do it instinctively
Once you're sure that everything is correct and precisely accurate, then repeat the activity carefully to drill it into your muscle memory. Start slow... it's more important to be right than to be fast! If you have time, come back to it a few minutes later in your practice, and repeat it a few more times.
Step 3) Put it back together... and TEST it!
Once you've mastered each of the different actions, put everything back together again at a slow speed, and see how it sounds! If there are still issues, go back to the element that needs further attention. Or if everything is working well, you can start to increase the speed.
But remember, at the beginning, you must...

Remember to play SLOWLY when you start practising! Even if you can play it fast, resist the temptation. A slow speed will give you much more time to think about the details, and it will help you drill the movements more quickly and deeply into your memory, too.
Practice Exercises
Here are a few exercises that you can use to break down a piece of music, so that you can practise the individual technical movements, before putting everything back together again:
SAY the words
If the piece is a song, and it comes with words, then try speaking the words out loud, to help you clarify the rhythms! Verbalising different note lengths helps you to get a good feeling for what the rhythms are.
CLAP the rhythms
If the piece you're learning doesn't have words, then this will probably be your first task! Clap the rhythm of the music to be sure you have got all the timings right, and that you have a steady pulse.
SING the words
If the piece has words, try singing them. This way you're practising the pitch and the rhythm together... but without the distraction of complicated violin technique.
SING the note names
If you should be playing an A, sing an A. If you should be playing a B, sing a B, and so on. Try to sing the notes in time (with exact rhythm).
If you're struggling to pitch the notes, slow it right down and work with a tuner or another reliable sound source, so that you can hear the pitch frequency that you're aiming for. Then you can try to match the pitch with your voice.
SING the numbers (fingers)
If you're not yet secure with your finger placements, try singing the notes of the piece in tune, but use 'D', 'D1', 'D2', 'D3' etc. (or G/A/E, depending on the string). This way you are associating the finger placement with the correct timing and pitch.
'Air Violin'
Act the up and down bow gestures (the bow direction) with your right arm. You don't need to hold the violin or the bow for this... although you can hold the bow if you like!
The important thing is to get used to the up and down bow motions and make sure the bow changes are happening in time, and to practise those movements without being distracted by the left hand and the violin.
Air Violin + singing or speaking
Combine some of the previous singing and speaking tasks with the 'air bow' motion. This will start to associate the up and down bowing motion with the rhythm and pitch changes.
Violin Only (no bow)
Place the left-hand fingers on the fingerboard in time with the rhythm. You can combine this with a speaking or singing exercise. Again, don't use the right (bow) arm - just focus exclusively on getting the left hand correct, without any other distractions.
Everything together
Finally, put all the movements back together!
You'll find that because you've spent a considerable amount of time on each individual movement, you will have 'drilled' your muscle memories really effectively.
So when you put all the movements back together again, everything will automatically synchronise more accurately ... even when your brain is busy thinking about the music!
*****
Next time you come across a challenge that seems overwhelming in your practice, then break the music down using these techniques.
When you finally put everything back together again, it will seem easier and more fluent, because your muscle movements will be more precisesly trained than they were before, and everything will feel more natural!
It's a funny name, but no... they're not some imaginary character from Children's TV!
"The Clappits", as they're affectionally known here at ViolinSchool towers, are in fact superb new RHYTHM EXERCISES that will help anyone to get their pulse and their rhythm sorted... pronto!
The 'Clap It' exercises aren't just for beginners - though if you're starting out, we recommend just following along with a metronome or the video playback, and trying to clap the rhythms in time.
More advanced players can combine rhythm and pulse exercises with different speeds to build up the precision of their rhythmic skills.
Here's Clap It! No.1 (free for everyone... and there are 6 more in the members area of the library too!):
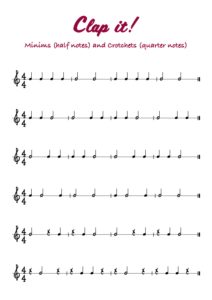 (free login required - signup here)

Create your own Clapping & Rhythm Exercises
Using exercises like the Clap Its, you can build up rhythmic precision by layering more and more complex rhythms and speeds, whilst keeping your pulse really strong and secure.
Here are a few ideas to get you started...
Pulse in the Feet, Rhythm in the Hands
Get a good strong pulse going in your feet... you can either tap one foot (but don't forget to switch feet when you get tired!), or you can walk ... Left - Right - Left - Right, like a soldier marching!
Remember to use a Metronome to keep you steady and well in time...
Then, add the rhythm in your hands!
If necessary, slow everything down to find a speed where you can keep the rhythm and the pulse going together... but whatever you do, keep the pulse steady!
Speak the Rhythm, Clap the Pulse
Get an even beat going with your hands (clap - clap - clap - clap), then try SPEAKING the beats.
Say 'crotchet' or 'minim' at the beginning of each note. Or if you prefer the syllables to match the length of the note, try saying the word 'one' on each crotchet (quarter note), and 'one ... two' on each minim.
'Air bow' Exercises
Combine the speaking and foot-tapping exercises with the 'Air bow' ... i.e. the physical up-and-down bowing gestures. The more precise you can be with your speaking or singing whilst you also act the rhythm with the bow hand, the deeper your instinctive 'feel' for the rhythm will become.
All the time, be aware of the pulse. It's the heartbeat of the music! If your rhythms don't fit within the regular beat, then they're not right.
We strongly recommend using a metronome to help you stay in time with the beat... or use the Clap It videos that you'll find on each page.
See all the Clap It Exercises here in the ViolinSchool Library!
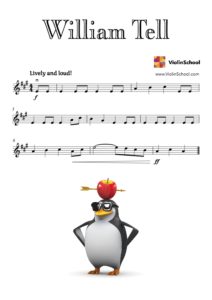
Here's a new Beginner piece we've just added to the ViolinSchool Library... the famous William Tell overture! You can download it (free login required!) from the ViolinSchool library... just click here:
Legend has it that Tell, a Swiss marksman from the 1300s, was able to shoot an arrow into an apple on his son's head... at 80 paces!
The story of William Tell was made into an play by Friedrich Schiller, and then into an opera by Gioacchino Rossini.
The final theme from the opera's Overture has become one of the most famous pieces of classical orchestral music. Listen to it here, performed by the Milwaukee Symphony Orchestra:
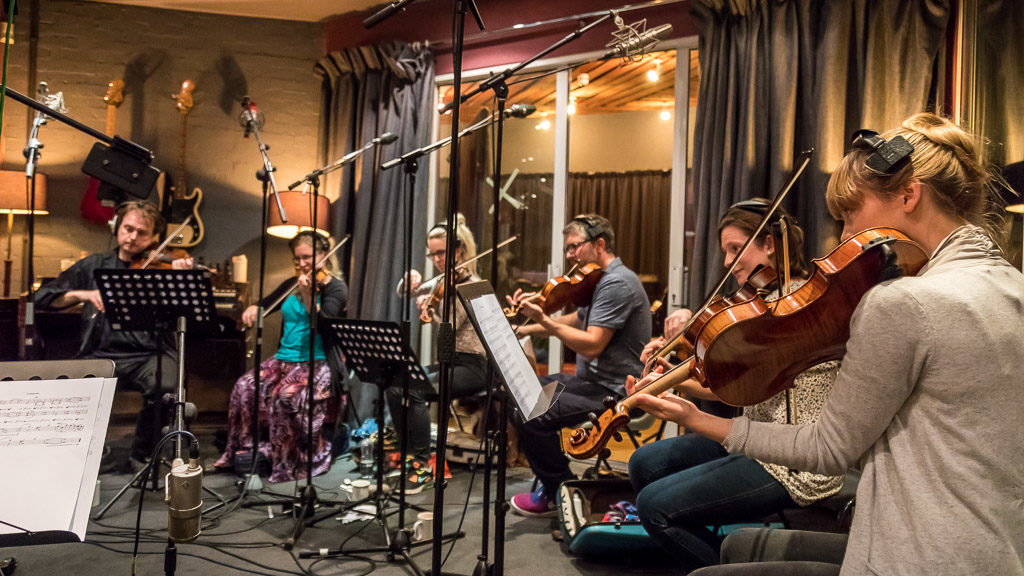
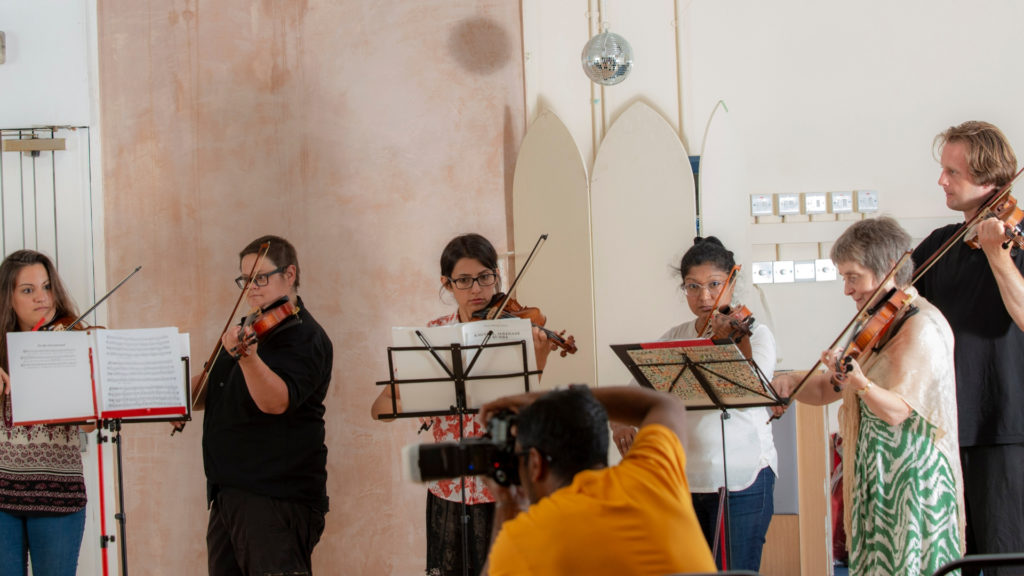
Here's a new video from the most recent VIOLIN ORCHESTRA concert in London. The Violin Orchestra plays Rondeau from Abdelazer by Henry Purcell, arranged by ViolinSchool's David Worswick.
Filmed at St John's Waterloo in London, on Saturday 8th December 2018.
Would you like to join the Summer 2019 Violin Orchestra in London? We welcome violinists of every age and level, from first-time players who are just playing in first position, through to intermediate and advanced levels.
Booking for the Violin Orchestra is now open online - click here for full information and to register today!
'Sight-Reading' music is the process of playing something whilst you're looking at it for the very first time.
When you sight-read, you have to play the music as accurately and expressively as you can - even though you've never seen it before!
Sight-Reading Is Like Reading Aloud

Sight-reading music is a bit like reading aloud from a book.
Imagine you’re reading a story to somebody. You have to phrase the sentences in a way that makes sense, pronounce complicated words correctly, look ahead to see what's coming up next, and breathe in the right places.
But at least there’s no real ‘technique’ to worry about. People won't mind if you stumble over your words from time to time!
However, sight-reading music can be a bit more of a challenge. There's more to do physically when you're playing the violin, and there's a lot to take in from the music notation.
If you're playing at speed, there's not much time to do it, either!
Violinists often have to sight-read music when playing with other people, so you need to develop the skill to be able to play the right thing at the right moment, as other musicians may be depending on you.
For this, it's important to develop confidence in your sight-reading ability, just as much as in your violin technique.
If you're not a confident sight-reader, the sight of a new, unknown piece of music can make your brain freeze!
This happens because we feel overwhelmed by the amount of new information in front of us, so we forget about all the important technical and musical skills that we need to make the music come alive.
Other issues, such as dyslexia or poor eyesight can make you feel unenthusiastic about having to sightread, but...
Don't worry! ... whatever your age and experience level, you can always improve your sight-reading. You can learn to become a confident sight-reader.
In future features in this series, we'll be showing you practice techniques and approaches that will help you to practise your sight-reading... and to keep making it better and better!
Why Sight-Read?
Sight-reading is a really important skill, and the ability to sight-read fluently is a crucial part of your training as a violinist. It's useful for everyone - from beginners playing together for fun, right through to professional session musicians working in recording studios.
People often forget to practise sight-reading, or ignore it because they think it's just something you just have to do for violin exams! But it's a far more useful skill than that.
By learning to sight-read well, you can learn pieces more quickly, and you'll enjoy playing in orchestras and ensembles much more, because you'll have more confidence.
If you never include sight-reading exercises in your violin practice, the skill will remain undeveloped, even whilst other aspects of your playing get better. This isn't a good situation, because the longer you avoid learning the skill, the bigger an obstacle it will seem to be.
Learning new music becomes significantly easier when you can sight-read well. You can scope out a piece of violin music by sight-reading it through once, before you start to practise it. This will give you a sense of the overall structure and style, so you'll have a better idea of what you're aiming for when you start doing detailed technical work.
Highly developed sight-reading skills can also help to create opportunities for you to play in musical ensembles. It's much easier to get to know other musicians and to try out different types of ensemble playing when you can read through lots of music quickly!
Being good at sight-reading makes you a more versatile perfomer. You'll be able to assimilate new music and diverse styles very quickly, and play with minimal rehearsal time.
At our London school, we run events and ensemble sessions throughout the year, where violinists get together and play through new pieces of music.
Players develop a high level of fluency in their sight-reading, by building up their ensemble playing experience, and reading through as much new music as possible.
An Integral Skill For Good Violin Playing
A common problem with sight-reading is that people think of it as being separate from other musical skills, and from general musicianship. But if you don't approach sight-reading holistically as an integrated part of your approach to violin playing, it'll be much harder to play new music with other people.
But it doesn't need to be that way! Sight-reading is fundamentally just the skill of reading music, but applied to movement and sound in real time. It's a learnable skill, and the more you do it, the better you'll become.
Once you really understand the elements of sight-reading as a skill, and train yourself on each of those elements using good quality sight-reading exercises, you'll start to see massive progress in your ability to read music at sight.
And most importantly, you'll feel free to enjoy playing music - even if you're only seeing it for the very first time!

This is the first in a series of articles exploring Violin Sight-Reading... stay tuned to the ViolinSchool.com Blog for the rest of the series!
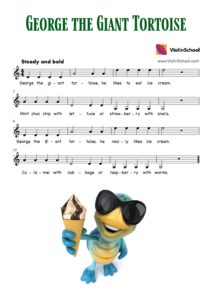
One of the loveable characters in our early stage tuition is the cool, ice-cream-loving tortoise George!
A connoisseur of ice cream, George is known to enjoy a wide variety of flavours. He tells us that snails work particularly well with strawberry, whereas a nice juicy topping of worms will make a raspberry cone come alive...!
George recently had his sheet music upgraded, and a great new playalong added too! So plug him into your earphones, and try playing along with the accompaniment!
We also strongly recommend singing along with George's song, to help you pitch the notes accurately. If you can sing it in tune, you're much more likely to play it in tune!
Have fun, and watch out for those snails and worms!
p.s. ViolinSchool Members can download George's sheet music from this page in the ViolinSchool Library, and our favourite tortoise will soon be making an appearance in the Beginner Violin Course as well!
p.p.s. for any tortoises reading, please note that ViolinSchool does not endorse a non-vegetarian diet.
 I taught a lesson today to a very experienced folk fiddler who could to play at a reasonably advanced level.
He could read music, albeit a bit unsteadily, so I initially assumed he knew the key signatures and other musical theory too.
But as a teacher, it’s good practise to check a learner’s knowledge by asking them to explain a topic back to you, just to be completely sure they understand.
And when I did this, I found that the fiddler struggled to explain what a key signature was, let alone how scale patterns worked.
On the one hand it’s testament to someone’s musicianship, creativity and listening skills that they can reach a high level of playing with almost no theoretical knowledge!
But on the other, it’s a massive shame not to have the clarity and confidence that comes from being able to communicate what you’re doing visually and conceptually through sheet music.
 Once you commit music to paper - even if it’s just chord symbols or the melody of a tune, you are committing to a clear structure.
(This is an inherent part of the ‘classical’ styles, which is why it’s much more common for folk players to have this problem - though sometimes ‘classical’ players have the opposite issue of becoming far too dependent on Sheet music, but that’s another story!)
That commitment gives you a clear understanding of exactly what you’re doing, and allows you to communicate more clearly with other musicians too.
This saves time and will generally get you a better, quicker result - especially when you’re playing a piece of music for the first time.
In the lesson with the folk fiddler, I put several of the new materials from our new Violin Course A in front of him.
 We talked through some of the ‘explainers’, reviewing concepts like sharps, flats and key signatures.
As if like magic, the previously baffling sheet music symbols all started to make sense, and before long, we were romping through scale patterns in all sorts of exotic keys!
Most importantly, by the end of the session, the learner had begun to develop a newfound confidence in music notation, that immediately affected the quality of his playing.
**
If you’ve been playing violin for a while but you’re not yet fully confident with music theory, then you might also wish to check out the learning resources in our new Online Beginner Violin Course.
If you just want to download and review the lessons, then you can access everything just with a ViolinSchool Membership (sign up here).
Or for a more personalised experience, including weekly assignments, coaching and support, and certification, then pre-enroll for the first Online Edition of the course today! (Deadline 1st July; Course completion deadline 31st August)
Many of the most frequently asked questions we get asked by first-time violin learners are about Music Theory, or 'note-reading'. And some of the most confusing topics are around musical KEYS.
So what is a key signature? This 'Explainer' from our new Online Beginner Violin Course will tell you...
[pdf-embedder url="https://www.violinschool.com/wp-content/uploads/Library/Sheet-Music/Key-Signature-ViolinSchool-1.0.0.pdf" title="Key Signature - ViolinSchool - 1"]
Download it from the ViolinSchool Library!
(free login required)
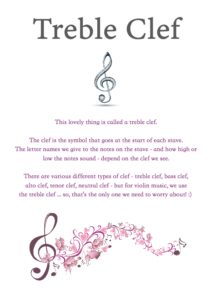
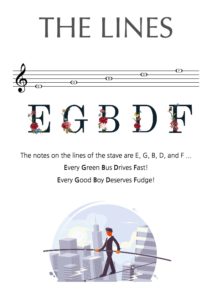
A key signature is the group of sharp or flat signs written at the beginning of each stave.
The positions of the sharp (#) or flat (b) signs tell us which notes need to be sharpened (raised by a semitone) or flattened (lowered by a semitone).
So, if there's an F# in the key signature, then all Fs are made into F#s! ... if there's a Bb in the signature, then all Bs are made into Bbs!
It's the key signature that tells us which 'key' the music is in ... ... and also saves a helluva lot of ink!
Which key am I in?
Depending on the number of sharps and flats in the key signature, you can work out which key you are in, and therefore which notes you need to play.
Here's a useful list of key signatures, to help you work out which key you're playing in!
[pdf-embedder url="https://www.violinschool.com/wp-content/uploads/Library/Sheet-Music/THE-KEYS-ViolinSchool-1.0.0.pdf" title="THE KEYS - ViolinSchool - 1"]
Download it from the ViolinSchool Library!
(free login required)[wcm_nonmember]
Would you like to download and print all our 'explainers'?
Become a member of ViolinSchool today and access thousands of learning resources, including our online courses and video instructionals, and a library of sheet music, technical exercises, explainers, checklists, practice tools, and much much more![/wcm_nonmember]
In our new Online Course A for Beginner Violinists, we've integrated music theory tuition into the course, so as you pass through the sequence of lessons about how to play violin, you'll learn music theory too.
Or if you already read music, you'll find the music theory modules a really useful and fun way to revise your existing music-reading knowledge... and translate it to the violin!
It’s official... we’ll be launching a completely new Online Beginner Violin Course on 30th May!
Registration opens today, and you can read all about it here:
https://www.violinschool.com/beginner-violin-course/
 It's taken a while to get our online courses right, but we believe this course - with over 150 lessons, including video instructionals, explainers, exercises, playalongs, sheet music, and more, will be one of the most comprehensive violin courses ever designed!
It’s also entirely online, so you can learn from anywhere.
Everything is ‘action-focused’, so the course is all about learning by doing. There’s a ‘full enrolment’ option for learners who want comprehensive support and a certification, or if you already have a local teacher, then VS Member access starts from just $19/month.
There are just 30 ‘full enrolment’ places available for the Summer Term, so take a look at the course and let us know if you have any questions, or sign up today at:
https://www.violinschool.com/beginner-violin-course/
https://violinschool-1.wistia.com/medias/5e583bbx5c
Can you survive the 10 Beat Challenge? It's a great exercise for warming up your bowing action, and for making clear and consistent sounds on whole bows. As well as improving your bow control, it will help to get the instrument really ringing and resonating.
Good bow division and bow distribution are essential for this exercise. You’ll need to pace the amount of bow that you’re using, so you’re always at the right speed for each stroke.
Download it!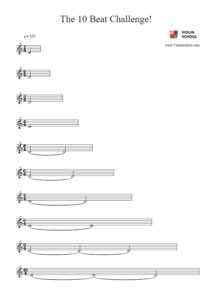
(login required)
Here's the next in our series of Intonation Exercises from the ViolinSchool Library - one per week, for you to improve the accuracy of your left hand placement!
Double Take: Play an open string whilst stopping notes in 1st Position. Work out the name of each interval, then compare the stopped note to the open string to make sure it is in tune.
Double Take
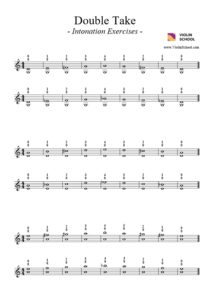
Click here to download it from the ViolinSchool Library!
(login required)
When you first start working on a piece of music, the most important priorities can seem quite clear. Maybe there are obvious technical problems that you know you need to fix, or tricky passages which demand extra attention.
Issues like these are reasonably straightforward to diagnose, and fix. So far, so straightforward.
But then there comes a point when you've sorted out all the obvious things. Everything is sounding OK. But you're unsure exactly what you need to do next.
So what do you do?
At this point it's easy to slip into 'mindless' playing, and play through your piece a few times, without stopping and making anything better.
But that's not practice! That's just playing it through!
What should I do instead?
To make your practise efficient and effective, you need to be mindful about what you're trying to achieve. Look for clear improvements, prioritise the most important tasks, and don't play the same passages of music repeatedly unless you're clear about why you're doing so.
True, that's easier said than done... particularly if you're tired, or losing concentration!
What do you do when you don't know what to do next?
How do you know what to prioritise?
The good news is that when you're learning a piece of music, there are a few simple concepts that you can use to focus your mind on what's most important, right now.
Be Clear About The Musical Fundamentals
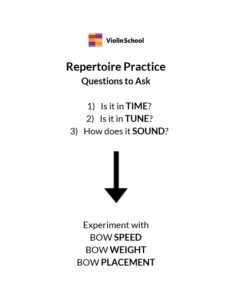
As ever, we want to start by thinking about how we want the music to sound, and then work backwards to determine our technical decisions. The most fundamental elements of music that we need to consider are timing and pitch.
It's not just a matter of playing just 'in time' or 'in tune'. Once we know we're playing roughly the right thing in the right place at the right time, we can increase the level of detail that we operate at in each of these areas.
Therefore, the better we become, the more these musical elements become crucial to our expression as well.
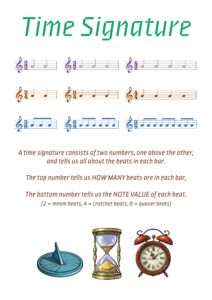
Time
The timing of a piece can include the tempo (how fast or how slow the piece is), the rhythm (how long and short the notes are), and the pulse (the regular beat of the music).
All of these areas can change as we play a piece of music, and the precision of our timing will affect how the emotion of the music is communicated to our listeners.
Pitch
When you're working on your tuning (intonation), getting the notes 'in time' and 'in tune' is definitely a key priority!
But once that's done, there are many more layers of detail you can consider, in order to make sure your pitch is as effective as it can be for communicating the musical expression effectively.
For example, understanding the harmony of a piece that you're working on, and the key that it's written in, will give you a clearer sense of the emotional resonance that the music is capable of creating.
You can then delve into advanced topics such as expressive intonation and think about the subtle ways in which you can alter the pitch to create an even more compelling and interesting interpretation.
Sound
As we change the balance of the fundamental bow movements - speed, weight and placement - we are able to access an infinite number of different types of sound.
So once you've got a piece of music to a basic level of being 'in tune' and 'in time', then a lot of your practice time will be spent on trying out different combinations of bow strokes, to work out what's most appropriate for the music you're playing.
This is in many ways a never-ending process... there's no limit to the number of bow strokes to choose from, and many different ways to interpret a piece of music!
Ever Higher Levels Of Detail
Because Time, Pitch and Sound (types of bow stroke) offer an infinite number of combinations, you'll find that if you listen deeply to what you are doing - and use your musical imagination to create a clear vision for how you want to play - then you'll soon find that the feeling 'I don't know what to practise now...' becomes less and less frequent.
You'll have so many interesting technical options to choose from, and so many different sounds to experiment with, that there'll always be something interesting to focus your attention!
When to Move On
With this heightened awareness comes the risk of the opposite problem... you're listening in so much detail, and discovering so many possible options for your musical interpretation, that you feel you can never move on... analysis paralysis!
To get around this, it's crucial to have a clear vision of what you want your audience to experience when you are playing a piece of music.
Once you have this, you can make it a priority to ensure that the basic timing, tuning and sound (tone production, phrasing) are adequate for the whole piece.
Then, if you have more time, you can review the entire piece of music again at a higher level of detail. The important thing is to keep moving through the music, raising the level of what you're doing across the whole piece - not just getting stuck on one section!
Repertoire Practice Questions
To remind you of these musical fundamentals when you are practising, here is a short, printable list of 'Repertoire Questions' to get you thinking - at any level of detail!
 Click to Download!
(free login required)
To play this happy piece, you’ll only need your first finger! Make sure it’s always landing in tune, exactly a tone (two semitones) above the open string.
Download it from the ViolinSchool Library:
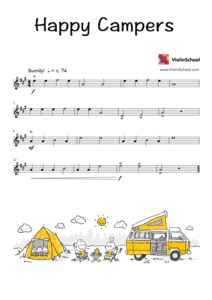 Click here to Download It!
(membership required)