
For this lovely, lilting piece, you’ll only need the second finger of the left hand. Each time, it should land at the interval of a major 3rd above the open string.
Download it from the ViolinSchool Library:
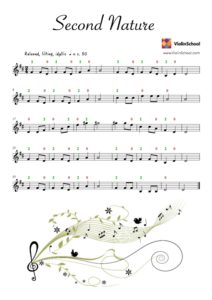 Click here to Download It!
(membership required)
Here's the next in our series of Intonation Exercises from the ViolinSchool Library - one per week, for you to improve the accuracy of your left hand placement!
In Pitch Perfect, you need to move the same finger from the same place on one string to the same place on the next (and the next, and the next!), to create a series of Perfect Fifth intervals.
Pitch Perfect
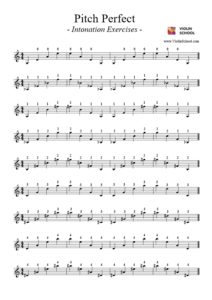
Click here to download it from the ViolinSchool Library!
(login required)
This gorgeous Scottish folk song is several hundred years old, and it's been passed down the generations with good reason... it's a gorgeous piece of music!
Today it's well known around the world, from recordings that have been made by artists in many different styles.
We've added a new MIDI playback, so you can practise playing the piece whilst listening to the music.
Play and Download it from the ViolinSchool Library:
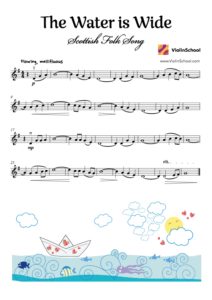 Click here to Download It!
(membership required)
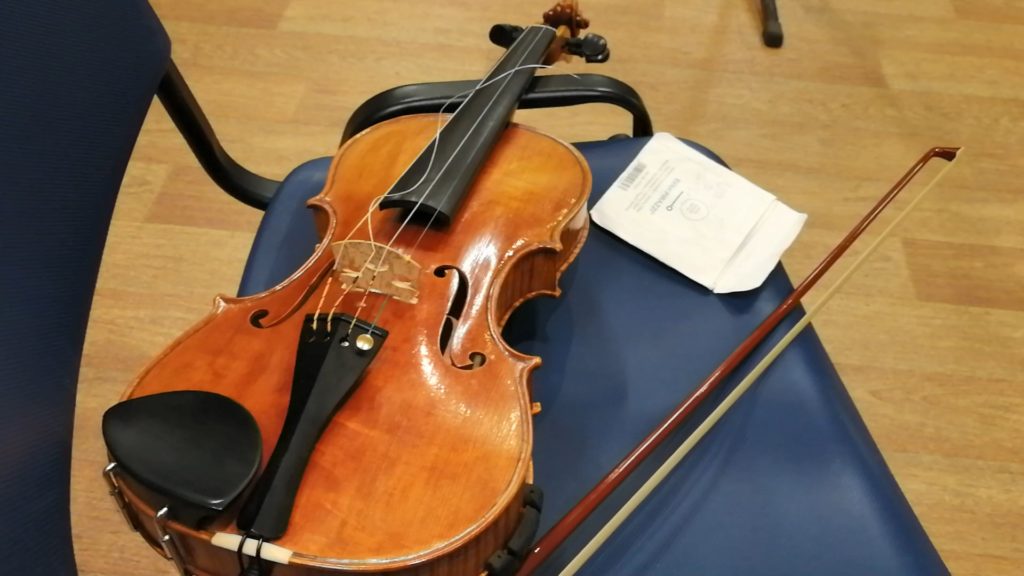
A comprehensive, step by step guide to changing a violin string safely, securely and efficently … and so that it stays in tune!
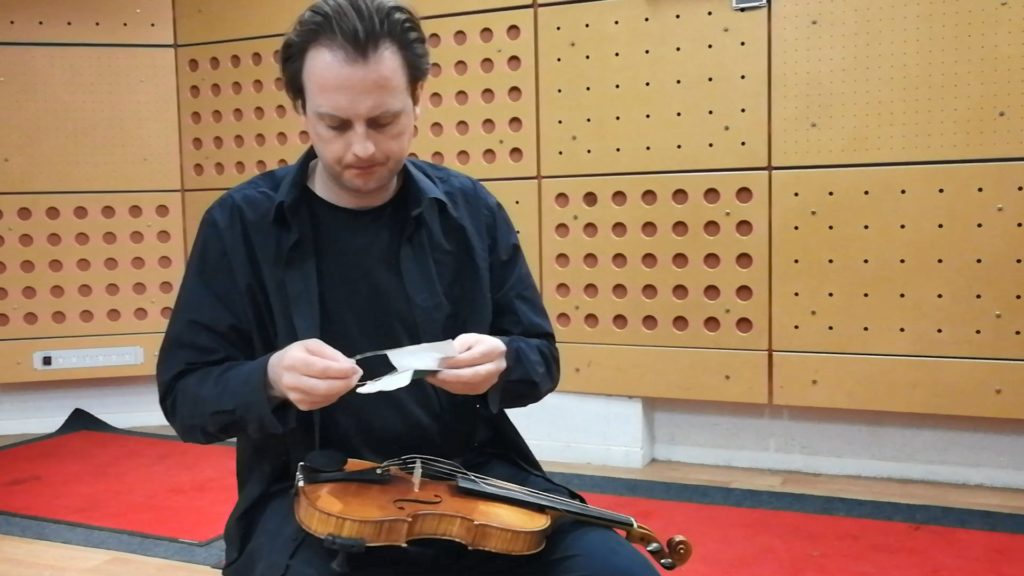
Changing the string of a violin doesn't need to be daunting!
Let's take a look at how to remove an old string and replace it with a new one.
We'll carefully consider all the steps of the process, so that you can avoid the string snapping, slipping out of place, or causing any other problems!
It's best to change violin strings one at a time so that you don't disturb the setup of the bridge.
Remember that the bridge - and the soundpost inside the violin - are only held in place by the tension of the strings.
This means that if you remove more than one string at the same time, the bridge can become unstable.
We're going to assume that you already have a replacement string, ready to use!

Remember that the type of string can greatly affect the sound of the violin.
You may wish to experiment with different types of string and see which brand works for you.
Strings can break for a variety of reasons, and sometimes with no warning.
So it's a good idea to have a set of spare strings with you at all times in your violin case.
This will allow you to replace the string, and keep playing… without having to trek to a violin shop or wait for an online order to arrive!
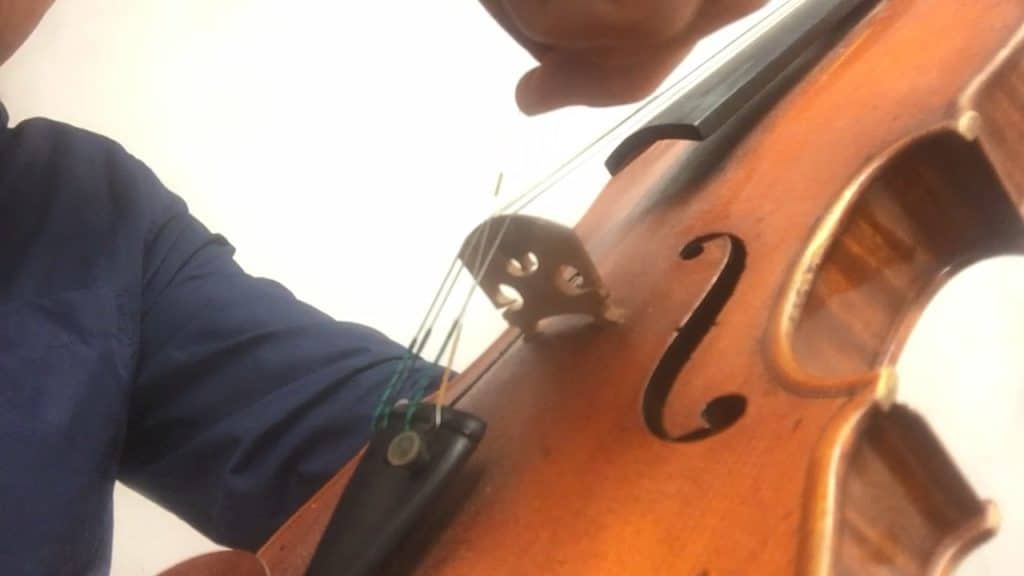
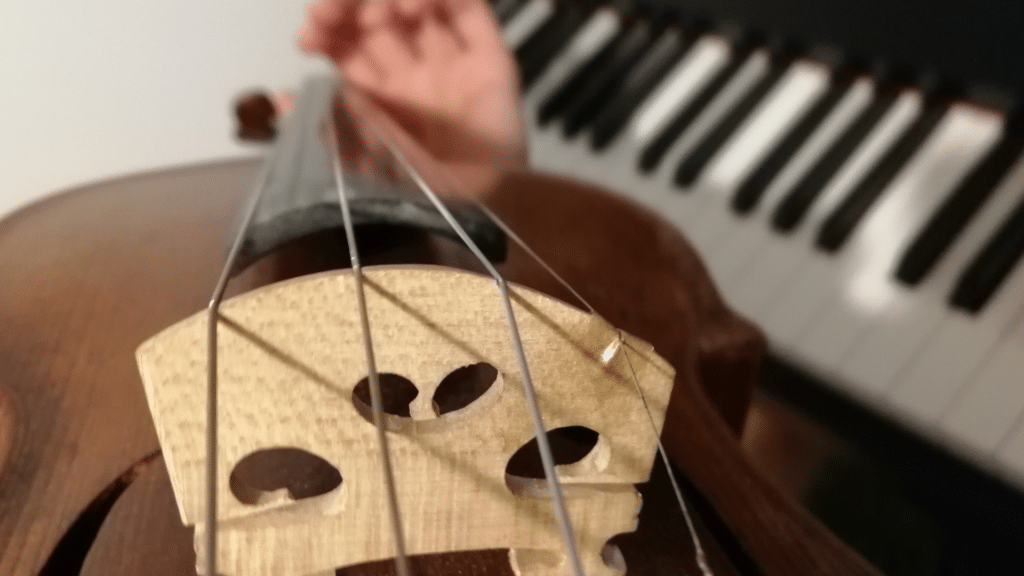
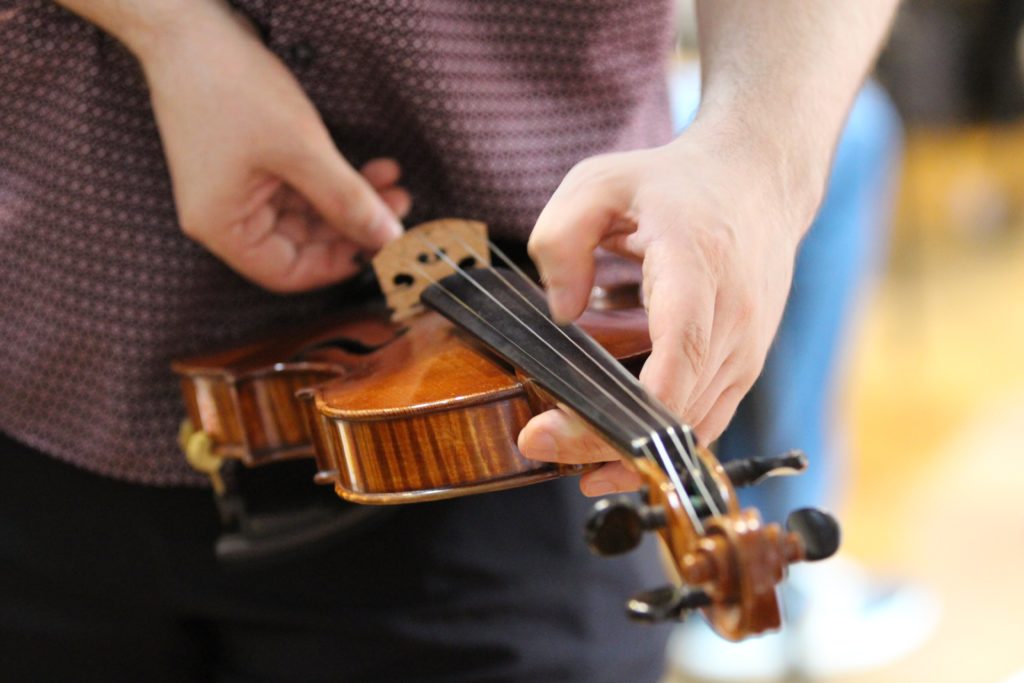
First, place the violin in a secure position, such as on your lap. It's important to make sure that the instrument doesn't slip out of place when you're changing a string.
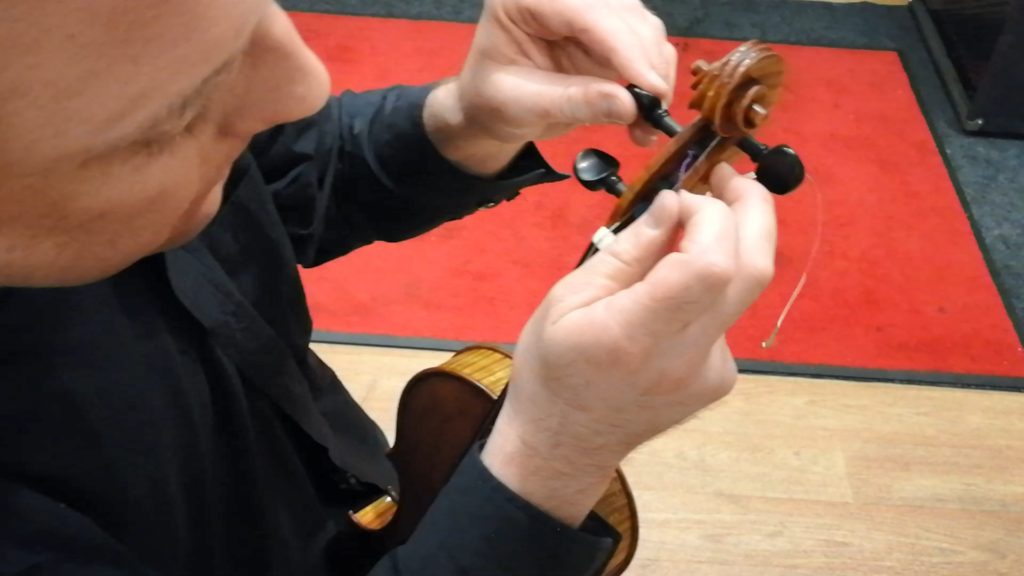
Firstly, remove the old string. You'll need to gently unwind the peg so that the string is loosened.
Keep turning until the top end of the string pops out of the hole in the peg, then you can simply pull it away from the violin.
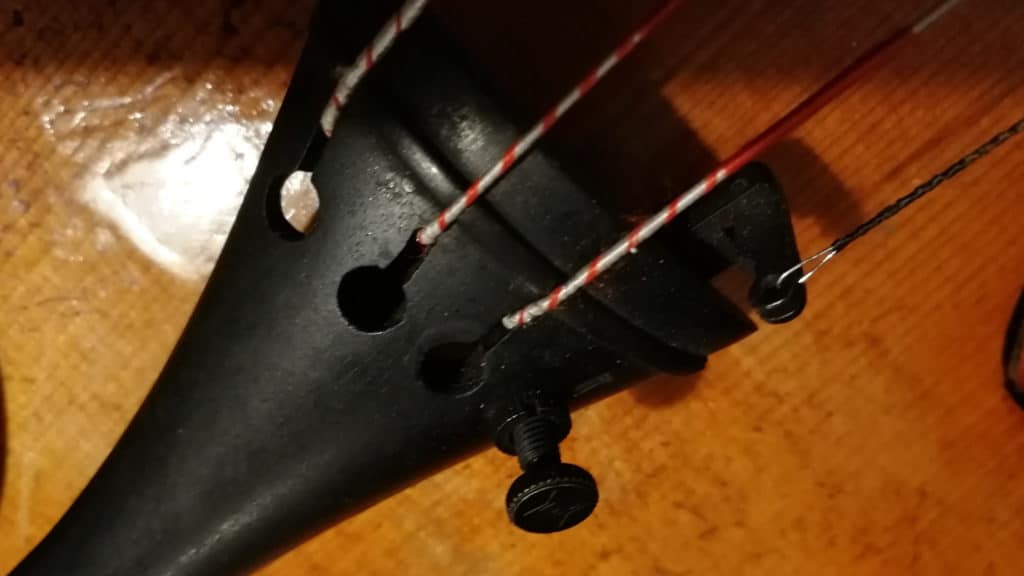
Then detach the other end of the string from the violin's tailpiece. Some strings have a 'ball end', which means there's a small ball in the loop at the bottom end of the string.
To help this type of string out of the hole in the tailpiece, you may need to wiggle it a bit before it comes loose!
Other strings have a 'loop end', which is exactly the same but without the ball - so the bottom end of the string simply forms an empty loop.
This type of string can be easily secured or removed by placing the loop on or off the hook that you'll find on the fine tuner.
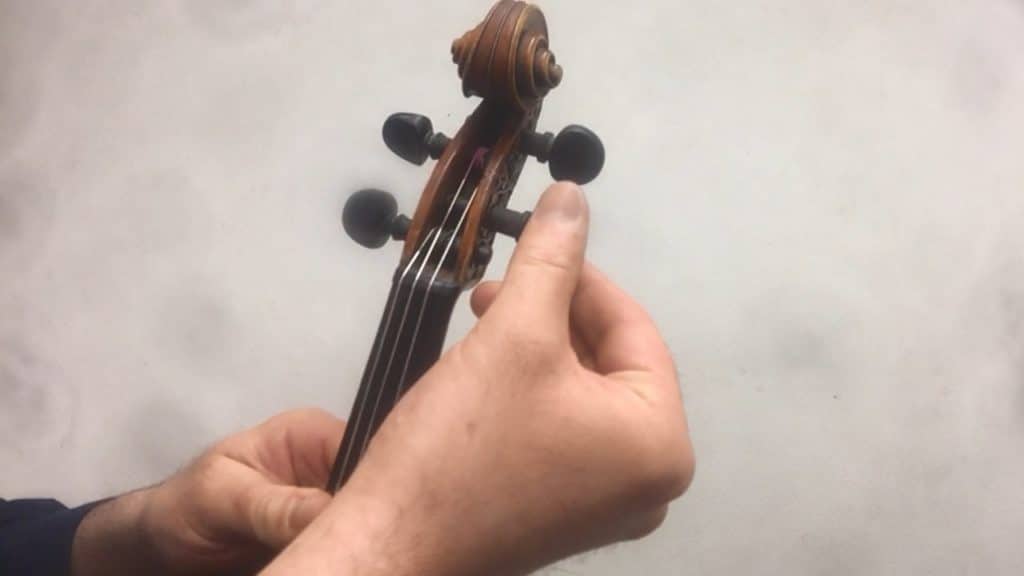
Before starting the string replacement, you should check the condition of the peg to make sure it will be smooth and secure when you put the new string in.
Make sure that the peg is clean. If not, the pegs can stick and squeak, and they won't turn smoothly!
If you've taken the peg out of the pegbox, put it back in, but only halfway. Or if you didn't take the peg out, then pull it out of the hole just a little bit.
The aim is to make sure that the hole in the middle of the peg is visible and accessible, so that we can put the end of the string through the hole.

Make sure that the hole is not on the wrong side of any of the other strings.
If you start to thread the string through the peg when the hole is on the 'wrong' side of another string, you might end up with the strings crossing each other in the pegbox.
This doesn't work, as it can compromise the pitch and tone quality, as well as making the strings unstable.
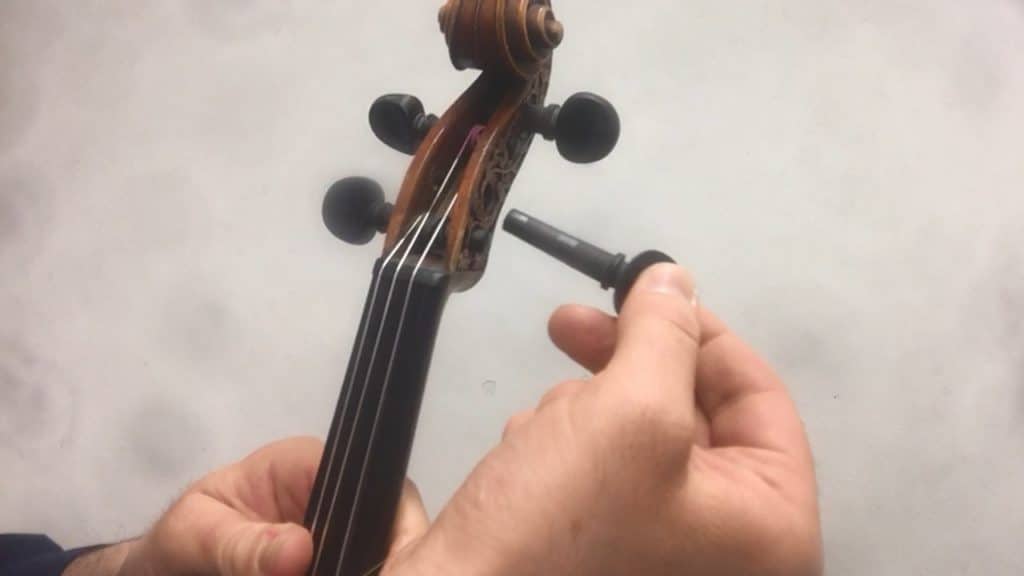
Once the hole in the peg is facing you, thread the end of the new string through the hole.
The string will poke out a tiny bit on the other side of the peg.
If you push it all the way in, you can usually feel the end of the string hit the back of the pegbox, so you know you've gone far enough.
Once the string is poking out from the other side of the hole, you'll need to turn the peg a few times to secure the string in place.
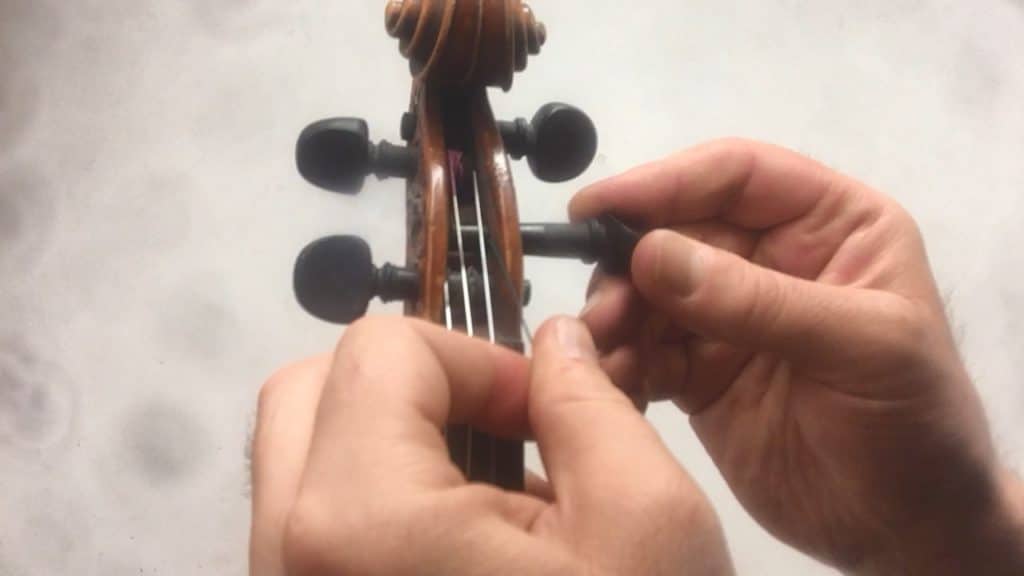
Make sure to turn the peg AWAY from you, not towards you, so that tension is held on the upper side of the peg. This way round, the top portion is angled more in line with the rest of the string, which reduces wear and tear.
As you turn the peg, you can use an adjacent string to guide you as you wind the string. The aim is to keep the string in a tidy coil as it winds onto the peg.
Once the top end of the string is well-coiled, you'll start to reach the end of the coloured wrapping at the top of the string.
At this point it's necessary to push the peg in, towards the pegbox, so that it is secure and there is enough friction between the peg and the hole of the pegbox.
This friction is very important… it's what holds the peg in place!
Once most of the coloured covered part of the string has been wound around the peg, hold everything in place with your weakest hand.
With your strongest hand (so, your right hand if you are right handed), reach for the other end of the string.
If your string has a 'loop' end, loop it onto the hook just above the fine tuner.
If your string has a 'ball' end, insert it into the hole in the tailpiece, and make sure that it's secure.
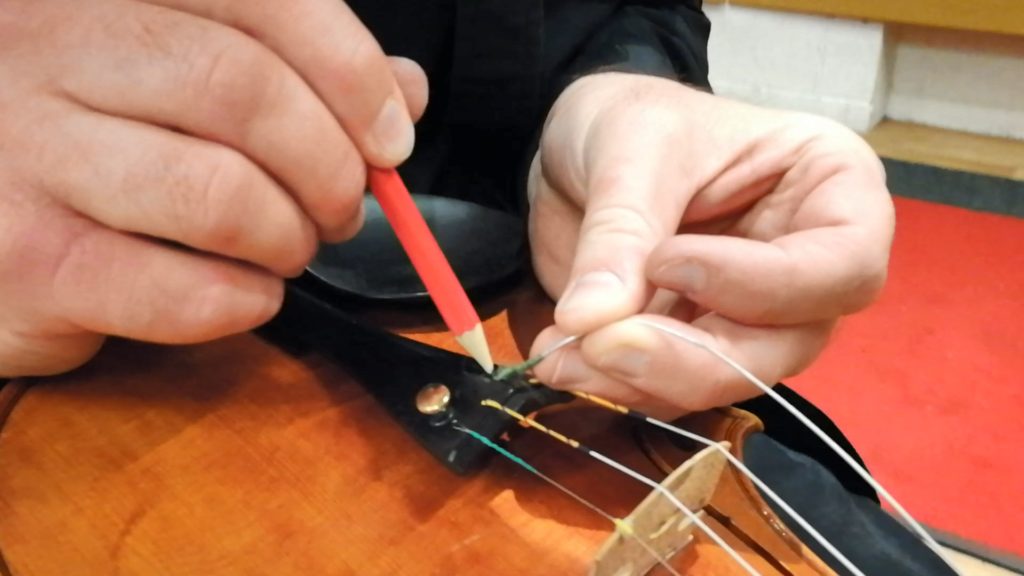
Sometimes it can be hard to insert the 'ball end' of a string into the tailpiece hole.
So if you need to, use a pointed object, such as a sharp pencil, to help push the ball downwards.
But if you do this, be really careful not to slip, as you could easily damage the varnish of the violin!
Once the bottom end of the string is securely attached, hold the string tense, so that both ends remain secure.
Your other hand should still be holding the peg firmly in place, because if you let go now, the string will uncoil, and you'll have to start all over again!

Without releasing the tension in the string, move your hand slowly back up towards the top of the violin, until both hands are within reach of the pegs.
Start to wind the peg slowly away from you, until the string is no longer loose, but not yet fully tightened.
Once there is enough tension in the main area of the string, you'll be able to let go of the string, and it will stay in place.
Once you've done this a few times, experience will tell you when the string is tight enough that you can let go of the string and it will stay in place!
Until then, you'll need to assess it visually and by feeling it. If the string is tight enough between the nut and the bridge, you will be able to pluck it and it will vibrate enough to produce a definite pitch.
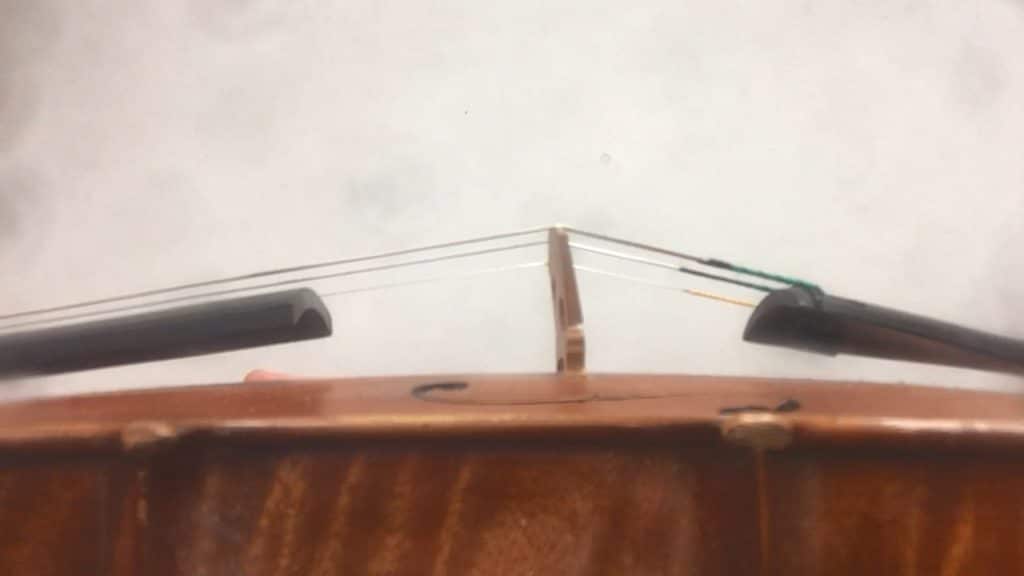
When the pegs are turned and the tension in a string increases, pressure is applied to the bridge in the direction of the peg box.
Over time, this will pull the bridge until it slants away from the tailpiece. If this is not monitored and corrected, it will eventually collapse!
That's why it's a good idea to check the vertical position of the bridge each time you change a string.
If the bridge position does require correction, use one hand to apply VERY gentle upward pressure to the strings, just below the bridge.
Be extremely careful … if you push too hard, you could snap a string or the bridge could collapse. And if you don't push enough, the bridge won't be able to move.
Very slowly and gently, use your other hand to apply pressure to the top of the bridge in the direction of the tailpiece. Nudge the bridge carefully back into an upright position, so that it is no longer slanting.
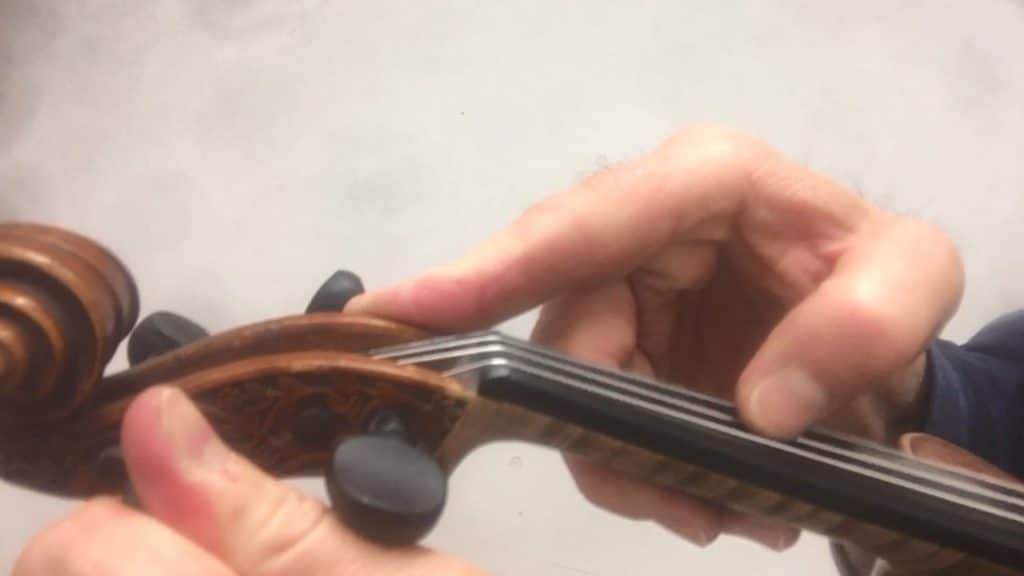
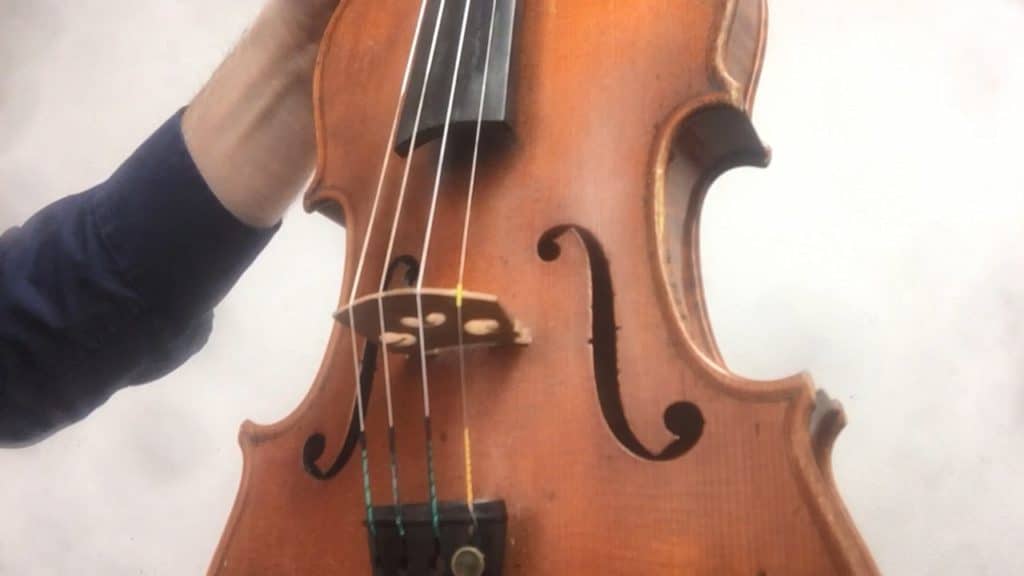
Changing a string is also a good opportunity to check that the bridge is still in the correct horizontal position.
Look directly at the face of the violin, and check the G and E strings are both positioned correctly in relation to the edge of the fingerboard. If the strings of the violin appear to be too far in one direction, you will need to re-centre the bridge position.
Secure the violin on your lap, then hold the bridge tightly using both hands. Slowly and gently, nudge it in the required direction until the strings are correctly aligned on the fingerboard.
Once the string is in place and the bridge position is checked, there's one more task that some strings require, before being tightened and tuned.
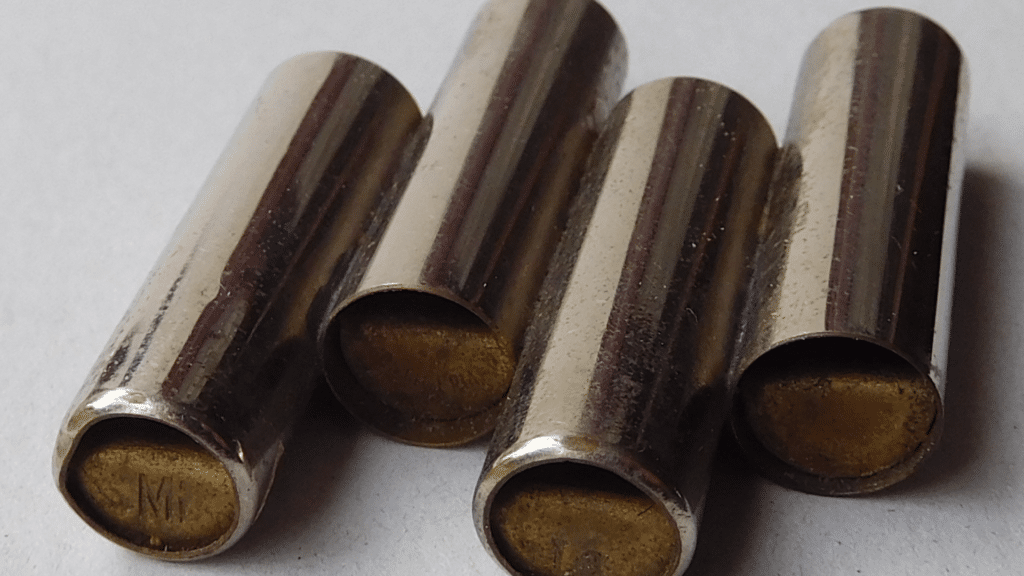
Many E strings (and some A strings) have a little coloured tube attached to them. The purpose of the tube is to provide extra support between the string and the bridge. It stops the string from cutting into the bridge.
If the string you're changing does have a tube, then slide it along the string until it reaches the bridge.
Depending on how tightly you have already wound the string, you may need to loosen it very slightly in order to lift the string away from the bridge momentarily.
As you do so, slide the coloured tube so that it is sitting directly on top of the bridge of the violin, supporting the string.
Once everything is ready, continue winding the string around the peg.
As you slowly wind it away from you, the string tension will increase, and you will start to hear the pitch of the string increase.
Keep plucking the string as you turn, so you can hear the pitch emerging, and the frequency increasing.
Remember, whatever you do, don't turn the peg too quickly… if you go too far, you'll snap the string!
Now it's time to tune the strings. Check out our feature, 'How to Tune a Violin' and follow the steps there to get your violin in tune.
Make sure that you check the other strings as well as the one you've just changed. The changing tension in your new string is likely to have changed the pitch of the other strings as well.
Even a small adjustment to one string can immediately have an effect on another.
For this reason, there's not much point in trying to get your new string perfectly in tune until you've checked the other strings haven't gone too far out of tune as well.
Once your new string is installed, and tuned to 'approximately' the right pitch, you can roughly check all the other strings, before coming back to the new string and tuning it for a second time.
You can then do a second 'round' of tuning (and if necessary, a third!).
Once each string is at approximately the right pitch, you can focus on individual strings and make sure they have precisely the right level of tension (and pitch).
At this point you can also use fine tuners, if you have them!
Remember that a new string can take a while to 'settle' as it gets used to the new level of tension.
Sometimes this can take several days, or even a few weeks! So you are likely to need to tune the new string several times more than usual in the first few hours of playing.
For this reason, it's a good idea to avoid changing the strings just before an important performance.
We also recommend keeping spare used strings in your violin case, as well as spare new strings.
Then if a string breaks just before or during a performance, you can change to a string that's already been stretched and settled on the violin.
If there's anything else you'd like to know about changing a violin string that's not covered by this feature, just email our Learning Support team at [email protected] and we'll be very happy to help you!
There's a lot to know about getting a violin ready to play!
So if you've found this feature useful, then check out our free course, 'Get Set Up', which covers all the essentials, from finding and selecting a violin to bows and accessories to chin and shoulder rests.
Click here to explore ViolinSchool's free 'Get Set Up' online course!
‘Wiegenlied: Guten Abend, gute Nacht’, Op. 49, is a bit of a mouthful, so let’s just call it ‘Brahms’ Lullaby’! Lull yourself to sleep with this beauty!
We've added a new MIDI playback, so you can practise playing the piece whilst listening to the music.
Play and Download it from the ViolinSchool Library:
 Click here to Download It!
(membership required)
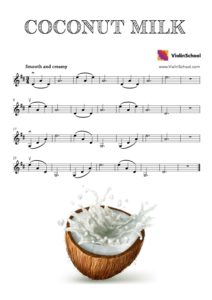
Mm-mmmm ... make your bowing and your string crossings smooth and creamy in this delicious, nutritious piece in ¾ time. No jerky arm movements! Glug glug …
In this NEW version of the piece, we've added lots of slurs, so that you can practise smooooooth string crossings back and forth between the different strings.
Keep your upper arm moving steadily as you move it up and down between the string levels. Don't forget to anticipate each string crossing, and start your upper arm early enough that you have plenty of time to reach the string you're moving to. No sudden landings!
We've also added a new MIDI playback, so you can practise playing the piece whilst listening to the music.
Play and Download it from the ViolinSchool Library:
 Click here to Download It!
(membership required)
A ViolinSchool favourite, the beautifully lyrical Weeping Willow is a tear-jerker of a piece... and it's now updated with a new, refreshed 'partition'!
We've also added a new MIDI playback, so you can practise playing the piece whilst listening to the music.
Play and Download it from the ViolinSchool Library:
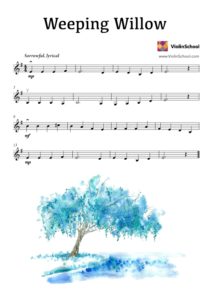 Click here to Download It!
(membership required)
Over the next few weeks, we'll be featuring a series of Intonation Exercises from the ViolinSchool Library - one per week, for you to improve the accuracy of your left hand placement!
We start today with Go The Distance, a very useful practice exercise for familiarising yourself with intervals in 1st position. Start first on open strings, then go one octave higher. Try singing the intervals too!
Go The Distance
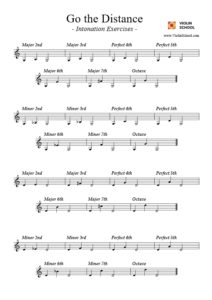
Click here to download it from the ViolinSchool Library!
(login required)
One of the most common questions we get about tuning and intonation is ‘which tuning app should I use’?
We like Cleartune on Android and InsTuner on iOS, but we'd like to know what YOU use, so that we can test every single one properly, and make the very best recommendation for all our learners...
Therefore, we're running a survey to see what the most popular tuning apps are amongst ViolinSchool learners!
Tell us your favourite apps, and we'll announce the verdict in a few weeks' time...
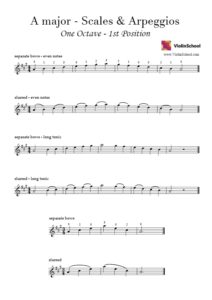
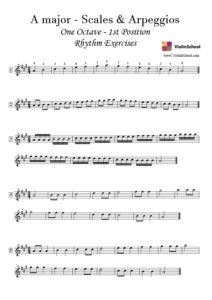
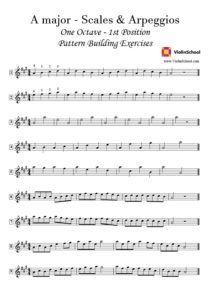
We've received a lot of good feedback about the G Major and D Major scale exercises (Level 1/2), so we've now added similar exercises for A Major as well!
You can find them in the ViolinSchool Library in the Scales and Arpeggios section.
free access, login required
free access, login required

membership login required
membership login required
membership login required

Enjoy!
Everything you need to know to get the strings of your violin to the correct pitch... and keep them there!
In this feature, you'll learn...
First we're going to learn about the pitch frequencies of each string, so we know what to aim for when tuning the violin!
The strings of the violin are tuned to the notes G, D, A and E.
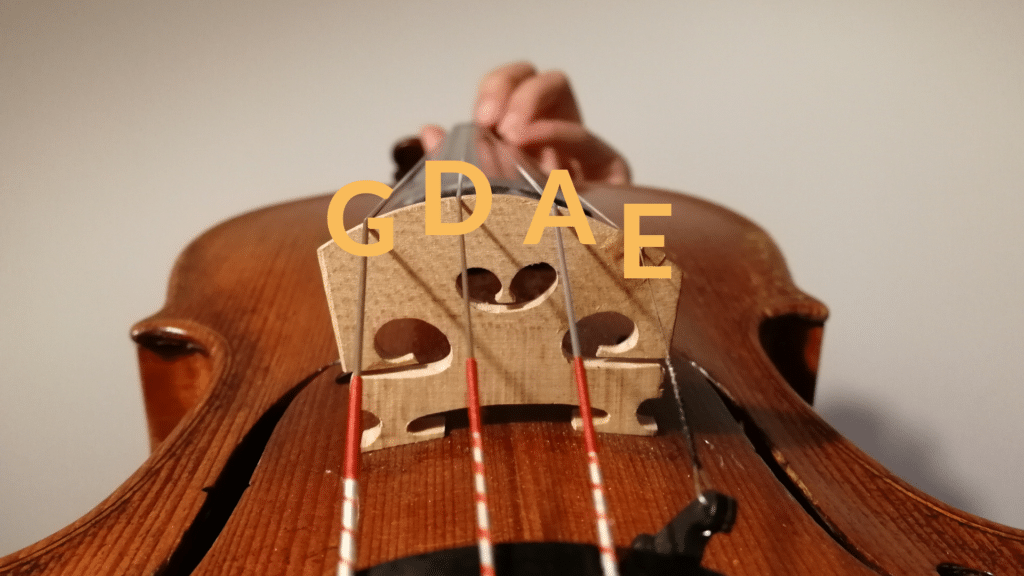
Each of these 'note names' describes a frequency of sound. The exact frequency can vary a bit depending on what style of music you're playing, or where you are in the world!
But the most commonly accepted tuning for the note A is 440Hz (Hertz). This is the sound produced by 440 sine waves per second. It sounds like this:
This frequency was decided on by the International Standards Organisation in the 1970s. Since then, the tuning of each string has been measured on the assumption that the frequency of A is 'fixed' at 440 sine waves per second.
Although there's a big debate amongst some musicians about whether this is correct (at our London School for example, we generally use A = 441Hz), we're going to assume that you just want to get your violin in tune as fast as possible... so we're going to stick with the A = 440Hz standard for now!
From A, we can work out the frequency of all the other strings. Each violin string is different to the next by an interval of a perfect fifth. This basically means that each string is five notes of the scale away from the next one.
SIDE NOTE: Tuning is actually a bit more complicated than that... a 'perfect fifth' actually describes two notes which have a ratio of 3:2 between their frequencies... if you want to know more about this, look up 'perfect fifth' and 'A440' on Wikipedia, or consult the ViolinSchool Glossary!
So, here are the other strings:
The G string is tuned to the frequency of 196 Hertz:
The D string is tuned to the frequency of 293 Hertz:
The A string, as we've already discussed, is tuned to 440Hz:
And the E string is tuned to 659Hz:
Before we get into the physical 'how-to' of tuning the violin, let's get clear on what we actually want to achieve.
To tune a violin accurately, you need to be sure that you're aiming for the correct right pitch in the first place. So it's a good idea to have a sound that you can 'refer' to. Let's call this a 'reference pitch'.
Your reference pitch will usually be A. This is because the 'international standard' has led to musicians all over the world tuning the A first, to be sure that it fits the fixed standard of 440Hz.
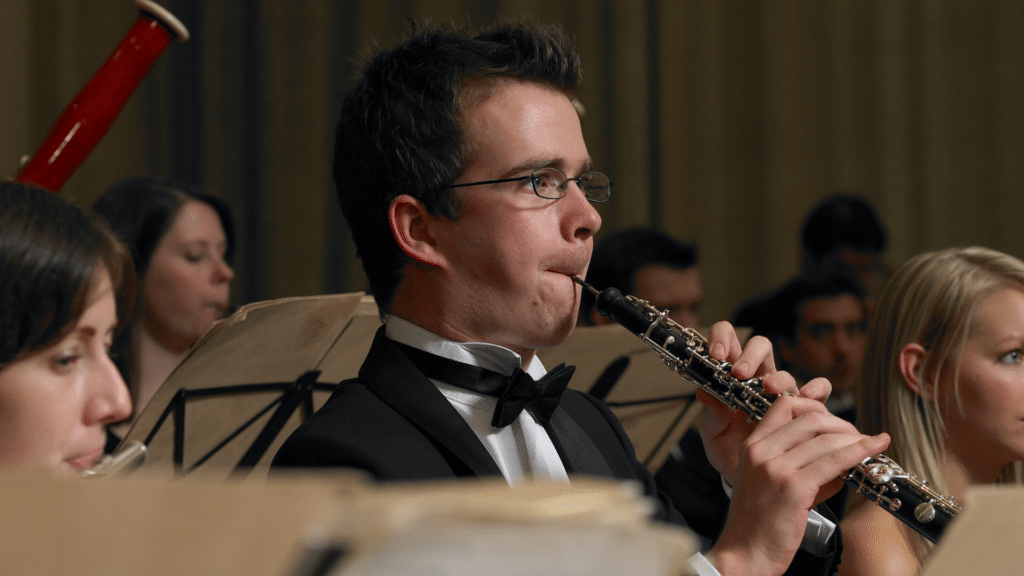
This is why you will usually hear a symphony orchestra tuning to an 'A' played by the lead oboe player. It's also why violinists will often start by tuning the A string, before they tune the other strings of the violin.
Thanks to modern technology, it's now easier than ever to find an accurate sound source to give you an 'A' you can tune to:
Piano or Keyboard
If you're fortunate enough to have access to a keyboard or a piano, then you can play the 'A' and tune to that. Listen carefully to the sound before you play it on the violin.
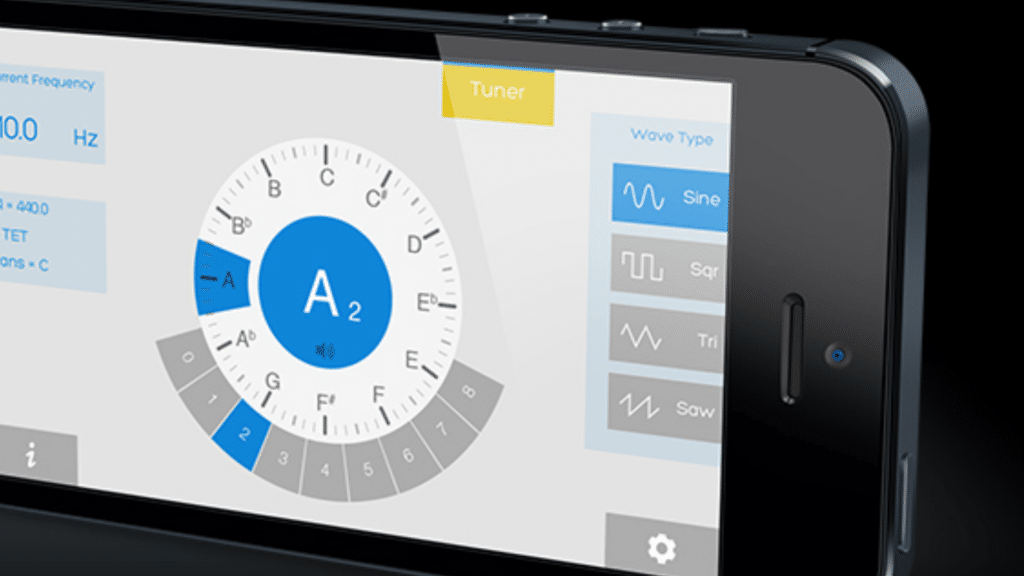
Digital Pitch App
A smartphone app is a great way of getting a clear 'reference pitch'. You can set the pitch you want, listen to it, and get feedback from the app about whether or not you've hit the right note. Just don't become dependent on it!
Online Tone Generator
If you don't have access to a smartphone, then you can use an online tone generator - like the ones at the top of this page - instead.
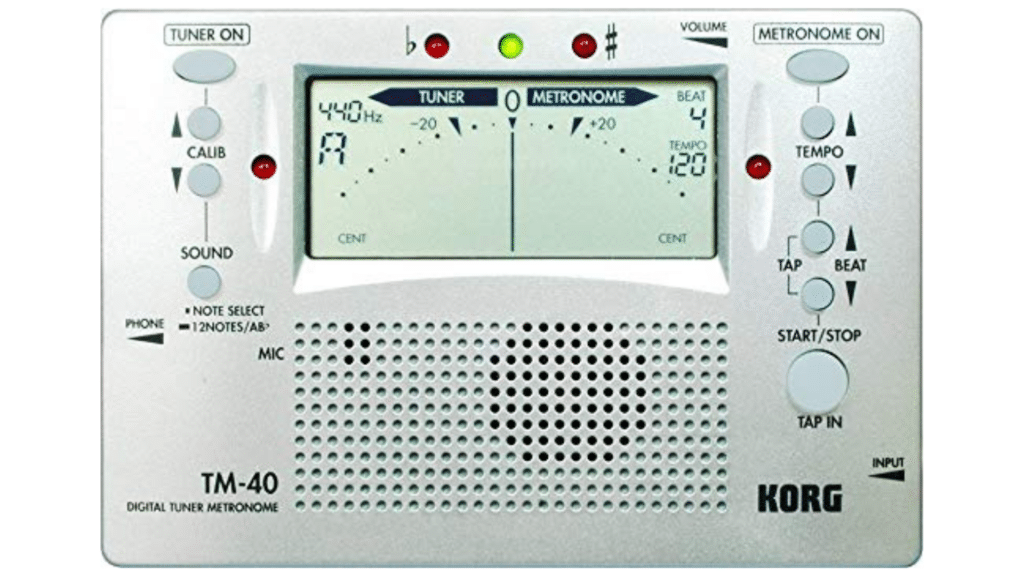
Offline Tone Generator (e.g. on a Metronome or Tuner)
Digital tuners pre-date smartphone apps, and are widely available from music retail stores. Be sure to check the accuracy level of the display, as some tuners measure pitch in more detail than others!
Some metronomes also have a pitch function built in, which allows them to generate the sound of an 'A'. But unlike an app, where you'll often be able to change the pitch of A, a piece of hardware like a metronome with an extra tuning function can often be fixed at 440Hz.
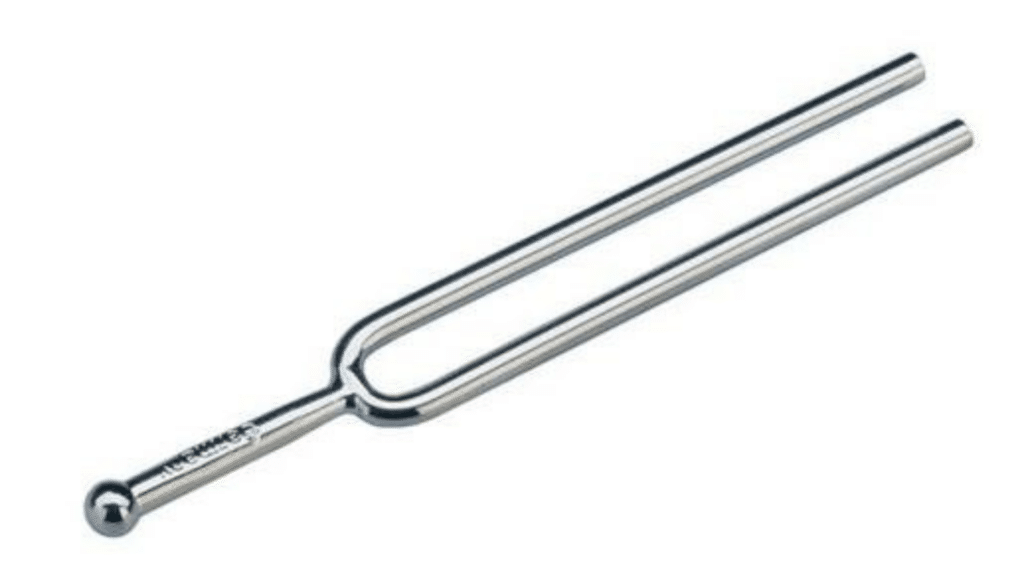
Tuning Fork
A tuning fork is a two-pronged piece of metal (usually steel) that resonates to produce a pre-determined pitch (most commonly A 440Hz) when you hit it against something!
Pitch Pipes
Pitch pipes are small tubes that you can blow in order to produce a sound. Each pipes will be fixed to a pre-determined frequency, so they will always produce the same note.
SIDE NOTE: When tuning the violin, it's really important that you allow the string to vibrate clearly, otherwise you might not hear the pitch accurately. So try not to 'pick' at the strings with the bow… instead, play long, resonant strokes and use the whole bow.
Once you have plenty of experience, it is possible to tune a violin by plucking the strings. But it's still easier to hear the pitch if you play the strings using the bow!
If you’re a beginner or if you don’t have much experience with music, your listening might not be ‘attuned’ to the subtle differences in pitch. This will happen over time.
But whilst your pitch awareness is developing, it’s a good idea to use a visual reference as well as an aural reference. This will give you confidence and certainty about being 'in tune'.
Nowadays, a visual reference can usually take the form of a pitch app such as InsTuner on iOS, or Cleartune on Android. Beware of tuners and apps that aren’t very accurate though, and don’t just follow the traffic light system - look at the dial to see how far you are away from your target pitch.

A useful approach is to use pitch apps to check the pitch only once you have already made the adjustments by ear! Then you're training your ear by making the aural adjustment first... and the visual reference serves as a confirmation (or not!) of what you've already done.
Over time, the more experienced you become at tuning using aural references, the less you'll need to refer to the visuals. Eventually you may not need to refer to a tuner at all!
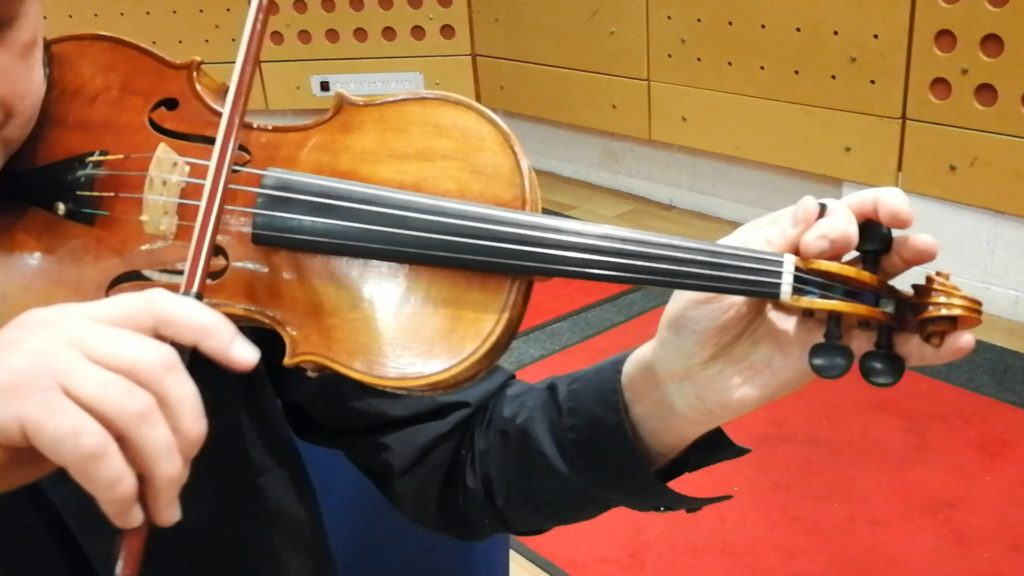
We change the tension - and therefore the pitch - of the strings, by turning either the Pegs or the Fine Tuners.
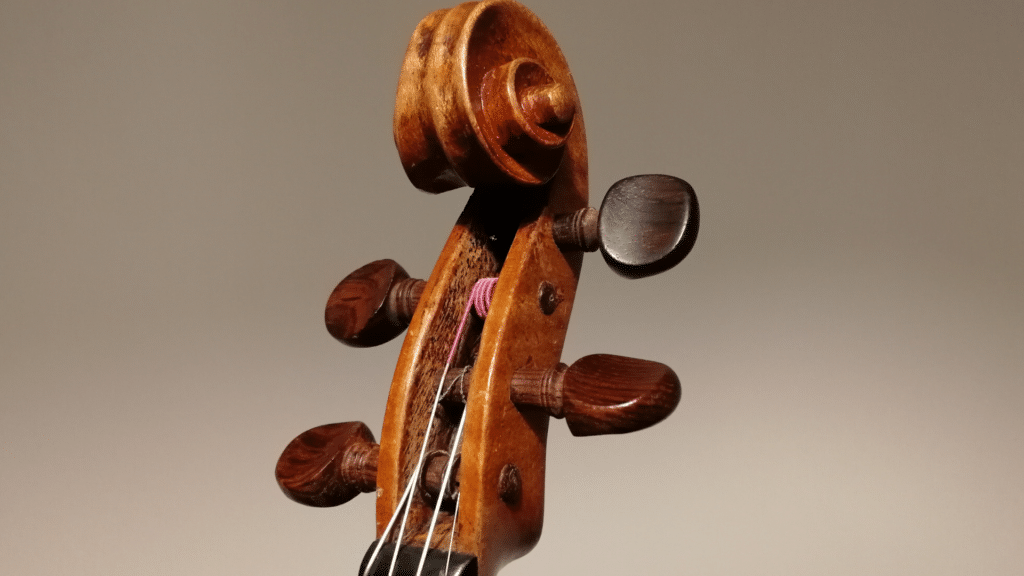
The pegs are the four wooden pins that sit in the pegbox of the violin, just underneath the scroll. Each peg has a small hole in the side of it, just big enough for the string to thread through.
This allows the string to be secured inside the peg, so that it can be wound and unwound safely and securely.

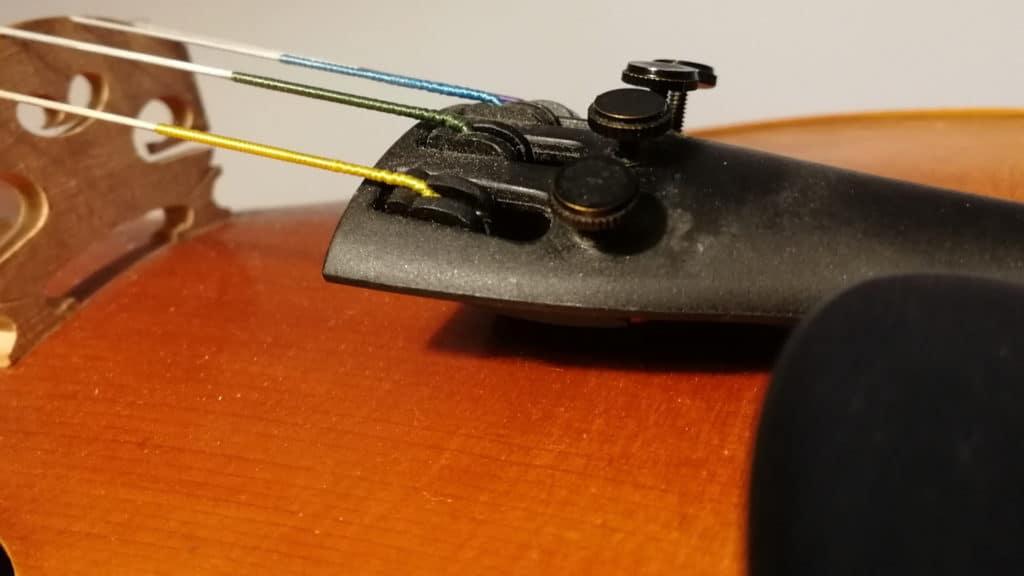
The fine tuners are four small metal screws which are mounted near the top of the tailpiece of the instrument. They work by bringing the metal attachments closer together when screwed.
The bottom end of each string is pulled further towards the violinist (and away from the pegs). This:
As a general rule:
If your violin is very out of tune, or if you've just changed a string and need to make a big adjustment to the string tension, then start by using the pegs.
WARNING! Whatever you do, don’t turn the pegs too quickly or too far ... otherwise the string might snap!
Also, do NOT try and turn the peg away from you without first releasing it towards you!
Although it can sometimes work to turn the peg away from you straight away, this should only be done if:
a) you're very experienced, and
b) you've already tuned the violin you're working with by turning the pegs (so that you can feel how the string responds)
The first time you pick up a violin you should quite simply NEVER turn the peg away from you without releasing it towards you first.
Otherwise you are very likely to overturn the peg, creating too much tension. If you do this, it will snap!
Turning the Pegs
Pegs can often be tough to turn, especially if the violin you're using hasn't been used for a while (or hasn't been 'set up' by a specialist violin shop). This is because of the friction between the peg and the peg box.
STEP 1: RELEASE PEG TOWARDS YOU (Release the String Tension)
Get into playing position, and be ready to play (you'll need to bow the string to hear the changes in pitch).
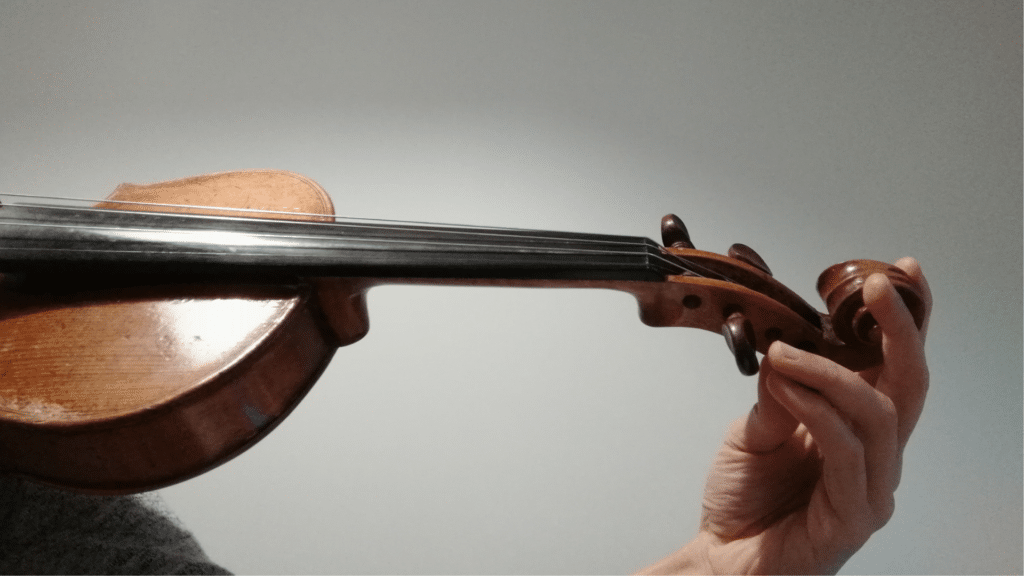
Hold the scroll or pegbox of the violin with your left hand, to provide support and leverage, and then extend your fingers/thumb towards the peg you'd like to turn.
Gently turn the peg towards you. Be careful in case it is extra-slippery or extra-hard. Use the other fingers and the hand to stabilise your movements.
Keep playing the string whilst you turn, so that you can hear the sound of the pitch changing.
Don't turn too far! Only turn enough that the pitch of the string is a note or two lower than the target pitch. Then it's time to wind it up again..
STEP 2: WIND PEG AWAY FROM YOU (Increase the String Tension)
Adjust your hand position so that you are ready to 'lever' the peg back to the right position. This usually requires your thumb to be underneath the peg, so that you are applying force to the underside of the peg.
Awkward-to-turn Pegs
If the peg has got into a near-vertical position, this can be very tricky... if you find you can't do it because you can't apply enough force at that angle, then try sitting down, placing the violin upright on your leg, holding the scroll in one hand, and turning the peg with the other.

Using pegs when the strings are very 'out of tune'
If all four strings of the violin are quite far from their correct pitches, then don’t try and get each string perfect the first time you turn the pegs. This is because if you turn the peg for one string quite a long way, then it will affect the intonation of the other strings.
Instead, go around all the strings couple of times, using the pegs to get each string to approximately the right pitch. By the time you’ve done this twice, or even three times, your movements will be smaller, and tuning one string will no longer affect the other strings.
Tuning only with pegs…
If you do not have fine tuners on your violin, then you will need to achieve an extremely high level of accuracy when tuning with the pegs.
But this can rarely be achieved by making smaller movements, unless the pegs are extremely smooth (or you have geared pegs, a relatively new invention that makes tuning with the pegs very easy!).
Therefore, you may find yourself needing to release and re-wind the tension of a string several times, making the string flatter, and then bringing it up again sharper.
Essentially you are synchronising your listening with the subtleties of the pegs and strings of the violin that you're currently tuning.
By listening to the change in the pitch the first few times you use a peg to change a string's tension, you are 'acclimatising' your ear so that you know how that peg and string behaves.
This is why you will sometimes hear a violinist releasing the peg and then tightening it several times. Essentially they are getting used to how the peg / string behaves on that violin right then and there.
Once you're used to this, you can adjust the speed and distance of your tuning movement to increase the accuracy of your 'big' peg-winding movements. Then you can land on precisely the note you want.
Only Pegs? Or Do I Need Fine Tuners Too?
Fine tuners were invented to make tuning a violin easier, but not every instrument comes with them fitted. However, they do make tuning significantly easier!
For first-time beginners, we do recommend getting fine tuners (or geared pegs) fitted if your violin does not already have them, because it is so much easier to tune the violin that way!
WHY do some violins have a fine tuner only on the E String?
It's really hard to use a peg to tune the E string! Small adjustments are particularly difficult, because the string is so thin and wiry, and therefore more difficult to handle.
E Strings are also much more prone to snapping than other strings, because they are thinner and therefore do not handle changes in tension so well. Using a peg to tune an E string only makes this problem worse!
That is why a fine tuner is usually fitted to nearly all E strings, whereas it’s just not as necessary for the other strings.
Fine tuners are good for making small changes to the pitch of the strings.
As a general rule, changes of approximately one note (i.e. a semitone , or a ‘half step’) are more easily handled with the fine tuners than with the pegs.
Anything larger than that will require so much turning, that it will take the fine tuner significantly out of line from the other fine tuners.
For this reason, it's a good idea to learn how to use the pegs so that you can handle big string adjustments, and then use the fine tuners to finish the job!
Which way do I turn the Fine Tuners?
If you're having trouble remembering which way to turn, then drill this into your head...
Turn it LEFT to make it LOOSE!
Turn it RIGHT to make it TIGHT!
Sticky/Squeaky Pegs:
If the peg is 'sticky' i.e. it's hard to turn (or squeaky... or even won't turn at all!), then you can take the peg out, and rub some peg paste onto the pin at the point where it touches the hole in the side of the pegbox.
If you don't have peg paste to hand, then you can also use dry soap, or the lead of a pencil!
Tight or Blocked Fine Tuners:
If you have been using the fine tuners a lot, they will sometimes go all the way in to the end of the screw. When this happens, you won’t be able to turn them any more, because they’re as far in as they can go.
The reason we tend to turn the fine tuners more often to the right than to the left, is because more often than not the violin strings will go flatter in pitch, because the tension in the strings will reduce.
When this happens, you need to unwind all the fine tuners to a position where you’ll be able to use them again, and make adjustments with the pegs to bring the strings back to approximately the right pitch.
Loose Fine Tuners:
If a fine tuner is loose, it needs to be turned a bit further in a clockwise direction, to go back into its screw.
However, this will probably make the string too sharp, so be prepared to make some adjustments from the pegs as well, to compensate for the change.
If that doesn't solve the problem, the screw is likely to be broken, and the fine tuner will need to be replaced.
Temperature Changes:
Extremes of temperature can affect the physical state of the violin's strings, which leads to changes in the string tension.
For this reason, you may find that your violin goes out of tune when you take it between different places where there are different extremes of temperature (such as a warm home to a warm teaching studio via a cold subway train!).
If this happens, expect to need to use the pegs!
Any Questions?
If you have any questions about tuning, just leave a comment below and our Learning Support team will answer you as soon as we can!
Next Steps For Learning:
This feature is part of our free online course called ‘Get Set Up’, which explains all the most important information about violins, bows and accessories. Click here to explore the rest of this free online course!
Hello everyone!
Here in London, the new term is starting, and for the first time ever we are synchronising our online and offline tuition.
Regardless of whether you're learning with us here in London or from anywhere around the world, you'll have access to exactly the same course content, learning resources, exercises and learner support.
The class structure of the London Beginner Courses A, B and C will form the basis of our Online Courses A, B and C which we'll be releasing gradually over the coming weeks.
If you'd like to be notified when each course becomes available, don't forget to join our mailing list - you can leave your email address on the courses page.
I'm reliably informed by our technical wizards that all Member accounts have now been transferred over to the main website at www.ViolinSchool.com so you can now log in there with your existing details (though you may need to reset your password depending on when you originally registered... if you need any help just email [email protected]).
More about this soon, but the big news right now is that...

I'm super excited to let you know that our upgraded Digital Library is now fully stocked and ready to use!
There's sooooooo much more we have in the works for the Library, but the most important things that you can use right now are:
Weekly Updates / New Learning Resources
Because there's so much happening now that term has started again, it's hard to keep track without a regular update, so we're restarting the ViolinSchool Updates most weeks from now on.
If you're a member, you'll get a weekly email with direct links to all the new resources, tutorials, and lessons so you can access them in one click.
And if you're not a member yet, signup is open again - you can join today for $19 and access absolutely everything in the library instantly!
Requests & Feedback
Remember that as a ViolinSchool member you can send requests for sheet music, exercises and tutorials.
Requests that we know will be useful for other learners go straight to the top of our production list. So ask, and ye shall receive!
And of course we ALWAYS love to hear your feedback (in fact, most of what we do has been built according to what our learners have asked for!)... so don't hold back, let us know
Stay tuned for more!
We'll be blogging regularly from now on to share with you all that's new, including new topics and video tutorials as they are delivered.
So bookmark this blog and keep an eye on your inbox for our newsletters!
OK, that's all for now. More soon!
- Simon 🙂
We've been busy over the Christmas holidays! Here’s a sneak preview of what’s about to launch at ViolinSchool...
To coincide with the start of New Year Term at our London School, we’re opening up our new and improved Digital Library to all existing members.
If you have an active subscription to ViolinSchool.com, you can already log in and download anything and everything (you may need to reset your password).
Each week we’ll be adding more learning resources, and of course we always welcome requests for new repertoire, video tutorials and exercises.
Explore the New Digital Library >>
 The Online Courses are moving back to the main ViolinSchool.com website, and we’ve been busy upgrading each course so that it fits the offline courses that we run in London.
Updated versions of the free-to-access Get Set Up and Beginner Quick Start courses will be available later this month, then during February and March we’ll be releasing Course A, Course B and Course C.
These comprehensively upgraded courses will include all the exercises and pieces of music from the Beginner Violin Courses that we run in London.
For the first time, we’ll also be introducing courses for Parents & Children.
And we’re updating the all-important topics of How to Practise, How to Play in a Group, and How to Perform!
Our weekly updates start again later this week - keep an eye on your inbox for all the latest new learning resources from ViolinSchool!
Not on our mailing list yet? Leave your email address here for free learning resources each week!
Click below to play a Christmas Greeting from The Violin Orchestra!

We'll be back in early January with all-new online courses, our upgraded digital library and weekly updates of everything that's new in the world of violin!
Have a wonderful holiday season and we'll see you in a couple of weeks!
And now, some CHRISTMAS CAROLS... click below to download!
Need some lyrics for people to sing as you play? Click here for the lyrics!
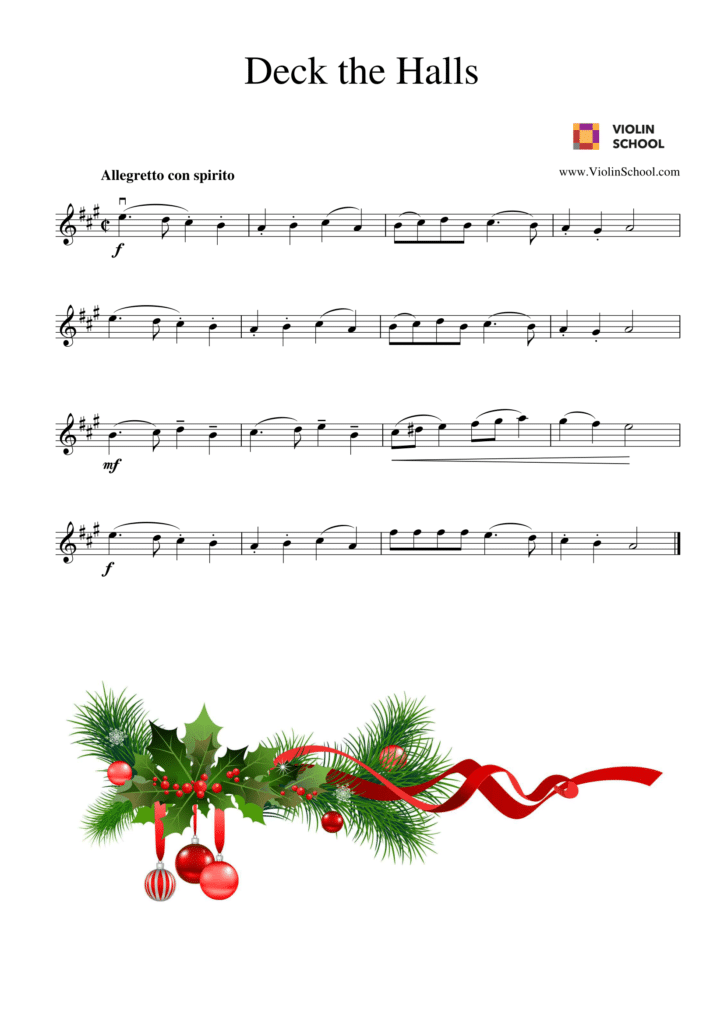
Deck the Halls

In The Bleak Midwinter
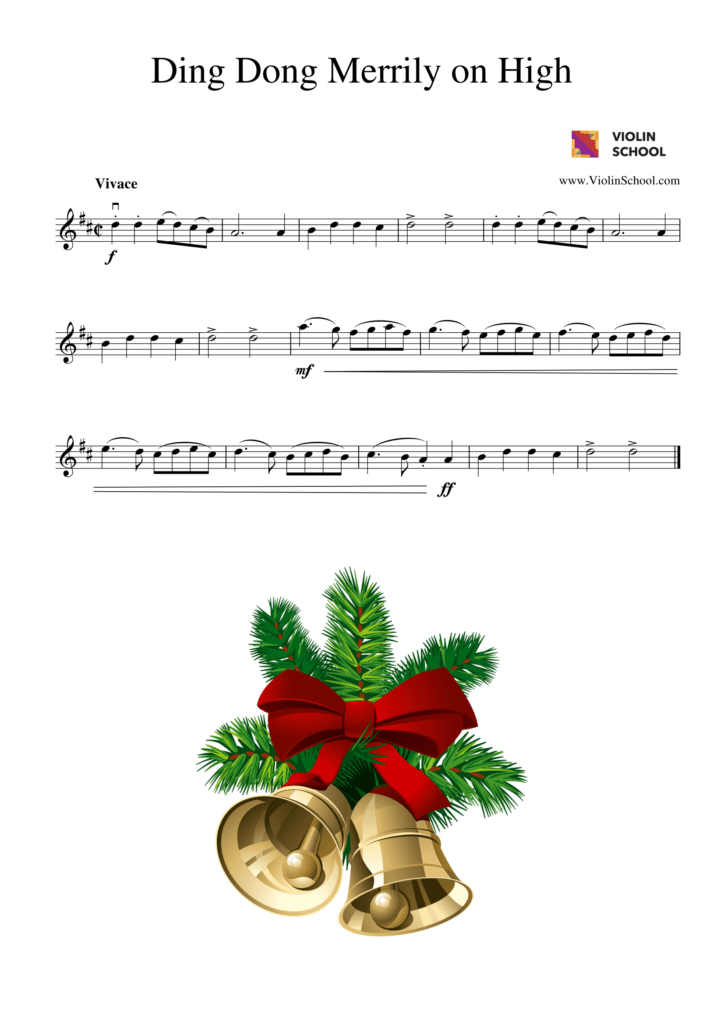
Ding Dong Merrily on High
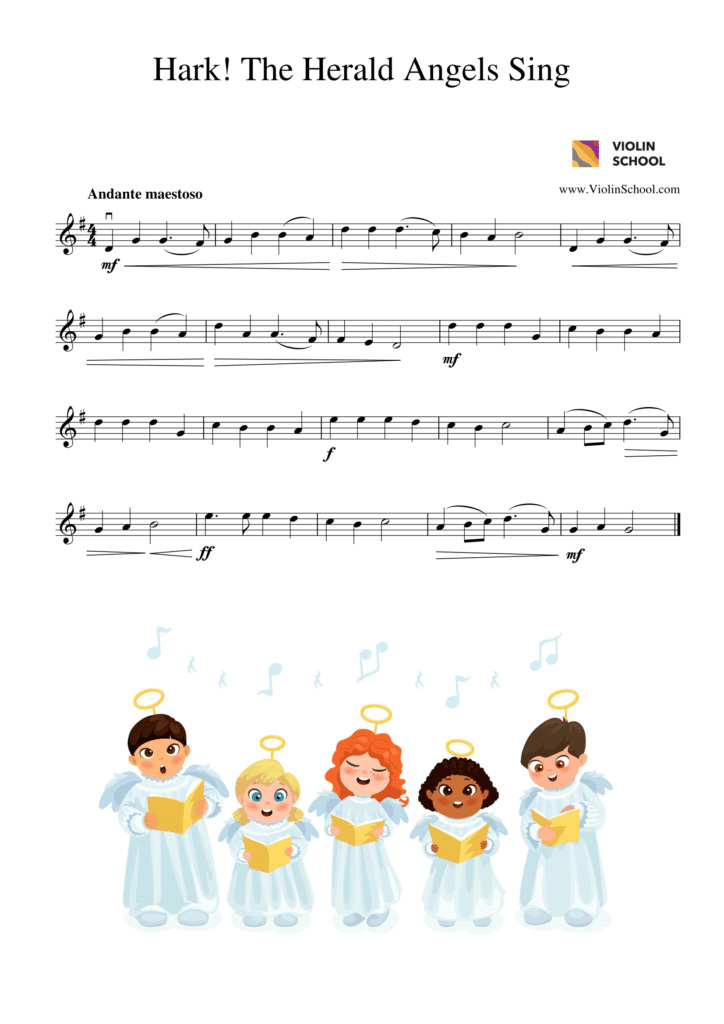
Hark! The Herald Angels Sing
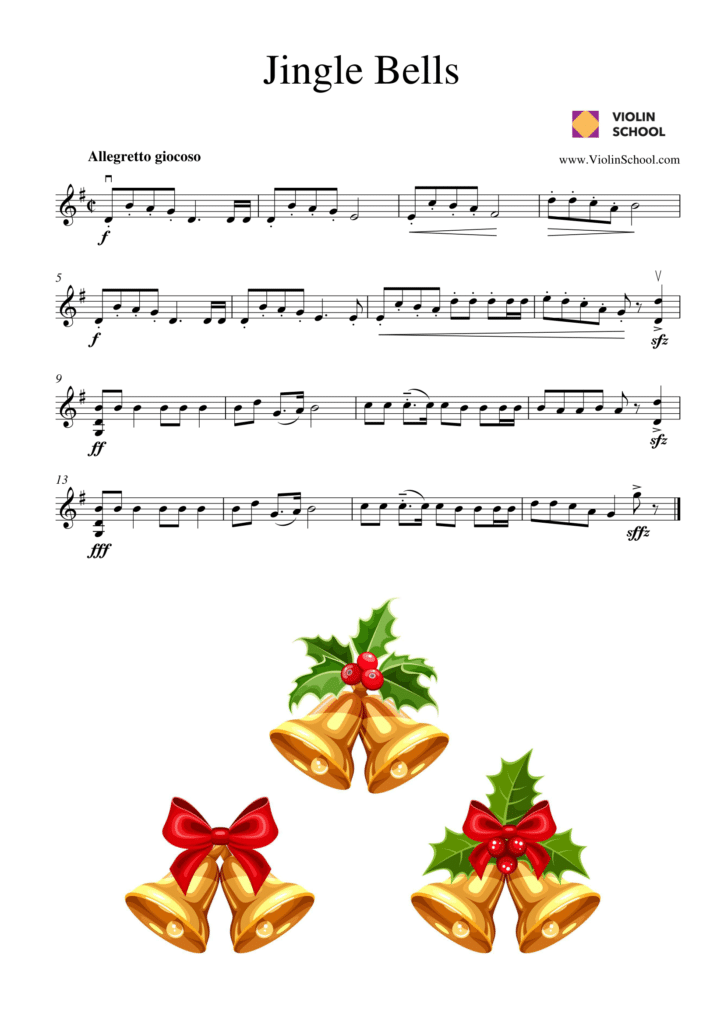
Jingle Bells

We Wish You A Merry Christmas
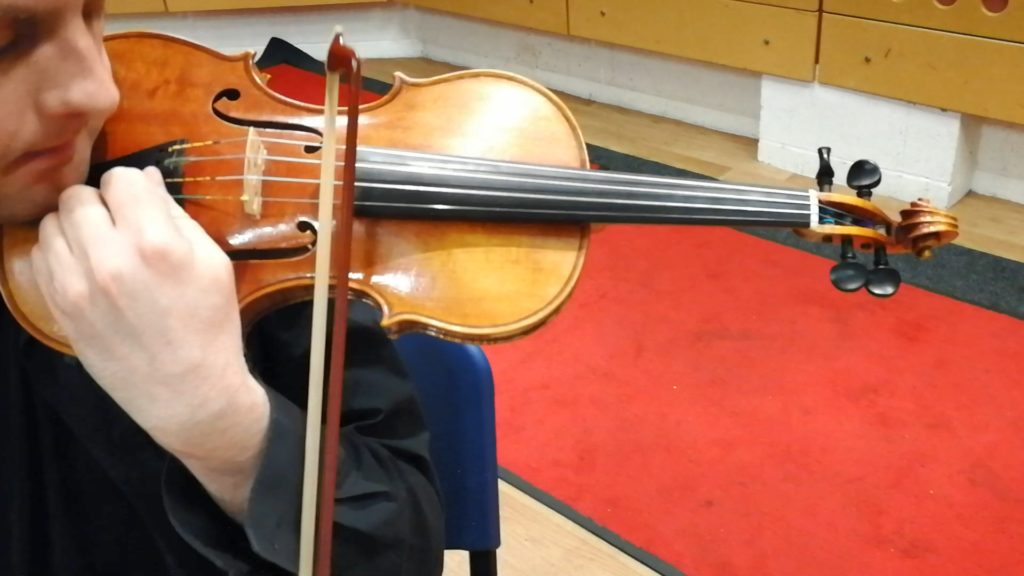
There's a fascinating moment in many of our Beginner Violin Classes where I shout 'FREEZE', and everyone suddenly stops moving. Then, to much hilarity, I point out that every single person in the room is bending around to the left!
Faces are turned towards the violin, eyes are locked down in an intense stare, and everyone is looking directly at the bow/string contact point or the left hand fingers.
Everyone's eyes - and everyone's attention! - have turned to where the most compelling action is!
But what effect does this have on our playing?
Unnecessarily bending and turning to the left isn't great for violin playing. Even just staring at your left hand or bow whilst playing can lead you to twist your head and neck too. Ouch!
Unnecessary tension will start to creep in, your neck will begin to ache, and other parts of your body movement will start to seize up.
If your whole mental focus follows your gaze, you'll end up with the left side of your body taking up 100% of your attention. There'll be no spare space in your brain for checking that your body posture is correct!
For clear, easy sound production, our body posture and right hand technique must be relaxed, well-balanced and correctly positioned. So having that spare capacity isn't just important, it's actually essential.
So why do we get distracted?
Our primeval 'fight or flight' responses demand that we give fullest, fastest focus to our most difficult challenge at any given moment.
This is why our subconscious memories kick in: they allow us to respond to challenges faster than the speed of thought!
But the unique complexity of violin playing means that the immediately obvious solution isn't always the right one.
Yes, we need to rely on fast instinctive reactions... but those instincts are themselves based on carefully thought out, well-drilled behaviours, which in turn can be very counterintuitive!
Whoa...! This is the point where many people start to think: "this violin thing is really difficult!".
But it doesn't have to be that way.
There are two precautions you can take in advance which will make it MUCH easier to tackle complex violin-playing problems:
1) Practise the fundamental body movements carefully and conscientiously so that they're drilled deeply into your muscle memory. Then...
2) Take the time, EVERY time you're about to play, to make sure all the fundamental balances of the body are correctly set in place BEFORE you start...
...If you do these two things, then you'll start playing with a clear head... and will be able to focus on the other challenges ahead of you!
But when there's so much else to think about, how can you develop the discipline to remember to do these two things?
The solution, as ever, is having a checklist - and remembering to use it!
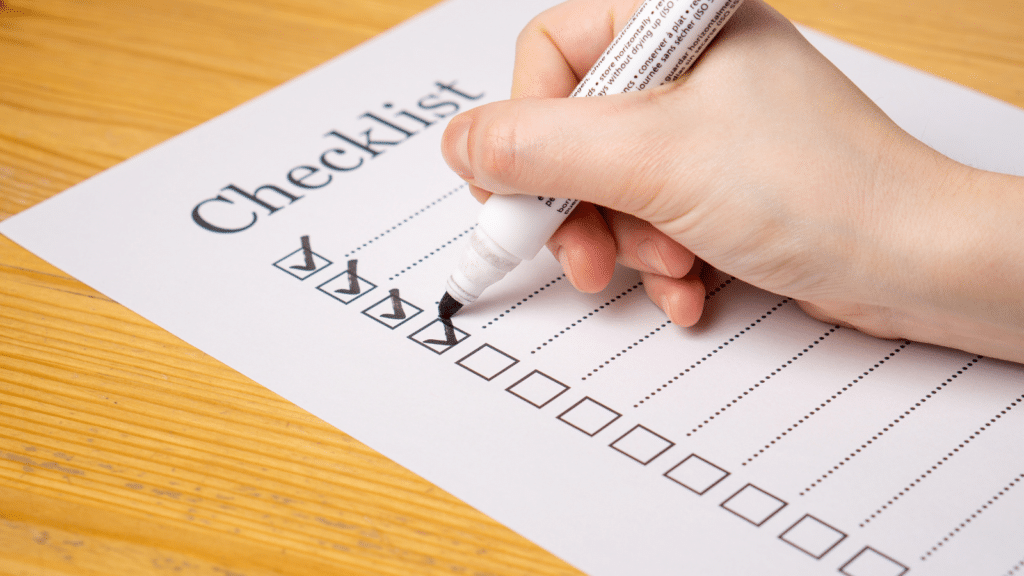
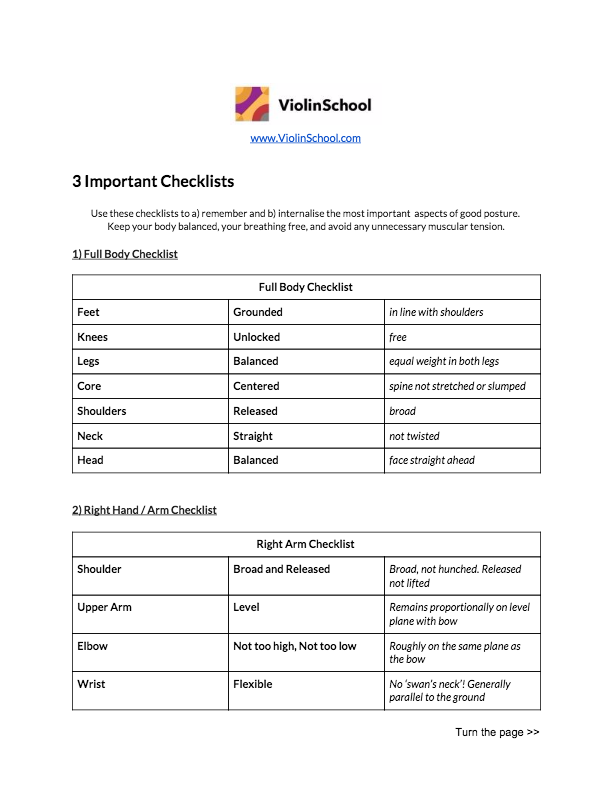
Firstly we must insist upon getting our fundamental body positions in place BEFORE we start to play. Use ViolinSchool's 3 Important Checklists to make sure that each part of the body is in the right position.
Secondly, we need to remember to check in regularly whilst playing, to make sure they haven't shifted.
THEN we stand the best chance of keeping a good balance, and therefore optimising our sound production as we play!
It's worth reiterating how important that second principle is - of checking the body position regularly whilst playing.
You see, it's not enough just to make sure your body is correctly positioned before you play - crucial as that is.
Because as you play, your body movements will gradually wear down the integrity of your posture. This creates inefficiency in your other technical movements.
You might start with the best of intentions, but as other challenges begin to take up your focus and attention, you have a stream of other things to think about, so you forget about your posture.
The solution to this is to actively reset your posture on a REGULAR basis as you play. You need to take time out from that shiny new finger technique or that difficult bowing motion, in order to check that the fundamentals are still correctly in place!
But this goes against our human nature. What's urgent often takes the place of what's important. But we can’t afford to allow that here!
Even if it feels wrong, we violinists need to develop enough discipline to make sure that the fundamentals of good body posture are always in place... whatever the cost!

Getting a trick or a technique right at the expense of your core posture or bowing technique might feel like an achievement at the time. Indeed, for a few minutes in a larger practice session, it could be the right thing to do.
But if you repeatedly ignore your body position and posture in order to focus on technical details, then in the long term it will lead to frustration.
Inconsistencies in body movement and core left and right hand positions will ultimately set the body off balance. And this will undermine much of the good work you've done on the details of your violin technique, by introducing inefficiencies and unnecessary tensions into your physical movements.
So... if you find your eyes moving to the left, that's fine for a moment or two, but don't let them stay there! Keep yourself focused on the tasks ahead, and use a clear checklist to give you the discipline you need to stay alert to EVERYTHING that matters... not just what seems most urgent!
Use ViolinSchool's 3 Important Checklists to help you check your posture and body position before you start to play:
A common problem when learning the violin is understanding where you’ve got to in the learning process.
This is important, because if you don’t have any reference points with which to measure your progress, it can be hard to know whether what you are doing is working.
And if you can’t be objectively sure that you’re doing things right, then you won’t have confidence in what you’re doing.
A strong level of self-confidence and certainty about what you are doing is absolutely crucial to being able to perform effectively on the violin.
A comprehensive curriculum can be a very useful tool for developing your confidence about where you’ve already got to with your learning.
A Curriculum is a very useful way of providing this objectivity. It provides a clear breakdown of topics into different levels of achievement.
Unlike other systems of measurement, such as exam grades or graded learning systems such as the Suzuki method, a good curriculum goes into detail about the actual topics involved in each level of learning.
By seeing the detail of what makes up each level, you get a much clearer sense of the ‘big picture’, and the true scope of your learning journey becomes apparent.
At the entrance to a big public park, it’s common to see a giant map of the area, with a big arrow on it that says ‘you are here’.

By putting your current location into context like this, you can suddenly see the ‘big picture’... the many different routes available to you start to become apparent, and you get a sense of the overall journey that lies ahead of you.
A map is very useful, but it has its limitations. It can tell you where you could go, but it doesn’t tell you where you should go!
One of the most important functions of a Curriculum is to show not just the topics that you need to learn and master, but also a suggested order in which to approach them.
This sequence or ‘gradient’ should be smooth... always challenging you in a new and interesting way, but never pushing you so far out of your comfort zone that it becomes too difficult or demotivating.
It’s very important to note that there’s no one ‘best’ way through the topics of violin playing.
Just as there are different tracks to the top of a mountain, there are limitless routes to choose as you navigate the many topics required for great violin playing.

Which track you take will depend on a number of factors:
Remember that a curriculum is a general guide rather than a definitive set of instructions. Although the overall direction of a curriculum should offer a progressive sequence of topics for you to learn, the exact route that you take through the detail of each level can and should vary depending on what’s best for you.
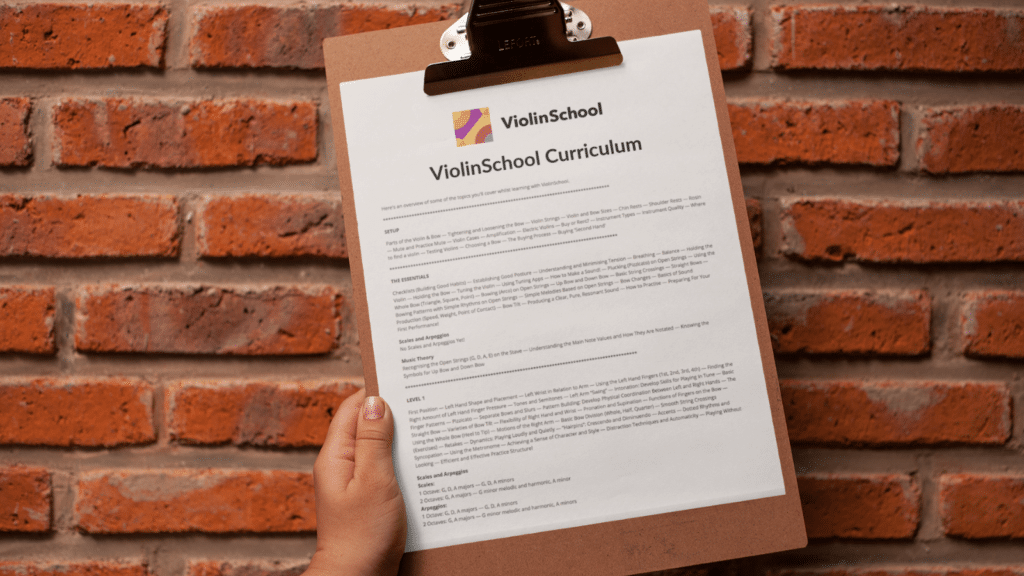
We’ve put together a curriculum for our learners which provides a comprehensive, step-by-step list of topics, sorted into different ‘levels’.
These ‘levels’ are unique to ViolinSchool, but the minimum achievement level for each level is approximately equivalent to the ABRSM exam grade system.
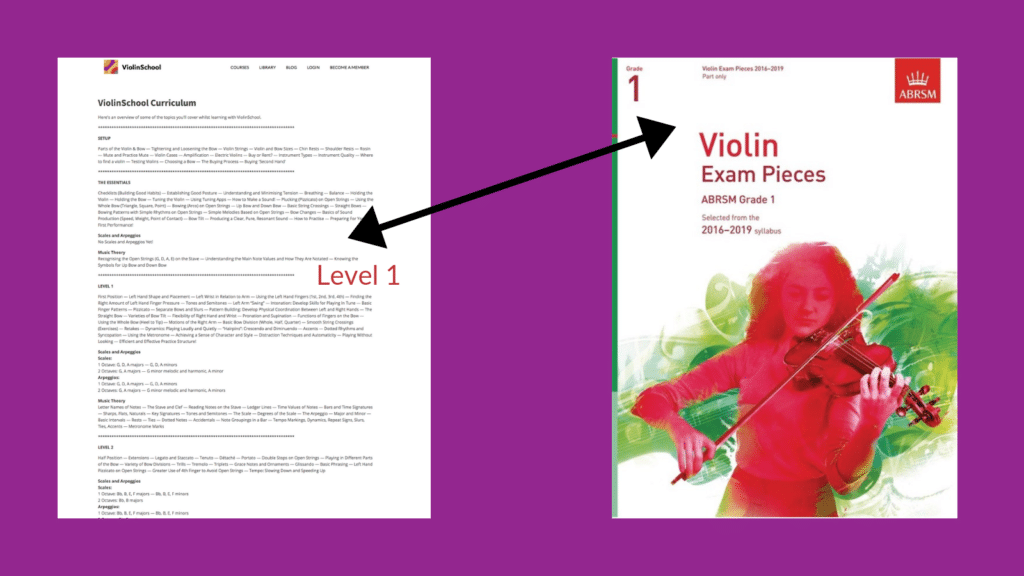
In other words, if you’ve mastered ViolinSchool Level 1, you should be able to complete ABRSM Grade 1 with good results.
We consider the ViolinSchool Curriculum to be a ‘live’ document, which means we regularly refine and update the sequence according to the latest research. Your comments and feedback are always welcome!
Remember that everyone’s path through the sequence will be slightly different.
Use the curriculum as a guide, but don’t feel that you have to learn each topic in the order that it is listed.
Also remember that most topics are complex and multi-layered, and will need to be learnt and developed in stages over a long period of time. It’s best not to assume that you can ‘learn’ a topic in one sitting!
Finally, be sure to consolidate each topic as best you can, before moving forward to the next level.
Use our online courses to acquire the skills you need, but also choose plenty of practice exercises from our Digital Library, to ensure you are carefully drilling everything you’ve learnt.
This kind of consistent, conscientious training is necessary for building up your habits and instinctive skills.
Doing this with every topic at every level will give you the confidence to keep moving through the curriculum, knowing that you’re building your violin playing on solid foundations!
Our new Beginner Violin Courses at ViolinSchool London have been growing in popularity over the past year, so we've now introduced three levels - A, B and C - to help first-time adult learners to reach a good basic playing level on the violin!
Until 10pm on 9th December, learners in the UK can save £100 on all courses (£50 on Children's Course) with our 'Earlybird' booking discount for early enrolments.
Adult Learners should take a look at the Beginner Violin Courses here:
https://london.violinschool.com/beginner-violin-course/
Parents, check out our new Children's Violin Course here:
https://london.violinschool.com/childrens-violin-course/
Or check out the full Tuition options at on the dedicated website for our London school.
If you're not in the UK don't worry... we'll soon be sharing all the content from these great courses on our eLearning platform.
This is one of the busiest times of year here at ViolinSchool, but I'm going to take a moment out to show you some of what's coming up here at VS towers!
 The overhaul of our Digital Library is nearly finished, and if you're a member of ViolinSchool, you'll be getting an email soon to let you know where to login.
Did you know we also welcome member requests for new additions to the library?
If there's a piece of music you'd like to learn (subject to copyright!), or a technical topic that you need extra help with, tell us what you need.
If it's something that will benefit other learners, we'll get it done for you at no cost (ViolinSchool membership required).
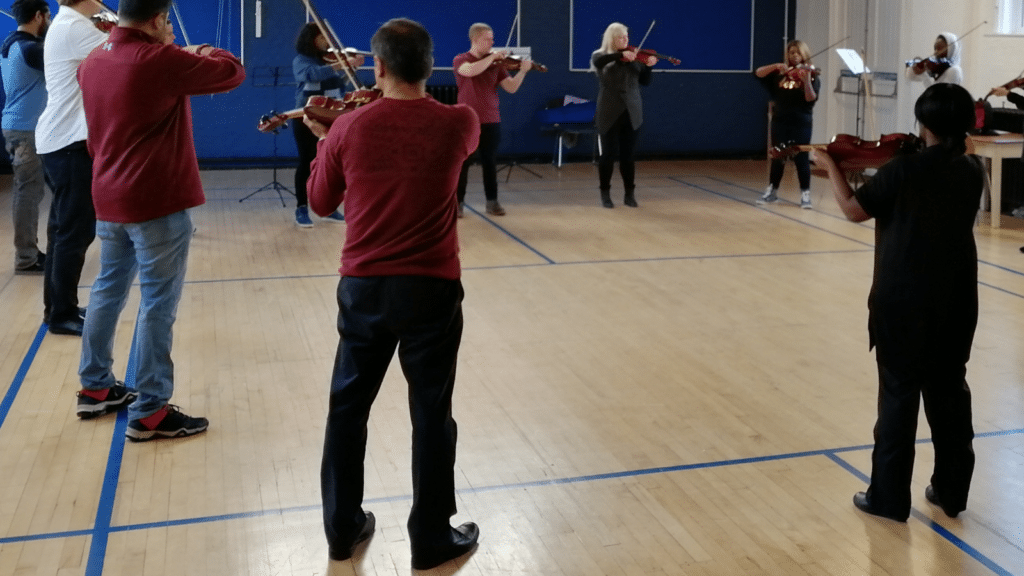
The start of November means the start of The Violin Orchestra for our school in London, but we'll also be making the Violin Orchestra repertoire available to all our members, wherever you are.
You'll be able to build up your performance experience by practising along with the new MIDI score and part videos, which will show you what to play, when to play and how to play!
We made a decision earlier this term to merge the structure and curriculum of our online and offline courses (from our London school). The reason for this is that we've found learners make better and faster progress during offline courses, if they also have access to the same materials online.
A blend of online and offline learning gives a really comprehensive all-round experience, by offering multiple perspectives on core material. It also provides useful patterns of repetition in your learning... exposure to new ideas at different times in different ways helps with both understanding and with retention.
We're updating the online courses right now and members will have access to all of them really soon (we'll email you as soon as they're accessible again on the main ViolinSchool.com website).
Finally, our regular weekly email updates begin again from this week, packed full of new videos and partitions for you to enjoy. If you're not already on our mailing list, make sure you're subscribed so that you receive our newest content each week! We'll send you superb new resources every Thursday, to keep you focused in your violin practice.
Have a great November, and we wish you the very best for your practice sessions over the winter season!
- Simon, ViolinSchool

Title: G Major: Exercises in Thirds
Description: Here are some exercises for practising the G Major scale in thirds. Make sure you practise slowly, and be very aware of the position of your bowing arm.
Level:
Topics:
[wcm_restrict]
Click here to download it!
/wcm_restrict]
[wcm_nonmember]
Join ViolinSchool today for instant access!
This download is for ViolinSchool members only! Click here to become a Member of ViolinSchool and get instant access to all library downloads!
/wcm_nonmember]
It's all very well learning the violin through lessons and your own practice sessions. But until you're out there in the real world, playing music with other people, it can all feel a bit theoretical.
Of course, it's important to learn solo pieces, and spend time on your own carefully building your technique. In fact, the intellectual challenge of tackling the many subtle layers of violin technique can be very rewarding in itself!
But when we talk about 'making music', we're really referring to the magic that happens when you play with other musicians. That's when we have to listen and interact with each other ... and that's never going to be the same every time. Playing music with other people is a truly creative endeavour.
When playing in a group, you need to develop a fairly strong instinct for what you're doing, so that you can shift your focus away from your own playing and towards other people's. That's how you keep your awareness high, so that you can always sense what's going on, and respond accordingly.
You need to rely on your training and instinct to deliver the technique you need, so that you can stay in the present moment, and focus on the people around you... and on the music that you're creating and sharing together!
At our London school we run a series of ensembles and other community music making opportunities throughout the year, including our popular Violin Orchestra, and the Saturday ViolinHubs where we build up Technical, Performance and Repertoire (group playing) skills.
If you don't have similar opportunities in your area, then it's a good idea to ask around at music schools and shops, to see if there are any local people who are interested in playing music. You'll be surprised at how many 'hidden' musicians there are... people who've played music as a child, and would love to start playing again. Could you start your own music group, meetup, or even an ensemble?
The social aspect of playing music together is incredibly important. As well as providing strong connections to your local community, playing in a group or an orchestra is really great for personal development... and it's often simply a lot of fun, especially when players become good friends!
But orchestras and ensembles are all about using what you already know to create great music. So what happens if you haven't yet learnt how to play?
Traditionally, musical instruments have been taught on a 'master and apprentice' basis, where a reputed musician will pass on their knowledge and understanding during 'one to one' lessons and personal coaching sessions.
But what we're increasingly finding at ViolinSchool is that the social aspect of being in a group can be incredibly beneficial to the effectiveness of your learning.
Whereas in a one to one lesson you only get access to the knowledge of one expert, a group tuition program (such as our Beginner Violin Courses for Adults and our Children's Violin Courses at our London School) can help give you wider context for your learning.
Firstly, you become aware of the progress of the group, and whether you're keeping up. You can see the progression that's expected during a course, and supplement your learning with class resources and a curriculum.
But most of all, you can talk and engage with your fellow learners, discuss ideas that have been covered in the class, and support each other (with perhaps a bit of friendly competition to motivate you along the way!).
As relationships develop with the people around you, you learn more about yourself by learning about each other. Each of us starts with different strengths and weaknesses, and the way that we overcome challenges and obstacles can be both informative and inspiring to other learners.
Being generous with our knowledge and wisdom not only helps other people to progress, but it helps us ourselves to grow. One of the best ways to truly know whether you understand a topic, is to explain it to someone else. By sharing and discussing ideas in a social learning context, we become better and stronger - both as a community, and as individuals.
Social learning doesn't replace one to one attention... there are times when a bit of personal tuition is exactly what's needed in order to break through a particular obstacle, or work in detail on a complex task that needs the advice of an expert, for example.
But a good selection of social learning and playing opportunities blended with online and one to one tuition can provide an excellent mix of perspectives, environments, information sources, and experiences... all of which will enrich your life as a violinist and musician!
If you're about to embark upon a Violin Course, a series of violin lessons, a new school term, or even just a new routine of regular practice, then it makes sense to get your instrument into the best possible condition before you start!
There are few things more frustrating (and demotivating!) than diving into a new period of learning with excitement and enthusiasm, only to find that you can't make progress because your tools are faulty, worn or out of date! So follow this checklist before you go to your first class or practice session!
Check the Strings
Violin Strings wear out. If you've been playing a lot, you'll find that they may have become worn, dull in sound, or even started to lose their outer coating (in which case they'll need replacing immediately - before they hurt your fingers, or weaken and snap!)
Or if you've not been playing at all, and the violin has been sitting unplayed in a cupboard for a while (it happens!), then the strings may have deteriorated through lack of use. Either way, one of the smartest things you can do before starting a new course is to check (and if necessary replace) the strings.
For regular players, it makes sense to buy a new set of strings every year or two, but if you play a lot, you may want to do this more regularly. Some professional players will replace the strings before every major concert tour, but it quickly becomes an expensive habit if you do this every couple of months!
On the other hand, you don't want to leave it years between each string change. Even if you don't notice the strings wearing out because it's so gradual, you'll definitely hear the difference once a new set is on the violin... it breathes new life into an instrument!
Spare Strings
It's remarkable how many people, especially at beginner level, don't have a spare set of strings. Strings do sometimes break - this is normal! But if you're nowhere near a violin shop, or need to wait for an online order to arrive, you may find yourself unable to practise for several days...
...don't risk it! Get a spare set of strings and you'll be prepared for when string disaster strikes!
'Playing In' New Strings
If you replace your violin strings the day before your first class, then you should expect to have minor difficulties tuning the violin for at least a couple of days. This is because new strings need to be 'played in'... they need to get used to the tension that's created by winding and fixing them onto the violin.
The strings will naturally stretch during this process, which musicians sometimes refer to as 'settling' ("I just changed my strings; they need some time to settle"). Until newly attached strings are stable, you may find that they violin slips out of tune far more than usual!
The amount of time it takes for violin strings to settle does depend on the make and model of the string, and on the thickness (generally, the lower strings will take longer to settle than the higher strings, though this can vary). As a general rule, a few hours of playing over a couple of days is usually enough to 'play in' strings to the point at which they become stable.
Keep a set of old strings!
It's good practise to have used strings on hand in case you have a string break during a concert, and need an urgent replacement that's already been 'played in'. After all, if a string has already been stretched and worn, it's not going to slip out of tune as easily as a brand new string that hasn't been used.
So keep your most recent set of old strings in your violin case... just in case you have a string snap just before - or even during! - a concert or event. You'll be glad you did!
Check the Bow Hair
Another 'perishable' part of your equipment is the bow hair. Over time, the bow hair - like the strings - becomes worn and less responsive. Bow hair can also become dirty (especially near the heel, if you're in a habit of making contact between the bow hair and your right thumb.
So you should consider refreshing it on a regular basis (but be aware that, if you're using a cheap bow, it may not make economic sense... bow rehairs are usually more expensive than replacing cheap bows).
It's also common for the hairs of the bow to break from time to time (especially if you're playing a lot of ferocious, fast music... or if you're pressing too hard on the string!).
So even if your bow hair is fairly new, make sure that you've got a full complement of bow hairs on the bow, and that it's not becoming too one-sided (as hairs will tend to break on the far side of the bow - i.e. away from you - due to how we tilt the bow when playing).
If you play a lot, then you might find yourself needing to replace the bow hair more than once per year. But for many people, it's something that only needs to be done every couple of years.
Accessories
Is your rosin in good condition? Is your music stand working well? Do you have enough pencils and pencil sharpeners? Do you need to replace the soft cloth that you use for wiping down your violin after using it?
It's easy to get into bad habits and forget how important these tiny details are. Having a 'duster' or microfibre cloth (for wiping rosin off the instrument's surface when you put it way) is a good example... there are plenty of violinists who keep the same cloth for so long, and don't think of ever washing or replacing it!
Music stands, especially cheap collapsable ones, can break easily. And though it might seem like a secondary detail, a faulty music stand can be enough to significantly disrupt a violinist's practice routine! Make sure that you have all these little things taken care of, and you'll have fewer obstacles in the way of achieving your learning goals.
Here's a comprehensive list of things to check before embarking on the next stage of your learning. Can you think of anything we've forgotten? If so, let us know at [email protected]!
The Violin
The Bow
Accessories
September is always an exciting time here in London (the home of ViolinSchool). Yes, there's a tinge of sadness that Summer is fading away... but as the nights here begin ever earlier, there's a buzz in the air... it's a time for new things, a time for action, and a time to work hard and get things done!
The beginning of an adventure is always a time of immense possibility; a time of anticipation as we imagine the trials, tribulations, and successes that lie ahead. The start of a new year of learning engenders all of those emotions: excitement, inspiration, and perhaps a little trepidation!
But the first step is the most important one: deciding to take the journey! I believe that committing to growth and self-development as a musician is one of the most powerful decisions a human being can take... and I wish every single one of you courage, resolve and strength as you embark upon the next stage of your learning!
Coming up at the London School
Here at ViolinSchool, we are looking forward immensely to the coming year (tumultuous and chaotic though it may be in the wider world!). Our research has shown that our eLearning will be greatly strengthened by growing our local school here in London. So we've doubled down on our development of the classes and courses at our London school.
This term, our Beginner Violin Course for Adults introduces a new level, Course C. As with the A and B courses, we'll be adding all of the course content to our eLearning, so wherever you are you'll have access to new video tutorials and repertoire at the C level.
I'm also super-excited to welcome my aunt Caroline Lumsden to ViolinSchool London... she'll be introducing our new Children's Violin Course, alongside Setareh Mood who now begins teaching children at our London school. We begin with the 3-9 year old age groups, with courses for older children (and parent-child online learning) coming later.
Caroline is acknowledged as an international expert in children's learning of string instruments, and her work brings together the very best of diverse approaches such as Dalcroze, Kodaly, and Suzuki, with an environment that inspired deep creativity and fun for every child. It's a truly holistic approach that's designed not just for learning violin, but for all-round development of beautiful musicians and human beings!
I'll be entrusting my own children's music education to Caroline and Setareh - and if you're in London, I hope you'll consider doing the same! Take a look at the Children's Violin Course page and get in touch.
Online Learning
Although the reach of our London School is significant (and you're always welcome to come and visit!), the biggest impact of our work comes from helping people all around the world to learn. And to speed the development of our online learning, we'll be putting our blog front and center of our teaching.
Blogs are a superb way of covering in-depth ideas that don't fit into eLearning courses, but they're also a way of developing new concepts and engaging with an audience. We'll be publishing here more regularly, and I'll be excited to introduce to you new guests and ideas that will provide ongoing inspiration as you move steadily through our curriculum.
One of the strongest aspects of ViolinSchool's London school - and indeed one of our core values - is Community. This Autumn, I'm looking at ways we can better bring our amazing community online. Do we finally develop our member Facebook group into a popular, well-used discussion group? Or would you prefer a closed-door online forum for ViolinSchool members to meet and discuss ideas in depth? I'd love to hear what you think.
Wherever you are, and whatever you're working on, we look forward very much to hearing you play soon. Happy practising, and talk to you soon!
- Simon
Director, ViolinSchool
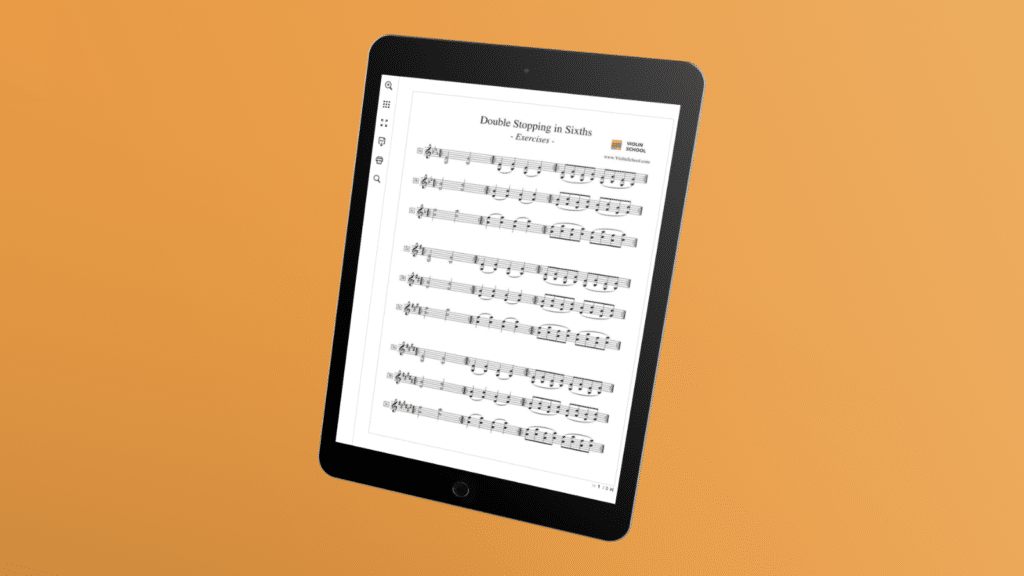
Title: Double Stopping in Sixths - Exercises
Description: These exercises are brilliant for practising double-stopped sixths! Use them for intonation work, and to develop a really solid left hand technique!
Level: Level 5, Level 6
Topics:
[wcm_restrict]
Click here to download it!
/wcm_restrict]
[wcm_nonmember]
Join ViolinSchool today for instant access!
This download is for ViolinSchool members only! Click here to become a Member of ViolinSchool and get instant access to all library downloads!
/wcm_nonmember]
Title: Hook, Line, & Sinker
Description: Hook, Line, & Sinker is a great study to use for practising hooked bowing. We use this technique to avoid unwanted accents or using too much bow when playing uneven note values. (such as dotted rhythms) in order to avoid unwanted accents on the shorter notes and to stop us from running out of bow!
Level: Level 6, Level 7
Topics:
[wcm_restrict]
Click here to download it!
/wcm_restrict]
[wcm_nonmember]
Join ViolinSchool today for instant access!
This download is for ViolinSchool members only! Click here to become a Member of ViolinSchool and get instant access to all library downloads!
/wcm_nonmember]
Title: Intonation Exercises - 1st-7th Position
Description: For a happy marriage of aural and muscle memories, keep the first finger down and learn the distances to the other notes within the hand ‘frame'.
Level:
Topics:
[wcm_restrict]
Click here to download it!
/wcm_restrict]
[wcm_nonmember]
Join ViolinSchool today for instant access!
This download is for ViolinSchool members only! Click here to become a Member of ViolinSchool and get instant access to all library downloads!
/wcm_nonmember]

