If you want to find a topic about which most violinists will disagree, the subject of shoulder rests should be high on your list! Every violinist has their own preference about which shoulder rest to use, if at all. Shoulder rests have only been in mainstream use since the 1950s, and some players still view them with suspicion!
Some people argue that a shoulder rest can reduce your agility, and that the violin becomes stable in relation to your body position - it cannot be moved around as easily. Some types of shoulder rest can also cause a slight muffling of the sound. But generally these are not significant enough issues, and nowadays many people prefer to use a shoulder rest (although it is still common for players of baroque violin not to use one).
The purpose of a shoulder rest is to give you more comfort and flexibility when you are playing. This is particularly the case if you are practicing, rehearsing or performing for a long period of time. If a shoulder rest is correctly adjusted, this should also improve your technique and prevent any long term neck problems.
Choosing a shoulder rest is more about finding one that is appopriate to the shape of your own body than that of your violin. The lenght of your neck and the breadth of your shoulders are the most important factors to consider.
You will also need to work out exactly where the right playing position for your violin is in relation to your body. To do this, hold the instrument as if are about to play. Ensure that your shoulders are relaxed, and keep your neck straight, without projecting your head forwards. Once you're in this stable position, you simply need to identify which shoulder rest fits best between the violin and your collar bone.
It is very important that you try out different types of shoulder rest to find out what works most effectively for you. If a music shop gives you a shoulder rest and expects you to buy it without trying it out, refuse! Make sure that you allow plenty of time and insist that a shop gives you the opportunity to try out different types of rest before making your purchase.
Finding the most comfortable shoulder rest is a bit like looking for a new technique in your playing: you need to work out what is most comfortable for you, that also gives you the most flexibility of movement. Experiment with different shapes, and if necessary consider bending the rest into a shape that feels comfortable, or try using a cloth, sponge, or other adaptation to see if you get a better result.
Above all, remember that a shoulder rest is a piece of equipment that is extremely personal to you. By trial and error, and with plenty of persistence, you will find the setup that is right for you.
Sheet music shops, like bookshops for the avid reader, are a wonderful resource for the violin student. Since the advent of online shopping, they are also becoming a rarity. The tactile and satisfying experience of looking through shelves of crisp, new music has given way to a search engine, a click of the mouse and guaranteed next-day delivery.
However, music shops still have their place. It’s much easier and more interesting to gauge the content of a tutor book or scale manual, search for chamber music for your group or find the score for your favourite piece when you can look through the pages of music.
For ViolinSchool learners based in London, there are a number of established sheet music stores. Many of them have online shops, but they can offer a much more specialist, personal service in store. There’s also always the opportunity to buy a few extra treats; a new book of pieces, a shiny pin badge or a pencil shaped like a treble clef…
Yamaha Music London used to be called Chappell of Bond Street, before it was incorporated into the Yamaha fold. Based on Wardour Street in Soho, a short walk from either Tottenham Court Road or Oxford Circus tube, it has an extensive sheet music department.
Also in Soho, at 48 Great Marlborough Street, Schott Music is a smaller shop, but no less expert. Schott is also one of the leading publishers of classical music.
Another famous music publisher, Boosey and Hawkes, used to have a shop right by the world-class chamber music venue, the Wigmore Hall. They relocated in 2005, and are now based in Covent Garden on Aldwych, right in Theatreland.
Chimes Musichave three stores in London, each one within easy reach of one of the top music colleges. The Kensington shop, two minutes from South Kensington tube is close to the Royal College of Music, they have a store at the Barbican Centre, convenient for Guildhall students, and their third shop is inside the Royal Academy of Music’s York Gate building.
Foyles is well known as a bookshop, but their Charing Cross Road branch specialises in music too. The entire third floor of the store is devoted to music, with sheet music, books and CDs for sale where originally the shop stocked gramophone records.
Musicroom is an internet-based company with a huge online store, and a shop in most major cities. Musicroom London is on Denmark Street in Soho.
There are also numerous small sheet music shops in London’s ‘towns’. Check out your local area to see if there’s a hidden gem such as North London’s Islington Music. Tucked behind Upper Street, Islington Music has a range of sheet music as well as instruments and accessories. In East Dulwich, South London Music are the local sheet music specialists, and in Camden Town, Dots Music boasts an ever-increasing stock.
If you don’t get into central London much, and are anxious that any shop you choose to visit may not have what you need, there’s always the option to phone in advance and ask for advice. Sheet music shops are a pleasure to visit, and these businesses thrive despite Internet shopping, so take the opportunity to immerse yourself in an exciting aspect of learning, and next time you need to buy some music, visit your local sheet-music shop.
Happy New Year from everyone here at ViolinSchool!
We've got some exciting news to share with you for 2017...
Sheet Music Publishing Partnership
We're really happy to announce that the ViolinSchool team is taking over management of Musicland Publications, a leading publisher of sheet music and educational materials for string instruments.
Musicland itself is a family business, established in the 1980s by Alan and Caroline Lumsden (Hewitt Jones). Caroline, who is the aunt of ViolinSchool Director Simon Hewitt Jones, has been an advisor to ViolinSchool since 2013, and we're really excited to be bringing together her experience of educating children with all of the expertise in adult learning that's been built up by the ViolinSchool team in recent years.
In the near future, we'll be collaborating together on several ViolinSchool books, including all-new 'tutor books' that will complement our online learning programs. But the Musicland catalogue is already a goldmine for string players (and many of our London learners and Violin Orchestra players are already familiar with some of Musicland's chamber music!)
The new Musicland website is now live at www.musiclandpublications.com featuring 50 of the most popular pieces from the catalogue (and the rest will be arriving over the next few weeks). Music is despatched daily from our dedicated 'cottage warehouse' in South-West England, and as each edition is revised and updated, digital versions will become available through ViolinSchool and other digital sheet music distributors.
Release Dates for Online Courses
We're happy to announce release dates for the revised online learning programs:
We can’t wait to share these great new resources with you! Access to all of these great new courses is included in ViolinSchool membership, and we'll let you know by email as soon as they become available. Remember, you can check our online curriculum to see all the topics that will be coming your way.
The Violin Course
The other big project we’re about to start is The Violin Course, our epic 12-week course in London that guides learners from total beginner level to Level 4 of our curriculum. We’re starting this Saturday, and we have just a couple of places remaining, so if you’re interested in taking part then make sure you get in touch today! All the info is on the page at https://www.violinschool.com/violincourse/.
The content of the Violin Course will also form the basis of our online learning programs, so even if you can’t make it to London, then keep an eye on our blog, our social media and our newsletter. Over the coming weeks we’ll be sending you lots of video lessons, sheet music and other great resources to help you make 2017 the year where you take your violin-playing to the next level!
Auld Lang Syne is sung around the world every New Year's Eve, so today, why not try playing it on the violin?
Happy New Year from everyone at ViolinSchool. Here's to a wonderful year of music-making in 2017!
At this time of great change, as people across the world celebrate this special time of year, it's more important than ever for us to remember the great human values that draw us together.
At ViolinSchool, we celebrate our two 'guiding forces': Creativity and Community.
Community binds us together through shared musical experiences and brings joy and understanding to our lives.
Creativity allows us to be inspired; to dream, to imagine and to create the wonderful musical expressions that previously seemed unimaginable.
The whole ViolinSchool team is taking a few days out to rest, re-energise, and prepare for an epic few months ahead. Wherever you are today, we wish you a peaceful and restful holiday season.
ViolinSchool Support is closed on 25 & 26 December, with limited service only on the 27th. See you again from 28th December onwards!
As you can imagine, we see hundreds of violins pass through the doors of ViolinSchool each year, and for our London students, a lot of time and energy is spent ensuring that violins are in tip top condition.
This page will give you the low-down on all the violin shops in London. We are in contact with most of London's violin shops, but we maintain complete impartiality. By listening to the feedback from you, our students, we are constantly monitoring the quality and integrity of London's violin shops, and reflecting as accurately as we can the strengths and weaknesses of each.
This page is focused on Violin Shops (which are usually string shops - catering also for viola, cello and bass instruments). But don't forget that many general music retailers also supply entry-level violins, and you can also find a good selection of instruments on the internet (and also a very bad selection... we will write more about how to avoid being ripped off soon!).
Violin Shops in London
Stringers - Marylebone
The appropriately-named Stringers actually takes its name from the proprietor, Maureen Stringer, who opened the company in Edinburgh. More recently, they have begun trading very succesfully in London, and now have a dedicated shop in Lisson Grove, near Marylebone Station.
Guivier is the grandfather of violin shops. Since the 1960s, they have been trading at their shop in Mortimer Street (near Oxford Circus), but the history of the company goes way back into the early 20th Century.
Gareth Ballard has set up his violin workshop near Imperial War Museum in Lambeth. Gareth offers a very personal service and have much experience in getting the most out of musicians instruments as well as repair/restoration and hand crafting new instruments.
The Violin Orchestra had so much fun in London last week playing the Pirates of the Caribbean theme tune, amongst other great music... if you missed the livestream, you can still see it on our Facebook page! (including the attack on our conductor by Domini the Pirate!)
Here's another great interpretation of He's a Pirate by Hans Zimmer, by Mr Cool Violin himself, the virtuoso violinist David Garrett.
So I'm deep in one of our research documents, examining some tiny detail of how the arm moves during a Tremolo stroke. I'm trying to make sure that I've got the best possible wording for an upcoming video script.
If I use this word or that word, will it be clear enough? What about people who don't already know what the word means? Would it be clear enough for a non-native English speaker? Or for a child to understand?
I cross-reference with a couple of our primary sources. Ah, Leopold Mozart (Wolfgang's Dad) agrees with me - he writes almost precisely the same thing in his 1756 treatise. Except... he uses the words 'vibrato' and 'tremolo' interchangeably.... ARGH!
I have one of those moments. Why do we use the word tremolo anyway? Or vibrato? Or any piece of violin-playing jargon! Why are we even trying to use words to describe this stuff?
We have to, of course. Otherwise we'd never be able to communicate about what we do. But with something as complex as violin-playing, there's a limit to how useful terminology and words can actually be. Talking about violin-playing is all very well, but as with any highly intricate skill, there's a distinct reality gap between theory and practice.
The reason for this is simple: when you're working on a task that contains extremely large numbers of variables, there are an uncountably large number of potential ways to do it!
And that's why there are many ways to play the violin. Everyone's different. There's no 'right' way.
That said, there are plenty of principles which it's possible to agree on as being 'correct' or 'incorrect'... broad, measurable ideas that can objectively be said to be true for any violinist. To communicate those principles in a way that they can be truly understood, internalised and applied, then you need to talk about them... and talk about them often. And we'll be doing plenty of that in the months to come, both here on the ViolinSchool blog, and also in our Video Lessons and Online Courses.
But the way teachers talk about those principles has to be different for different people. A video or a blog or a teacher's description might resonate perfectly for one learner, but make no sense at all to another.
That doesn't necessarily make the content good or bad, or right or wrong... it's just a reflection of how each person learns. Our experience, knowledge, preferred learning styles, and so on, will all affect how we relate to, absorb and internalise information.
For that reason, a lot of terminology can be quite subjective. For example, in the 19th and 20th centuries, it was common to distinguish between different 'schools of thought' in violin-playing practice... people often spoke of the 'Russian' or 'Franco-Belgian' or 'German' school of violin-playing.
That might have held true in a pre-YouTube world, when long-distance travel was rare and ideas were slow to cross continents. But in the hyper-connected 21st Century, unthinking adherence to old-fashioned terminology is a lazily dogmatic way of communicating our art!
(We joke about this a lot at VS HQ. "Oh David... your spoon-hold is looking sooo Franco-Belgian this morning!")
**
Ultimately, 99% of your audience doesn't give a damn about the provenance or genealogy of your bow technique!
All they care about is that it sounds good.
It's important not to get too hung up on 'established' musical terminology; there's often quite a lack of consensus about what some of the words mean anyway! What's important is that we speak clearly and simply about what we're doing and how we're doing it, so that we can easily communicate it to anyone, anywhere!
I'll leave the last words to Ella Fitzgerald & Louis Armstrong:
It's that time of year again... The Violin Orchestra is back today with a Christmas Concert & Livestream today, Saturday 10th December!
To celebrate, we've made all our Christmas Carols free to download for everyone until the end of the weekend... you can grab them here!
If you'd like to play along with The Violin Orchestra, join us on our facebook page for the livestream... our London learners will play solos from 2pm, and then The Violin Orchestra will be performing from approx 3.20pm London time today (Saturday 10th December).
p.s. In London, UK? Join us in person at The Warehouse, Waterloo from 2pm (doors open 1.45pm). Entry by donation, no ticket needed - just turn up!
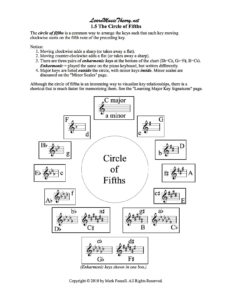
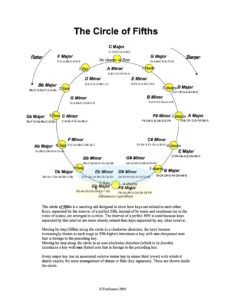
The circle of fifths is a musical theory tool that has its roots firmly in mathematics. It explores the relationships between those musical intervals that are most pleasing to the ear, based on discoveries made by the mathematician Pythagoras two and a half thousand years ago.
Pythagoras discovered and investigated the most basic facts about frequency and pitch. He found that there were mathematical ratios between notes. The octave, which is the most basic interval, the point at which pitches seem to duplicate, has a natural 2:1 ratio. If a string of a certain length is set in vibration it will produce a particular note. The shorter the string is, the more times it will vibrate per second, once it is set in vibration. When a string vibrates more times per second, the pitch of the note produced is higher. Therefore, if the string is kept at the same tension but its length is halved, it will produce a note one octave higher than the first. The same happens when you blow through a tube of air. A tube twice the length will produce a note an octave lower.
The circle of fifths, sometimes called the Pythagorean circle, is a diagram with twelve points that represent the twelve semitones within an octave. It is a chart rather like a clock face that organises all the keys into a system and can be used to relate them to one another. It is called a circle of fifths because each step of the circle is a perfect fifth from the next. The fifth is the interval that is closest in character to the octave, in that it is more consonant (less dissonant) or stable than any interval except the octave (or the unison).
A perfect interval is one where natural overtones occur. If you play a note on your violin and listen closely, you will hear the pitch you are playing. You will also hear overtones sounding. The most significant of these, or the easiest to hear, is usually the fifth. Where the ratio of frequencies between octaves is 2:1, the ratio of the frequencies of the fundamental to the fifth is 2:3. A perfect fifth is an interval of seven semitones. These seven semitones represent the building blocks from the first note of a scale to the fifth.
Watch this video for a clear description of how the circle of fifths is built.
The circle of fifths is useful because it shows the relationship between the keys, key signatures and chords.
It can be used to:
find the key of a piece
transpose it to a different key
compose new music
understand harmony and scales
Now you’ve watched the video on how to make a circle of fifths, have a look at this interactive circle of fifths. You can use it to look at the relationships between chords in any key.
So what is the circle of fifths useful for?
It is possible to learn the order of sharps and flats as they occur in music by using the circle of fifths. You can work out how many sharps or flats are in a key, and also which notes are sharpened or flattened.
If you look clockwise around the circle you will see the order in which the sharps appear in the key signature. When there is one sharp, it is F#. When there are two, they are F# and C#. Three sharps will be F#, C# and G# and so on.
Looking round the circle in an anticlockwise direction shows the order of flats. If there is one flat it is Bb. Two flats are Bb and Eb. Three are always Bb, Eb and Ab, and so on.
In a circle of fifths in the major keys, C major appears at the top of the circle. C major has no sharps or flats. The next key in a clockwise direction is G major. G major has one sharp, which we now know is F#. Then comes D major which has F# and C#. Going in the other direction, F major has one flat, Bb. Bb major has two flats, Eb major has three flats.
Use the interactive circle of fifths above to notice the enharmonic changes this creates in flat keys between, for example F# and Gb. Look at the circle in D major and then in Db major to see how the pitches are renamed. Two notes that have the same pitch but are represented by different letter names and accidentals are described as enharmonic.
The circle of fifths can also be used to work out which keys are related to each other. You can see that the keys on either side of C are F and G. Therefore, the two closest keys to C, which has no sharps or flats, are F, which has one flat, and G, which has one sharp. F and G therefore make up the primary chords in C major. F is chord IV, the subdominant, and G is chord V, the dominant. Using these three chords you can build the standard chord progression IV V I.
The secondary chords are those further away from the note of your key, so in C major, D, A and E would be secondary chords, which means they may appear in the harmony of your piece but are not as strong as the primary chords.
Watch these two clips. They explain how the circle of fifths works in major and minor keys:
The circle of fifths is also useful for understanding chord progressions such as those from dominant seventh chords. Dominant seventh chords have a tendency to want to go towards another chord. They contain a dissonance that melodically and harmonically needs to resolve. The chord that the dominant seventh resolves to is one fifth lower, so A7 resolves to D major, F7 resolves to Bb major, and so on. If you are asked to play a dominant seventh in the key of D, you will start on the note A.
Here is another clip explaining how to use the circle of fifths to understand your scales.
The model of a circle of fifths, with the consequent understanding of chord progressions and harmony and the hierarchy and relationships between keys, has played a hugely important part in Western music.
The violin bridge is a device designed both to support the strings and to transmit their vibrations to the body of the instrument. Made from maple wood, the shape of the bridge varies from one violin to another, and its placing and fit have a significant impact on the tone and playability of the instrument.
Violin bridge fitting is a task best assigned to a trained luthier with specialist knowledge. The height, thickness, placing, shape and top curve of the bridge are all vital to how the violin will work.
Student violin kits often arrive in the mail without the bridge set in place. Instruments are packed this way to avoid breakages in transit.
The bridge that comes with a beginner instrument will often be a chunky, approximate cut, far too thick to vibrate well. Oddly, violins designed for beginners can therefore be more difficult to play than those owned by advanced players.
When your violin arrives, take it to a good violin shop or luthier to set the bridge up. Violin bridge fitting involves a certain amount of refining and shaping as well as knowing where to place the bridge.
Every bridge starts out as a ‘blank’, a crude, thick, unshaped design. Bridge blanks come in different sizes. A standard full-size bridge is 41.5 millimetres wide, but a narrow violin will require a smaller bridge. A trained luthier will be able to tell you if your violin needs a non-standard bridge.
A good bridge blank shows a longer grain of wood on the front where it will face towards the fingerboard, and shorter grain on the back where it will face the tailpiece.
How does a bridge blank become a bridge?
The feet of the bridge sit on the belly of the violin. When the bridge blank arrives, the feet will be flat, but the belly of the violin is curved. Some violins have a higher belly arch than others and no two are the same.
The feet of the bridge must be sanded so that they sit firmly on the belly. As the bridge is held in place by the tension of the strings and NEVER glued in place, this element of violin bridge fitting is crucial. The better the fit, the more contact the bridge has with the belly, meaning the vibration travels down into the body of the instrument unhindered.
The top of the bridge (which is most likely the same height on both sides of your bridge blank) must be shaped and cut down so that the arch and string height is correct. A standard height for the E string is 3mm above the fingerboard while the G string rises 5mm.
Again this will very from one instrument to another and from player to player. If this shape is cut badly, the violinist will experience difficulty in crossing strings. If the strings are too high they will require too much left hand pressure which can cause tension, and equally strings that are too low can cause left hand discomfort and distortion in the sound as too much of the string is in contact with the fingerboard.
Once the violin bridge is fitted to the correct height, it then needs to be properly shaped. The back of the bridge will remain at a right angle to the body of the violin, but the front of the bridge must be thinned.
Carving out much of the wood again improves the transmission of vibrations from the strings to the body of the instrument. The ankles can be narrowed, the feet be made thinner and the ‘kidneys’, the holes that look decorative but have the function of reducing the bulk of the bridge, can be carved out.
Too much wood in a bridge will dampen the sound of the violin in the same way that placing a mute on a well-fitting bridge produces a more muffled sound because it prevents the bridge from vibrating to its full extent.
Finally, grooves must be added so that the strings can sit on the bridge. The strings should sit on top of the bridge and never sink into the wood, again to aid vibration.
An old bridge that has developed deep grooves can be adjusted with veneers to raise the strings. Strings left sinking into a bridge can also cause warping, as the bridge will be tugged back and forward every time the violin is tuned.
Can I fit my own violin bridge?
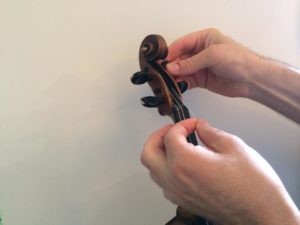
If your violin bridge has fallen over or received a knock, it is sometimes possible to set it back in place by looking carefully at the marks on the varnish of the belly which will show where the feet normally sit. However, if you have an older instrument, there may be numerous such ‘footprints’ which will make it hard to set.
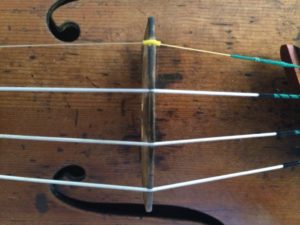
Loosen your strings and place the bridge on the violin, making sure the lower side is on the E-string side of your violin. Tighten the strings a little at a time, ensuring that the back of the bridge remains perpendicular with the belly of the violin.
Tightening the strings can cause the bridge to pull forward, and if left leaning either forward or backwards the bridge can easily warp over time: As the strings pull down on the bridge the feet will stay in direct contact with the belly causing the bridge to bend.
If your bridge is cut badly or your instrument is of better quality than a basic student kit model, it is advisable always to take it to a professional to adjust the bridge. The shape and fitting of the bridge is so integral to the sound it is not worth getting it wrong, and whilst the bridge is easy enough to move it is also easy to break or damage.
Never change your strings by removing them all at once; change them one at a time and watch out for the bridge pulling or leaning forward as you tune the new string.
Ask your luthier to show you the optimum position for your bridge, and check it regularly to see that it is not leaning. A new bridge is expensive and unless a bridge has warped or broken it should last many years.
To get the best out of your violin and your playing, it is important to have your bridge shaped and fitted by an expert. Just as you could cut your own hair but you might regret the results, there is a complex knowledge bank behind the skill of violin bridge fitting.
There are countless videos on YouTube giving various levels of advice, but they cannot replace the specialist training and understanding of a luthier. That small piece of maple takes the vibrations from your violin strings and produces the mighty singing voice of your violin. Treat it well and it will reward you with years of beautiful sounds.
Here's a lovely piece of music for a Sunday! The legendary jazz violinist Stéphane Grappelli performs Blue Moon at a live trio recording from 1990. Enjoy!
Christmas is a-coming! Let's kick off the season with an old favourite, Jingle Bells! Click the image below to go to the free download page, and grab your copy today. O what fuuun it is to play our Jing-le Bells todaaaayyy.... !!
Here's a wonderful piece of violin history! American virtuoso Itzhak Perlman reminisces about his first meeting, as a student, with the legendary violinist Jascha Heifetz, at the Juilliard School in New York. Heifetz tried to catch Perlman out (though Perlman is too modest to say it like that!), by asking for a really difficult set of scales. Luckily, Perlman had done his practice...
Scales are really important for giving you clarify and confidence in your left hand, and we recommend to build a conscientious scale routine into your regular violin practice. If you're new to this practice technique, check out our article How to Practise Scales which will help you to get started!
Yesterday we shared Benjamin Zander's wonderful TED talk, The Transformational Power of Classical Music. Here's another - actually the most viewed TED talk ever - about creativity in Education. It's now over a decade old, but has lost none of its power and urgency... Sir Ken Robinson's message about placing creativity at the heart of education is inspirational, funny and moving all at the same time.
We watch this video every couple of years to re-inspire and energise ourselves... If you've never seen this video before, watch it now, you won't regret it!
Here at ViolinSchool towers we're all buzzing with excitement... we've launched our new flagship Violin Course, we're cracking on with getting the online courses out to you, and our ViolinSchool Blog starts up again today on our new ViolinSchool.com website! And what better way to begin with one of our favourite ever videos, The Transformative Power of Classical Music TED talk by conductor Benjamin Zander. Enjoy!
If you enjoyed this video, you might also like Zander's book The Art of Possibility - a thoroughly inspiring and uplifting read that's a massively helpful tool for developing good performance and practice psychology.
Introducing The Violin Course, our new flagship study program, developed exclusively by the team at ViolinSchool:
The basic building blocks of music are rhythm, pitch, and sound. When a scale is played well, the pitch is even so all of the notes with the same name in different octaves are in tune with each other. The tone quality and rhythm are even, not disturbed by bow changes or shifts. Evenness does not mean that the scale is robotic. Each note has its own musical character.
Once you have practised your scale so pitch, sound and rhythm are all good, the next thing to go for is to make it feel easy. Simon Fischer suggests that a nice way to do this is that each time you do something well, you should then see if you can achieve the same result with half the effort, then half the effort again. He says that until you can play something well with little effort, there is still room for improvement.
Instead of practising your scales as complete figures, work on the elements of each scale. The scale can be broken down into different components or “problems” such as one octave scales, shifting exercises, exercises for the coordination of left and right hands, finger preparation and finger placement. Rather than repeating a scale mindlessly over and over, search for exercises within the scale to address the particular problems you are having.
Here are some ideas for developing your scale practice…
Developing the Right Hand
Apply rhythms, accents and bowing patterns to all of your scales and arpeggios. This will produce the greatest improvement in the shortest time. Ivan Galamian, the famous violin teacher believed that by learning how to play different rhythm patterns you discover and repair all the weak areas where you don’t really know what to do with the bow and fingers, or where your fingers move too slowly.
Practice with different dynamics. This trains the bow for greater control. Combine crescendos and diminuendos within the space of each octave or between the bottom and top of the scale.
Tone
Play long smooth notes on an open string, for example, the A-string. Listen for the smoothness of tone. Now place your fingers on another string, such as the G-string, in a scale sequence whilst still playing the A. Try to keep the tone of the A as even and smooth as before. Build up the left hand activity to include a shift to third position and back down.
Ideas for the Left Hand
Start at the top of the scale instead of the bottom.
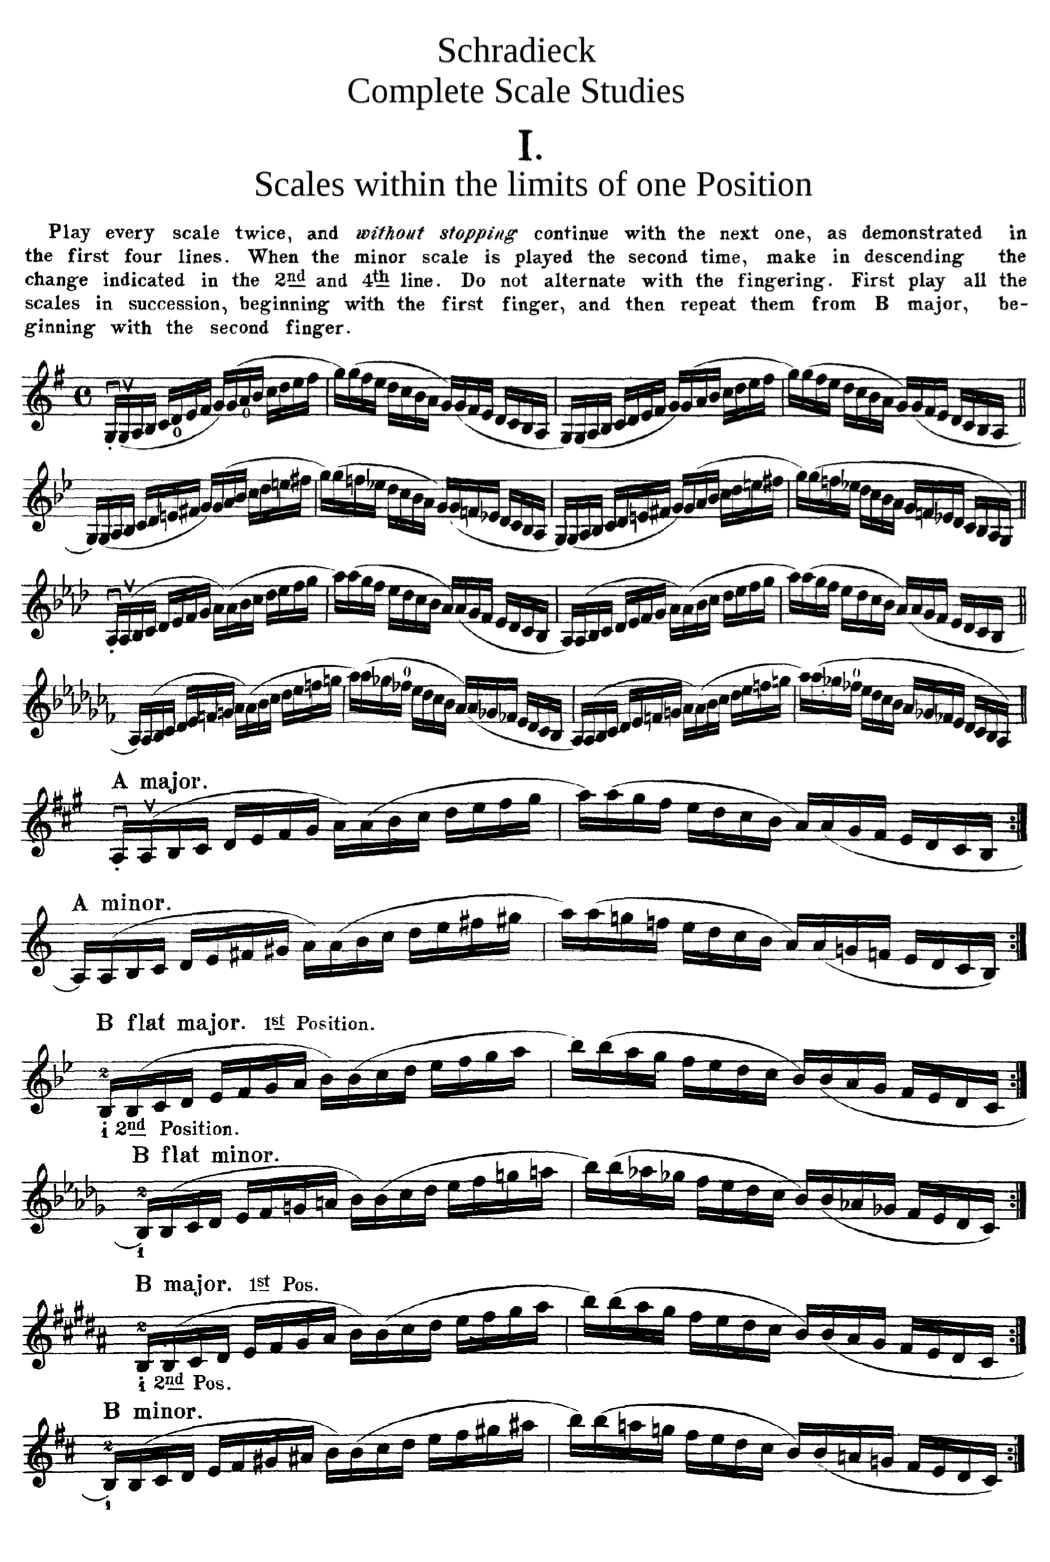
Practice scales within the limits of one position. This exercise is the first in the Schradieck book of scale studies and will teach you the hand positions in every part of the fingerboard.
Intonation
The major scale contains five whole steps and two half steps like this: T T S T T T S. If you think of this pattern as two groups of four notes that are joined by a tone, you can see the symmetry of the shape.
A scale should be built so that each note is heard relative to its position in the key. Each note of the scale has a unique hierarchical function and understanding this is important for building good intonation. The great cellist, Pablo Casals, and the famous violin teacher Dorothy DeLay both independently used this idea to devise a system for structuring the scale to hear the tuning within it.
Begin with the notes of what are called the perfect intervals. These are the first, fourth and fifth notes of the scale. In A major this would be A D E and A. In G major it would be G C D and G. Play only these notes all the way up your scale and back down again.
Then add the leading note, the seventh pitch. In G major this would be F#. This note leads to the key - note. Feel the sense of upward pull towards the key – note or tonic.
Next add the second and sixth notes.
Building the scale using this sequence is musically satisfying. Remember to try it in all the major and minor keys you are learning. It is easy to forget to work on all the different keys. In fact, when Carl Flesch first published his system of scales, it was only written out in C major, the idea being that his students would use the exercises in every key. Flesch realised that in reality many students only practised C major, so he wrote out the system in every key and even added bowing and rhythm patterns, and this is how Das Skalensystem was created.
Take a small section of your scale. Notice which fingers you can leave down and which you need to lift. By leaving fingers down you will give strength to the hand shape, making intonation more reliable, and by avoiding unnecessary finger movements you will gain an economy of movement, which is helpful when you want to play faster.
Use as many different fingering combinations as you can find, don’t always stick to the same one. By learning different fingerings your intonation will develop and you will have more freedom of expression and musical choice in your pieces.
Speed of Left Hand Fingers
Practice a section of your scale using short, repeated fast bow strokes on each note; say four sautillé notes on each pitch. Learning to sound these short notes will improve coordination between left and right hands and the left hand fingers will learn to move faster.
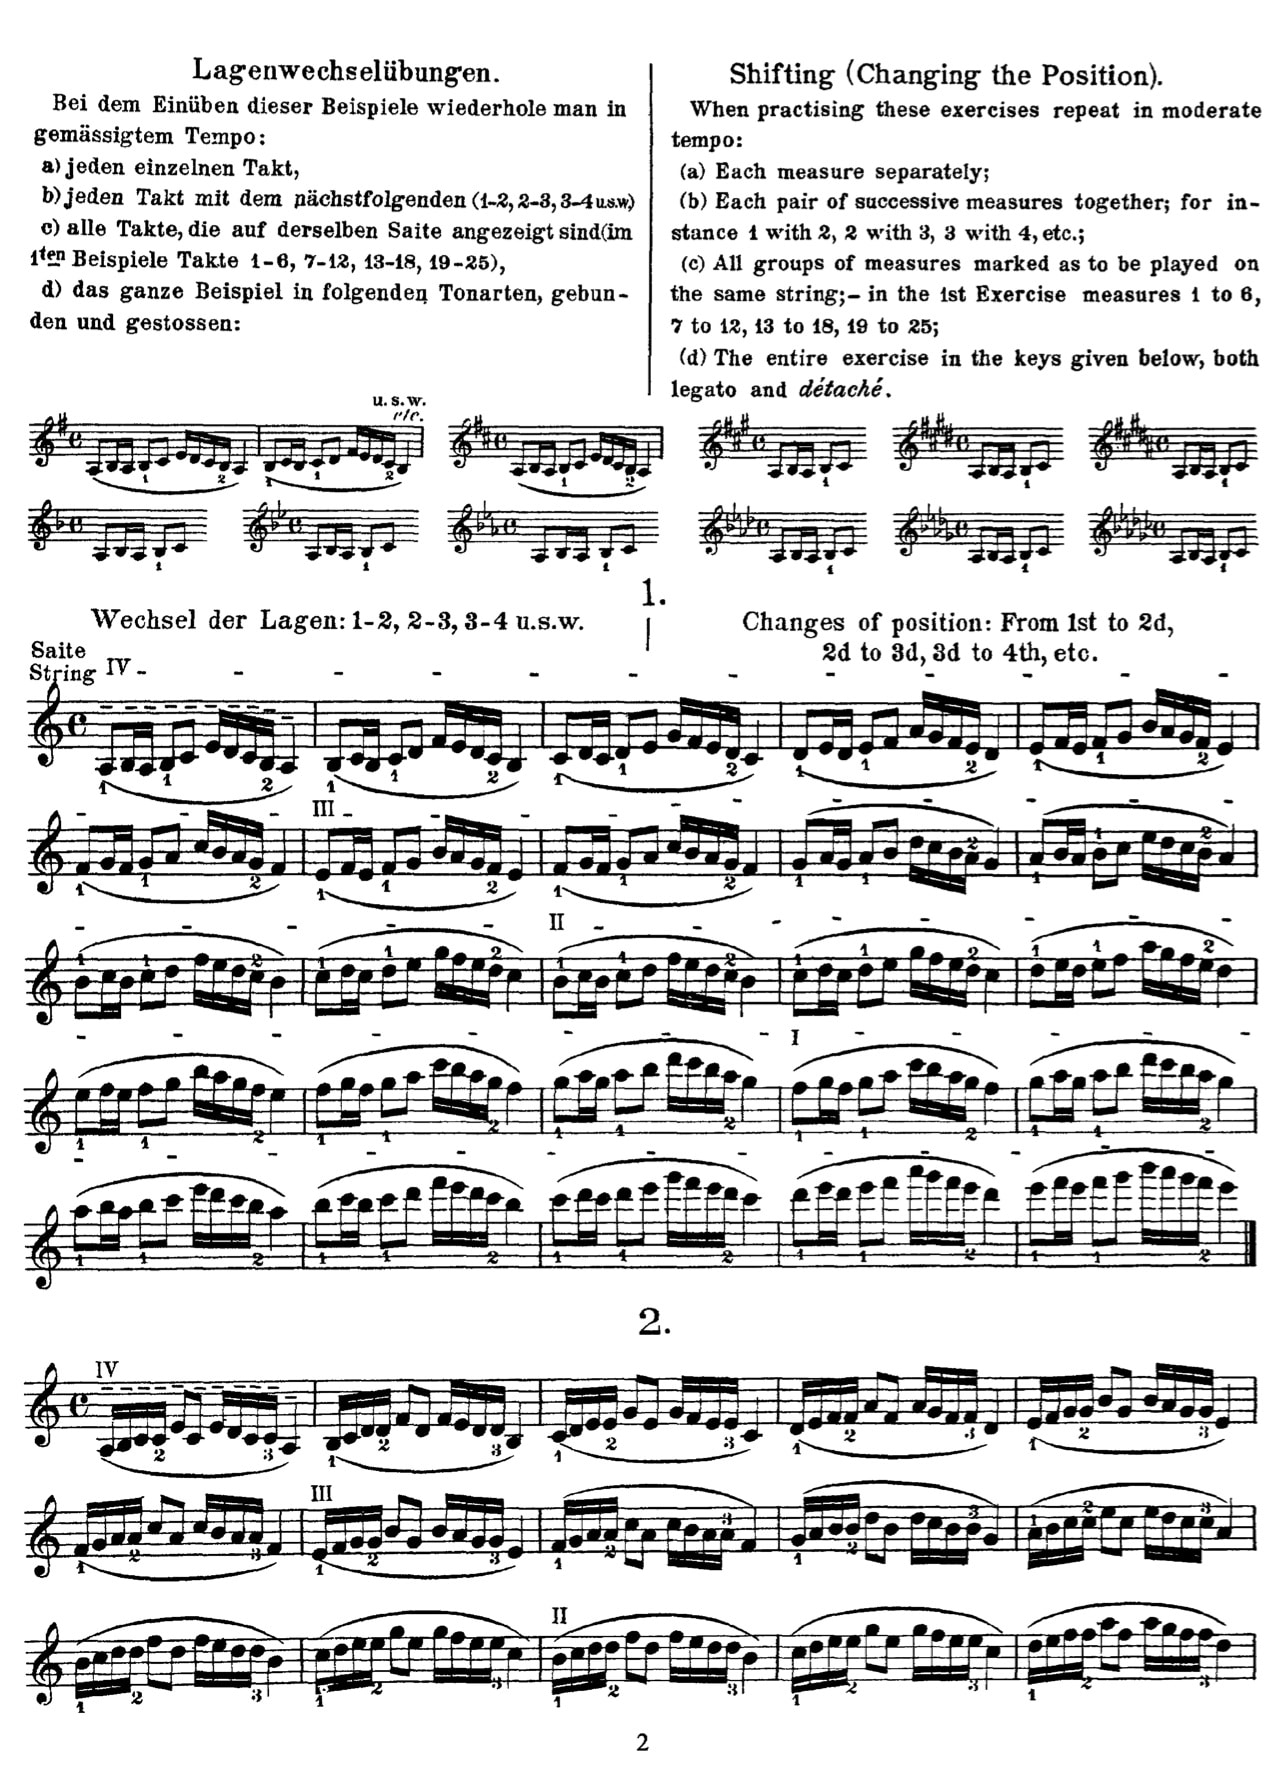
Shifting
“Trill” the shifts. Take an awkward shift and start working on it slowly, trilling between the two notes. Gradually speed it up to make it sound like a trill.
Practice scales on one string. Take a one-octave scale and learn to play it on one string, keeping a good hand position. Can you play a two-octave scale on one string? This may seem difficult but when you return to your three octave scale it will seem much more approachable.
Practice scales using only first and second fingers, shifting every two notes.
Practice the scale with the note before the shift missed out, instead repeating the previous note.
Identify your problem shift and isolate it. Can you find an exercise in the Sevçik book of Preparatory Scale Studies that will help you improve the shift?
Practice your shifts with “ghost notes.” Work out where the hand is going. Is there an intermediate note you can sound? This is particularly good for downward shifts where the hand is going to a position where it lands on a weaker finger. Practice these ghost notes in dotted rhythms and gradually eliminate the extra note whilst keeping an awareness of how the shift works.
Mindfulness
Another benefit of breaking your scales down into their separate elements is to give you a chance to learn to use your body in a comfortable, natural way. Practising long scale sequences in a mechanical way leaves no space for awareness and leaves you vulnerable to strain and injury. Breaking down your scale practice into bite-size exercises leaves the mental space for mindfulness of how the muscles are achieving the end result. This will give you better, more secure, long-term results.
Improving Your Scales
In the introduction to his book of scales, Contemporary Violin Technique, Ivan Galamian explains, “The direct way to … mastery lies through working procedures which present a constant challenge to the … thinking processes. For this reason new problems must always be faced and solved.”
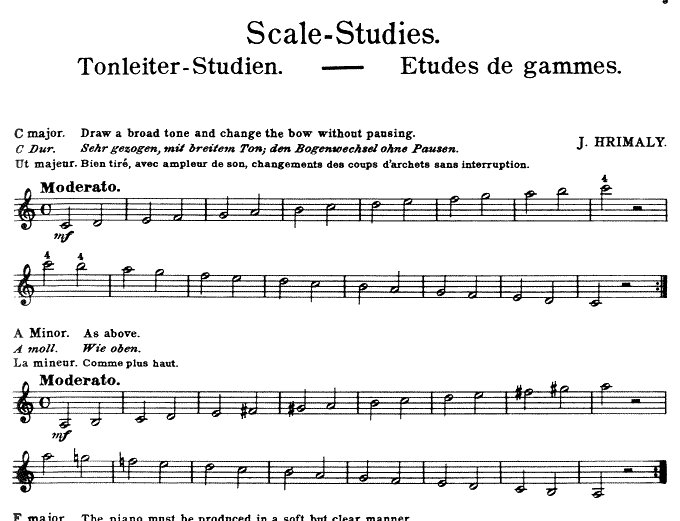
There are various books of scale studies available, the newest of which is Scales by Simon Fischer; a written-out practice full of comprehensive exercises for improving scale practice. There are also the scale studies by Jahnke, Hrimaly, Schradieck and Sevçik which can look a bit intimidating, but many of which contain similar ideas. For less advanced exercises try the Paul Harris series, Improve Your Scales, which are graded by the ABRSM system, so they start right at the beginning.
Practice in as creative a way as you can so your mind is always switched on and always learning. By analysing and exploring the elements of a scale and practising it in different ways, the original scale will seem much easier when you return to it, and your enjoyment of your scale practice will increase. There is nothing worse, after all, than practising something you find boring and not getting anywhere!
On this page you can learn the G major violin scale. Build up your understanding in different ways by using the video to link your aural and visual memories, the fingering guide to link your intellectual and physical memories, and the 'visual grid' to link the physical, visual and intellectual memories.
As you start to get familiar with the patterns and start to rely more and more on your aural senses, your intellectual/physical knowledge of the scale will begin to become 'automatic'. Then, you can start to use the sheet music as a quick visual reference for which notes you need to play.
VIDEO GUIDE:
how to play a G major scale
Here is a video guide explaining how to play the G major scale:
FINGERING GUIDE: which fingers to use
The symbols below will show you which fingers you need to use, so that you can play the scale without needing to read the sheet music.
The letter represents which string to use
The number represents which finger to use
e.g. - 'E1' = 1st finger on the E string, 'D3' = 3rd finger on the D string
[close] indicates that the two notes are next to each other, i.e. there is NOT space for another note inbetween
[wide] indicates that the two notes are one step apart from each other, i.e. there IS space for another note inbetween
Here is the one octave scale, which uses just the G and D strings:
Going up:
G [wide] G1 [wide] G2 [close] G3 [wide*]
D [wide] D1 [wide] D2 [close] D3
Coming down:
D3 [close] D2 [wide] D1 [close] D [wide*]
G3 [close] G2 [wide] G1 [close] G
*if you prefer, you can use a 4th finger instead of an open D string on both the way up and the way down. The interval still sounds 'wide' (known as a 'tone'), whichever way you choose.
Here is the two octave G major scale, which uses all the strings of the violin:
Going up:
G [wide] G1 [wide] G2 [close] G3 [wide]
D [wide] D1 [wide] D2 [close] D3 [wide]
A [wide] A1 [close] A2 [wide] A3 [wide]
E [wide] E1 [close] E2
Coming down:
E2 [close] E1 [wide] E [wide]
A3 [wide] A2 [close] A1 [wide] A [wide]
D3 [close] D2 [wide] D1 [wide] D [wide]
G3 [close] G2 [wide] G1 [wide] G
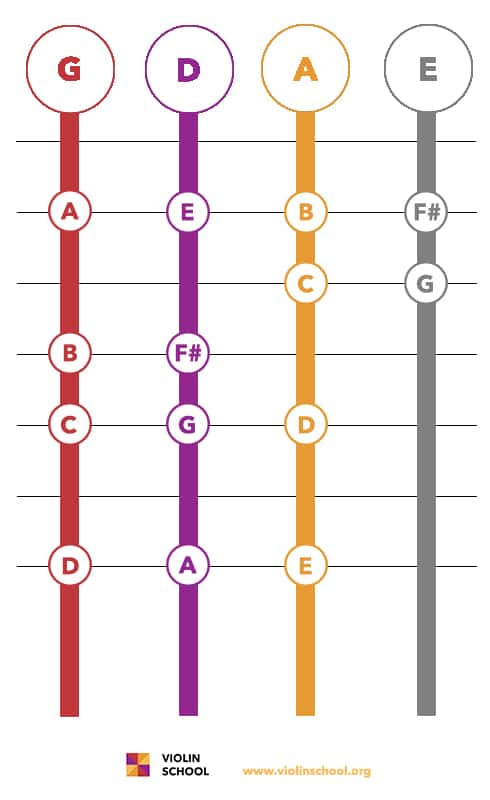
VISUAL GRID: where to put your fingers
Here is a visual 'grid' showing where to place the fingers on the fingerboard:
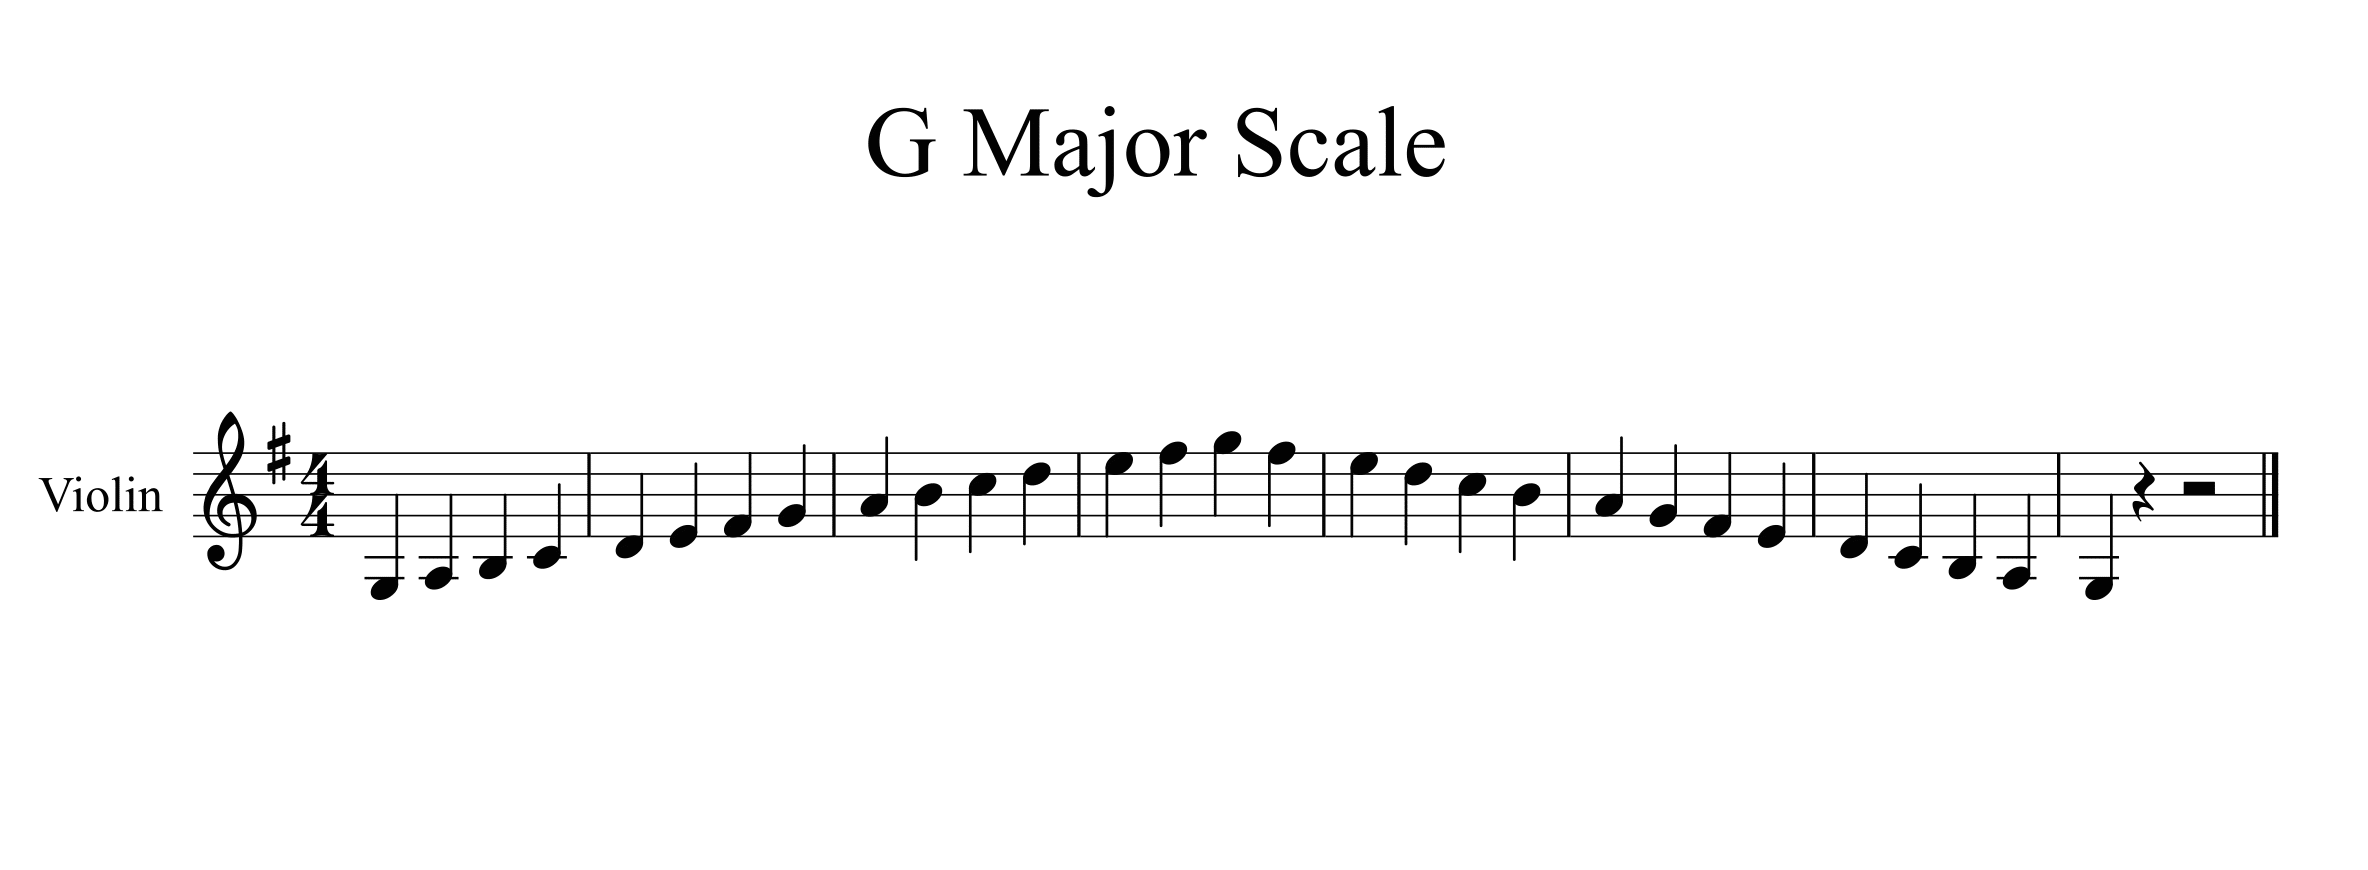
SHEET MUSIC: notation to remind you which notes to play
Here is the sheet music notation for a two octave G major scale:
Twinkle Twinkle Little Star is the quintessential piece for people beginning to play the violin! It's actually a great choice because it's fairly straightforward to play with three fingers and two open strings (A and D).
Twinkle Twinkle Little Star is one of the best-known melodies in the world, and one of the first songs that children often learn.
The English lyrics were first written by London-born poet, Jane Taylor and published in 1806 with the title "The Star" in Rhymes for the Nursery.
Twinkle, twinkle, little star,
How I wonder what you are!
Up above the world so high,
Like a diamond in the sky.
The original poem has five verses, but only the first is well known.
In this video, Simon from ViolinSchool takes you through the piece 'Twinkle Twinkle Little Star'. Learn the piece by playing along with the video and following the instructions! If you need a written guide on which fingers to use, check out the instructions below:
Here is the finger pattern you need to use in order to play Twinkle Twinkle Little Star. The letter represents the string, and the number represents the correct finger. So 'D' would be the open D string (no fingers), and 'D1' would be first finger on the D string, etc. etc. If a note is in bold, you should hold it for two counts (beats) instead of one.
If you'd like to learn how to play Twinkle Twinkle Little Star and many more great pieces for the violin, you can become a member of ViolinSchool and benefit from lots of great online resources including video tuition, live online classes, music libraries, and much much more!
Following a major upgrade on 5th November, we’re rolling out our long-awaited Online Courses between now and the end of the end of the year.
Our new Online Community is now available for members once you’ve logged in, and our program of Live Online Classes begins from 7th November.
Our twice-annual Violin Orchestra project is underway… this Christmas, you’ll be able to take part ‘virtually’ by sending in your recordings from wherever you are!
Or if you’re in the UK, join us in London on 10th December for our live webcast!
If you’re new to ViolinSchool, start with our New Learner Questionnaire which will show you where to begin learning!
If you’ve got any question or need help learning the violin, then get in contact with our Learner Support team anytime! We’re here 7 days a week to help you learn:
In this feature, we'll take a look at how often you should practise sight-reading, what music you should use, and how to structure your sight-reading practice to get the best results.
When and what to practise
Sight-reading is an important skill that you should be developing regularly during your usual violin practice sessions. A good approach is to try at least one new piece of music every day (or every time you practise). If you have lots of time to practise (e.g. 2 or more hours per day), then of course you can do more than that!
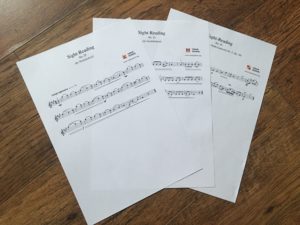
Sight-reading practice doesn't have to take long. You can just choose a very short piece of music to read. Try to get into the habit of playing something new 'at sight' as often as you can. If you're a member of ViolinSchool, you can start with our library of sight-reading exercises - if you have time, try a new one every day!
When it comes to developing the skill of sight-reading, consistency and regularity of practice is far more important than length or difficulty. If you practise sight-reading simple pieces a lot, then your sight-reading skills will improve, and you'll find it much easier when you eventually try to sight-read longer and more difficult music.
But if you start trying to sight-read repertoire that's too advanced for you, you will struggle to develop your skills correctly, and you may become demotivated. So be sure that you're not trying to tackle pieces that are too hard.
How to practise sight-reading
So you're in your practice room and you've chosen the piece or exercise that you want to use to develop your sight-reading skills.
But what do you do next?
Here's a useful method we've developed that will help you stay focused in your practice:
1) TRY IT!
Glance over the whole piece that you're about to play, and make sure you consider everything on 'The Sight-Reading Checklist', so that you're clear about exactly what you need to do.
Then, try playing it through once - straight through from beginning to end. Don't stop, don't go back, just perform it as best you can.
2) PRACTISE IT!
Now it's time for a second look. Play through the piece again, but do it slowly, carefully, and fastidiously... this time, you can stop and practise any bits that need practising.
3) METRONOME IT!
Play it through again - this time with a metronome! One of THE most important things to consider when you're sight-reading something is the timing - particularly the pulse of the music and the rhythm of the notes.
Don't worry about making mistakes - it's usually much more important for the music to STAY IN TIME than it is to get every note 100% right.
This is especially the case if you are playing with other people; even if the notes aren't totally accurate it's still possible to keep playing together, but if one person gets the timings wrong then the whole piece will fall apart!
4) PERFORM IT!
Imagine you are giving a concert, and try to give the best performance you possibly can - make it confident, convincing, accurate, and musical. Remember, you're now practising performing as well as sight-reading... so whatever you do, don't stop! You can always go back and fix any mistakes afterwards.
**
Remember this list to help keep your sight-reading practice efficient and effective!
TRY IT
PRACTISE IT
METRONOME IT
PERFORM IT!
**
Always remember that sight-reading is a learnable skill, so the more you do it, the better you'll become. Sight-reading is a critical skill for succeeding in a group environment, so you'll also rapidly build up your confidence - which is especially useful if you're playing with other people.
By making time for sight-reading on a regular basis and ensuring that you are always practising in a clear, ordered way, you will also be improving your overall musicianship and performance skills, as well as your violin technique.
A new series of first-hand stories from people learning the violin. Here's the journey of Setareh Mood (Violin Learner, Yoga Student, and Head of ViolinSchool Support)
My name is Setareh Mood. Since my childhood I've loved to play instrumental music, I've always found it fascinating. Living in different eastern and western countries, made me very interested in every kind of musical genre. I always wanted to work and study music, but rarely had the possibility of accomplishing that.
At the age of 12 I began learning keyboard and that was the first time I got familiarised with music notes. I played it for about two years, but the life of a student was very busy and I just used keyboard to perform some small school concerts.
When I was 18 I left my country (Iran) and went to Italy to continue my studies of Foreign Languages and Literature. After my degree from Milan's university, I taught Persian language and literature to Italians.
When I was 25 I felt that music playing was lacking so badly in my life. I didn't have any instrument
with me in Italy, so I borrowed a violin from my husband's cousin who was studying violin at that time. I played that violin for 1 year, which was enough time to make me fall in love with this beautiful instrument!
So after one year I bought my own violin. And went to some private lessons during two to three years. But a sense of community and setting goals was lacking in my playing and so I wasn't very disciplined and constant in my violin learning.
When I arrived with my husband in London in October 2014, life was very challenging. I tried to play violin when I could but it wasn't very easy without a guide or a community. Then one day last summer I found there was a violin orchestra for any age and level in London, run by ViolinSchool. The idea of being part of a group with my same passion thrilled me a lot. So I participated in the orchestra and I've got much more than what I was expected. I found a family, and my best English friendships came from this orchestra and ViolinSchool members.
I found that ViolinSchool gives us the hope that we can play the violin beautifully and enjoy it even if we have just begun to learn it.
And the eLearning program makes ViolinSchool special because we have access to the violin learning everywhere we go. And we have a dedicated advisory team who are always glad to help everybody with their questions.
At the moment I am studying Yoga to become an advanced yoga teacher, and my dream is to combine one day the unity of yoga to the harmony of music.
At the beginning of this year I began to be a part of the ViolinSchool team and my dream of working and studying for music became true 🙂
As Rumi said: Set your life on fire. Seek those who fan your flames!
Are you learning the violin and would like to share your story? Email us at [email protected] - you could be featured here next!
Over time, the strings on your violin will become worn and you will need to consider replacing them. However, strings can be very different to each other, and exactly when you need to change your strings will depend on a number of different factors:
Material
The material that a string is made of can make a big difference to how long it lasts. Gut strings generally wear out more quickly than steel strings. Check the specifications of the strings you have (take a look at the packet, or if you no longer have it, check the manufacturer’s website) to see what your strings are made of.
Condition of the Material
Some strings have an outer layer of wrapped metal, and this can sometimes become loose and begin to unravel. This is especially common where your fingers touch the fingerboard. The repeated action can cause the string to become stressed, which can weaken it.
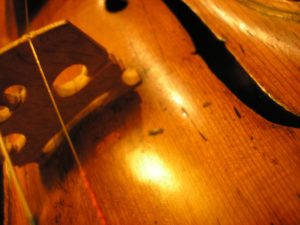
Wear and tear is also common where the string touches the violin near the nut (at the bottom of the scrollbox) or the bridge (see picture).
It’s worth checking that the nut and bridge of your violin are in good condition; if the grooves where the string should sit are not correctly engineered, then they can cause damage to the strings too.
String Damage
If strings do unravel, change them straight away! It can be dangerous to your fingers to play with strings which have a damaged outer layer, even for a couple of minutes.
Sometimes strings snap (commonly at the pressure point where the string rests on the bridge, but it is possible to snap elsewhere too), and if this happens they will be completely unusable, and you will need to replace them. For this reason, it is worth carrying a set of spare strings with you at all times!
Sound quality
Even if strings do last for a long time without breaking, they will eventually start sounding dull and will become difficult to tune. When a string is old and worn, you may be able to hear inconsistency in the pitch. Also think about the resonance of the sound you are making – does it usually sound like this? If you find that the sound you are producing doesn’t seem as clear as usual, then (assuming there is no fault in your technique!) this may be another clue that your strings are showing their age!
Usage
The amount of time you spend playing your violin will obviously affect the lifespan of the string! The more you play, the more the strings will vibrate, and the more their lifespan will decrease. However, there are things you can do to minimise the impact.
Do you clean your strings and fingerboard regularly? If not, the build up of dirt may cause some strings to age more quickly. Do you sweat a lot in your hand and fingers, or are your fingers oily? Be sure to clean up any residue at the end of your practice. Do you wash your hands before playing your violin? Could this affect the cleanliness of the strings?
Guidelines
It’s really hard to define useful guidelines about how often to change your strings, simply because there are so many different factors and each string will have a slightly different lifespan. On many internet forums you’ll find recommendations for changing strings ‘every 120 hours’ or ‘every 3 to 6 months’. But changing strings very regularly regardless of their condition can become an expensive habit.
Some people keep their strings on for a number of years (especially metal strings which last longer), and no doubt keeping things clean and well-looked after will help extend the lifespan. But strings which have been on a violin for an extended period of time are unlikely to work so well. Even if they remain in a good working condition, the tone quality will be significantly reduced.
You can be strategic about when to change your strings. For example, if you have a few months before a big concert when you are just practicing on your own, then it makes sense to change the strings a couple of days or weeks before the concert, so that they are still fairly fresh.
And sometimes the choice about whether to replace a string can be obvious. If you have an old violin that you haven’t played for many years, it’s best to change the strings; the tension holding the strings in place will have made them age them over time, even if they haven’t been played!
Assessing Strings
If you’re unsure about strings, or if you don’t have any information about what make they are or how long they have been on a violin, then use these simple questions (based on the information above) to identify whether or not they need to be replaced:
Are the strings hard to tune? Try tuning the strings. Do they stay in tune? When you play long strokes, do they ring clearly? If you try and play double stops across two strings (which should be a ‘perfect fifth’ interval), do you hear a true perfect fifth between the two notes, or does the pitch fluctuate? If it’s not stable, then it’s time to think about replacing the strings.
Are the strings sounding dull? A reduction in tone quality is one of the biggest giveaways that a string is nearing the end of its life. If your tone is become duller and less bright, and you don’t feel there’s anything about your playing technique that you’ve changed, then it’s probably worn out.
Is there any obvious damage to the strings? If there’s any damage whatsoever to the string, such as unravelling of the wrapping or wearing at the bridge/nut, then it’s time to get it changed.
Are you unsure about the state of the strings? Quite frankly, if you’re unsure about any of the above, or indeed if there’s anything else about the string that makes you doubt whether it’s still fresh, then you should replace it. A new string or set of strings will always give a new energy to your violin, so if you can afford it, it’s great to replace strings as often as is convenient, as then your violin will always have the best chance of creating a clear, ringing tone.
ViolinSchool’s recommendation: look after your strings well, be aware of all the factors above, and listen carefully to the tone you are producing. This should allow you to make an accurate assessment of whether your strings have remaining life or not. If you are in any doubt, and if it’s been a long time since you last changed the strings, then it’s definitely worth replacing them for new ones.
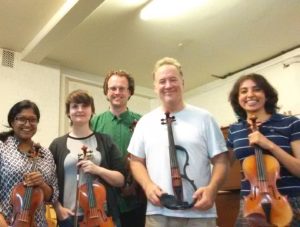
We were really excited to welcome the brilliant jazz violinist Christian Howes for the very first in our new series ViolinSchool Presents..., in which we'll be welcoming star violinists to share their expertise with ViolinSchool learners. Christian was delighted to round off his European tour by spending several days with ViolinSchool learners before returning back home to America.
Creative Improvisation Workshop with Christian Howes
Over the course of the weekend, players of all experience levels had the opportunity to work with Christian. Everyone was thrilled by the sessions, and they relished the opportunity to work on their violin skills with such a talented artist. The residency ended with Christian Howes giving a brilliant concert for everyone to enjoy, followed by many pints!
Advanced and pro players' session with Christian Howes
The whole weekend was a great success, and many people have already asked when he will be coming back again to Europe... we're already discussing future plans, so watch this space! In the meantime, we urge those who missed the weekend to discover Christian’s work by checking out his videos on his website: http://christianhowes.com/performance/videos/
Christian Howes coaching ViolinSchool's Director, Simon Hewitt Jones!
We look forward to inviting more top calibre violinists to ViolinSchool Presents… and sharing their knowledge with ViolinSchool learners!

 If you want to find a topic about which most violinists will disagree, the subject of shoulder rests should be high on your list! Every violinist has their own preference about which shoulder rest to use, if at all. Shoulder rests have only been in mainstream use since the 1950s, and some players still view them with suspicion!


 We're happy to announce release dates for the revised online learning programs:
 Student violin kits often arrive in the mail without the bridge set in place. Instruments are packed this way to avoid breakages in transit.
 Once the violin bridge is fitted to the correct height, it then needs to be properly shaped. The back of the bridge will remain at a right angle to the body of the violin, but the front of the bridge must be thinned.
 removing them all at once; change them one at a time and watch out for the bridge pulling or leaning forward as you tune the new string.
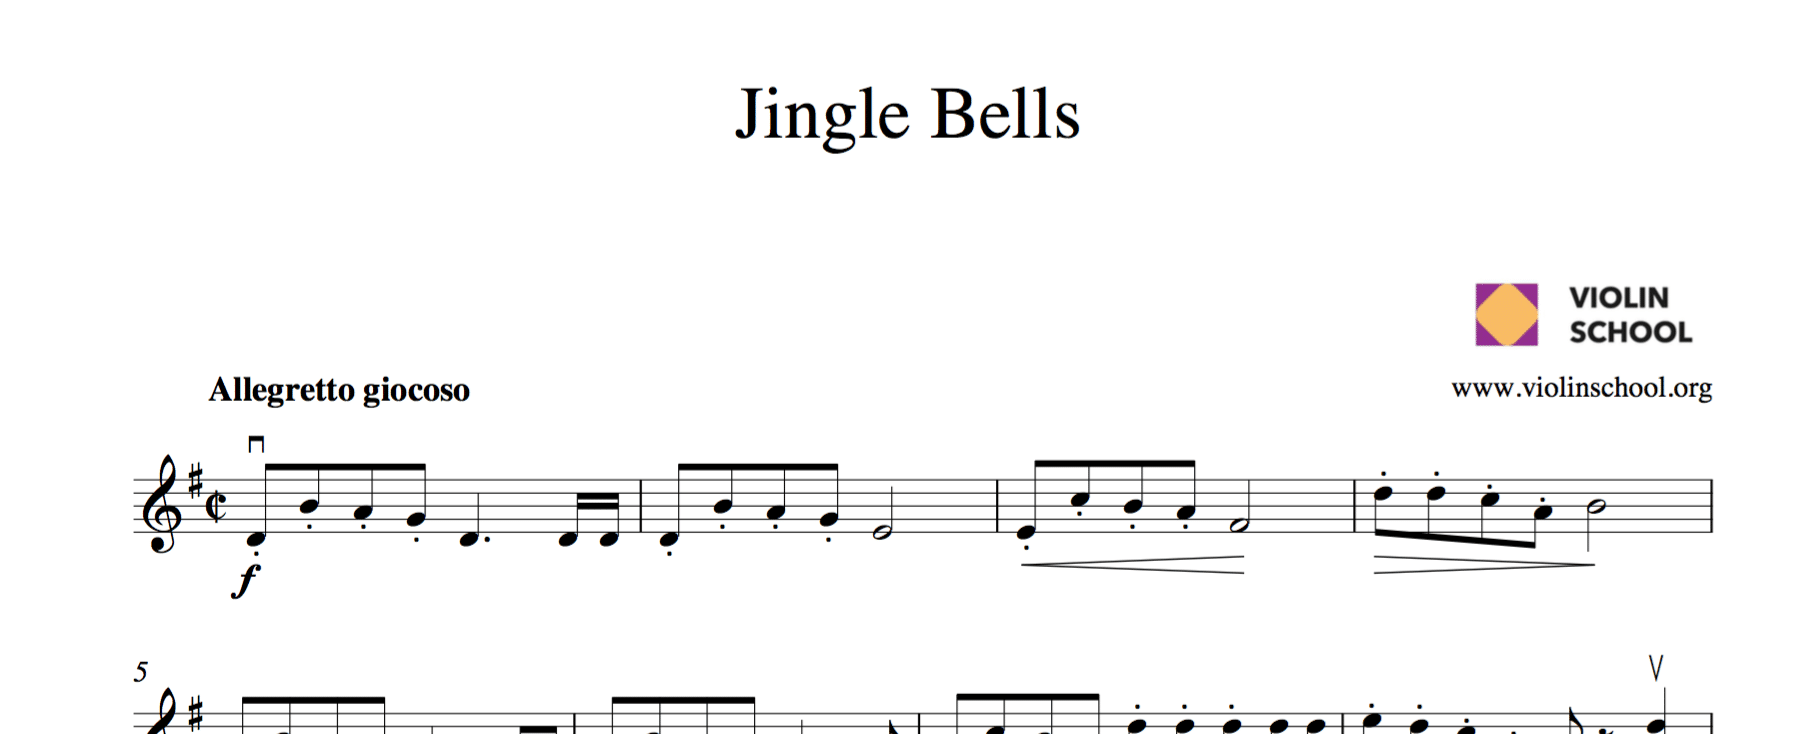


 Sight-reading is an important skill that you should be developing regularly during your usual violin practice sessions. A good approach is to try at least one new piece of music every day (or every time you practise). If you have lots of time to practise (e.g. 2 or more hours per day), then of course you can do more than that!
 My name is Setareh Mood. Since my childhood I've loved to play instrumental music, I've always found it fascinating. Living in different eastern and western countries, made me very interested in every kind of musical genre. I always wanted to work and study music, but rarely had the possibility of accomplishing that.
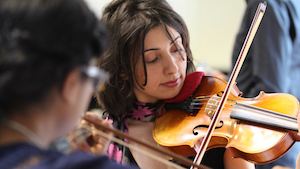
 Creative Improvisation Workshop with Christian Howes
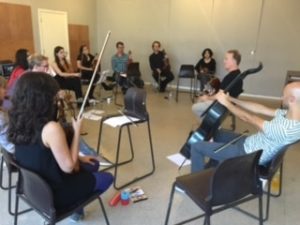 Advanced and pro players' session with Christian Howes
 Christian Howes coaching ViolinSchool's Director, Simon Hewitt Jones!
